Shared Knowledge
"Hydronic Heating System - Annual Maintenance"
5 November 2010
Updated: 17 February 2013
Summary: easy do-it-yourself (DIY).
Background:
Been my experience that most heating and plumbing service companies know little to next to nothing about hydronic heating systems.
If you call a heating and plumbing service company, they are going to check your furnace lights and fix it if it doesn't. Other than that, do not expect much of them.
Just because your furnace lights and pumps water through baseboard radiators does not mean it is ready for a new heating season.
Below I provide a list of what should be checked and done before each heating season.
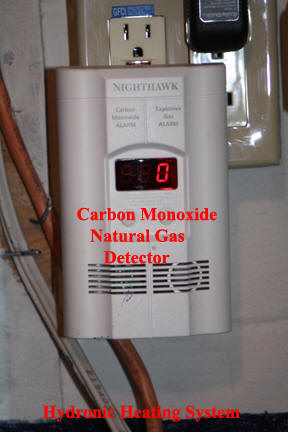
Change battery in installed carbon monoxide and explosive gas detector that should be in your furnace room. If you do not have one, buy one at any big box retailer. If you must have an outlet installed 5 feet up the wall to accommodate the detector, so be it. With detectors so cheap, why take a chance?
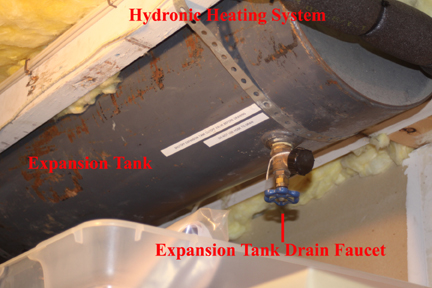
For instructions on draining your expansion tank click here.
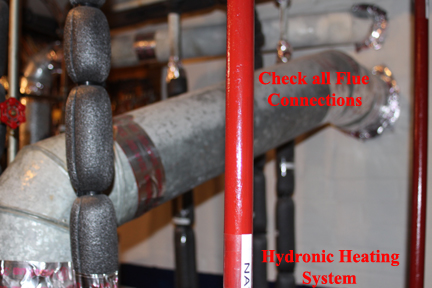
Check the stove piping from your furnace or boiler to your house flue. Make sure it is not loose at any junction and that it fits tightly at the furnace and the flue. Note: in the image below, you will see that I have used high temperature, silver, duct seal tape to tape all junctions and also where the stove pipe enters the flue at the back wall.
-
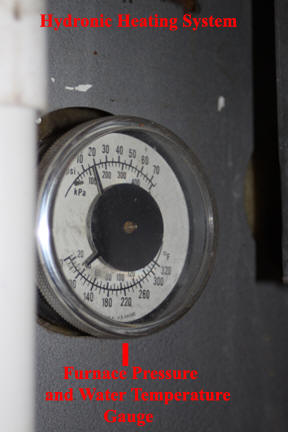
Check your system pressure with the system powered off, cold water. If the pressure is above 30 pounds per square inch, system pressure is probably too high and you need to have the cold water pressure in the system reduced before you start using the system for heat. A good rule of thumb is that water pressure cold, should be 12 pounds for a one story house with adding 3 pounds for each floor about furnace location. In my 3 story house, I have a cold water pressure of 12+3+3 = 18 pounds, cold water.
If your installed pressure gauge is not reading any pressure, it is probably defective and should be replaced.
If your installed pressure gauge is reading more pressure than your installed pressure relief valve, either the pressure relief valve is bad or the pressure gauge is bad and must be replaced.
Do not operate your system with either a defective pressure gauge or pressure relief valve.
Pressure relief valve testing. There is a small handle on the pressure relief valve on the output side of the furnace. It is recommended that you use this handle to open the valve slightly to purge stagnant water and clear the valve of debris but be warned that older valves might start leaking water via a drip or worse when tested. If an over pressure valve will not stop dripping when tested, it needs to be replaced. Pressure relief valves can be procured from multiple sources. Just buy one that fits the piping you have and has the same relief pressure as your old one.

Inspect the area around the furnace pilot light and burners. Access to this area of your furnace is usually behind a removal sheet metal panel. Use a vacuum and make sure area is clean. Oil burners are a little different but still can be inspected.

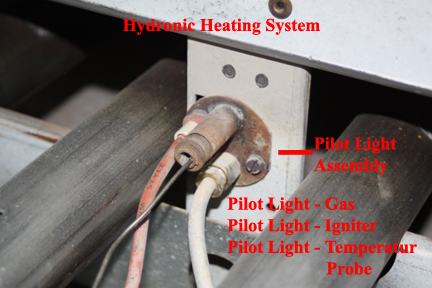
Check wiring around pilot light igniter and natural gas controller.
Make sure pilot light igniter is firmly attached to sheet metal of furnace.
The pilot light igniter must be "grounded" to the furnace for it to work properly. One of the screws holding the igniter to the furnace goes through a metal standoff on the back of the unit. This metal standoff must make a solid, good, electrical contact with bare metal of the furnace for the igniter to work properly.

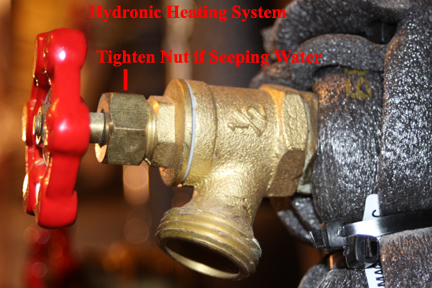
Check all shut-off or drain faucets. If they are dripping, they need to be fixed before the heating system begins. In most cases, simply tightening the nut around the valve or faucet will stop any drip or seep. In the worse case, the shut-off valve might have to be removed and a new stem and rubber washer installed (probably will require water draining your system).
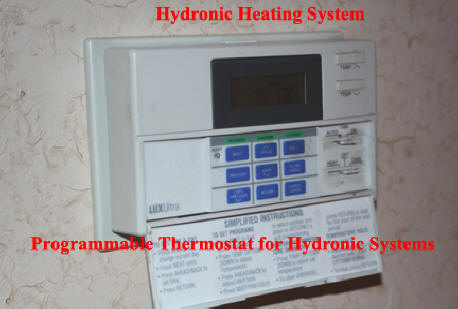
Replace batteries in programmable thermostats. The older, round type thermostats do not have batteries but newer, programmable do. Replace the batteries in all thermostats before the heating system starts.
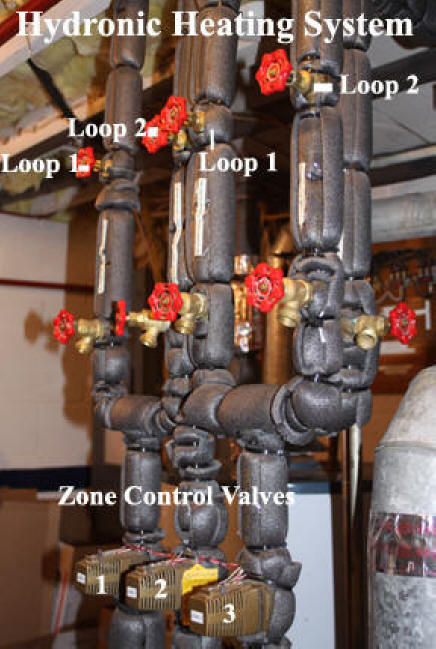
Check all furnace wiring, especially the small wires connected to zone control valves. These wires may or may not be strapped into place and thus could have been accidentally broken or removed.
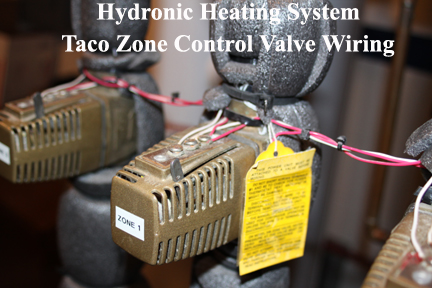
Check that all valves that should be open, are open and all valves that should be closed, are closed. Open valves include: water inlet; shut-off valve to expansion tank, return line bypass valves and all zone and loop shut-off valves. Valves that should be closed (system powered off and cold water): zone control valves.
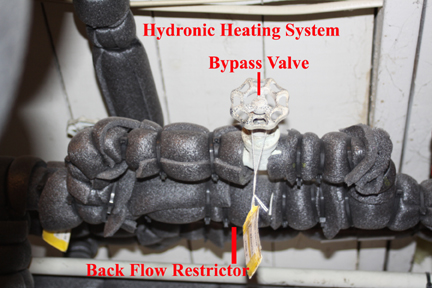
Note: on zone pipes that return to the furnace, there is a bypass valve installed around a check valve in each return line. The check valve prevents water from entering the return line and being sent up the zone pipe in the wrong, flow, direction. In a system fill or back flush operation, the back flow restrictor bypass valves must be open. Bypass valves on return lines should only be open during a system fill or back flush operation.

Note: there is a lever on each zone control valve. The default condition of a zone valve is closed, meaning an electric current must be supplied for the valve to open. With the hydronic heating system powered off and cold water, all zone control valves should be closed. You can test the status of each zone control valve by pressing forward on the zone control valve lever shown above. If you meet significant resistance in pushing the lever forward, this proves that the valve was closed as it should be. If the lever moves easily forward, this means the zone control valves is stuck open and probably needs to be replaced (replacement does not require draining the system of water.)
Clean fins of radiators. I know, what? The efficiency of your baseboard radiators is a strong function of the fins being clean and straight. At a minimum, vacuum the top of the fins and underneath if you can get to the bottom of the fins in the radiator. Not an easy task but bent fins in all baseboard radiators should be straightened. Needle nose pliers or a small knife are good tools for this.
Check all automatic air vents your system has. If open, not leaking? If not open, open but be sure to check later that they are not leaking water. Note that some automatic air vents may be installed inside a baseboard radiator and not obvious.

Automatic air vents will eventually leak out the top and can be hand unscrewed and replaced but only with cold water in your system.
Clean out automatic air vent installed on top of whole house air scoop, if installed.
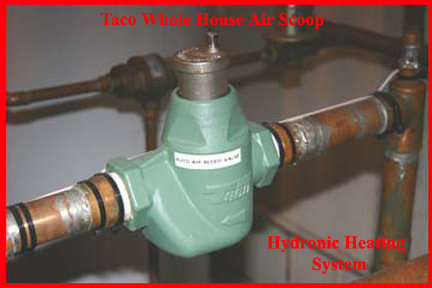
The very top of the automatic air vent will unscrew, counterclockwise and you can remove it from the vent and wipe out the inside of the vent.
If the automatic air vent on top of the scoop is leaking or has been leaking water, buy another vent identical to the one installed in the scoop and replace just the top and associated rubber float.
Get air out of all zone lines.
For instructions on how to do this, click here.
Fire up system: turn power on and turn set one thermostat to heat and the desired temperature above current room temperature by several degrees. Now go to furnace and look and listen. You should hear the circulator pump click on and then after some time, the whoosh of the gas burners. Stay with furnace. You want to be watching the furnace pressure and temperature gauge. Water temperature should slowly rise and water pressure move upward only by a couple of pounds per square (PSI). Eventually, the burners should cut off as the water temperature reaches the upper limit set in the furnace control unit. Still stay with furnace. As water circulates through radiators, the temperature of the water will drop and eventually the control unit will sense it is time to heat water again and once again ignite the burners.
With one zone tested, test all other zones.
If while the system is heating, the water pressure at the furnace begins to approach the pressure relief valve value, shut the system down immediately. You system water pressure is too high. Again, a rule of thumb. hot water pressure should only be 2 or 3 pounds above cold water pressure. If hot water pressure climbs 5 pounds or more above cold water pressure, your expansion tank needs a complete drain.
Finally, every 5 years or so, you should back flush the entire system. Although unclear what causes water in a hydronic system to turn blackish, it does and apparently various system components such as the circulator pump, can be contaminated.
Click here for more home hydronic heating system.