Shared Knowledge
"Hydronic Heating System - Back Flushing the System"
7 November 2010
Background.
Got an email from a fellow who said he had a hydronic heating system and that he had to replace his circulator pump because it began to whine excessively. When he pulled the pump out of the system, he found the inlet and discharge ports nearly clogged with "?".
Once a hydronic system is set up properly, you should not have to do much to it other than annual maintenance but I think that the problem described above requires that you back flush your system every few years. Few years? Maybe 5. And you ask, with a closed system, how could there be anything to accumulate in and around the circulator pump? Honestly, I am not sure, but I know when I have back flushed my system, water comes out black or blackish so something: the pipes; the pump; something, is contaminating the water.
What is a back flush operation?
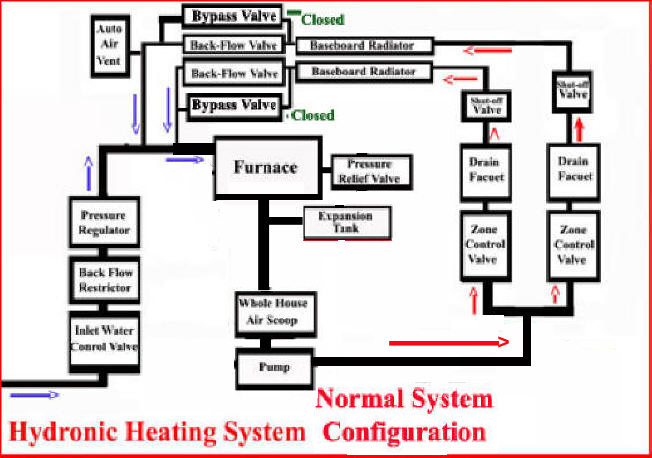
In normal hydronic heating system operation, water returns from zone baseboard radiators by the circulator pump and is sent into the furnace and then out to the zone control valves and up to the baseboard radiators.
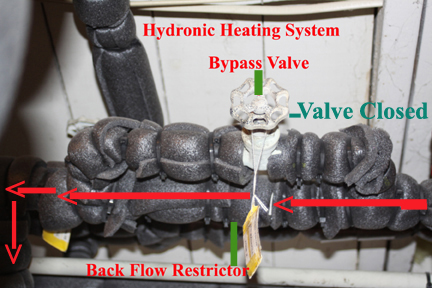
Note: the drawing above shows normal water flow in a hydronic heating system where the blue colored arrows indicate cool or radiator cooled water and red arrows indicate furnace heated water. Also note that bypass valves around back flow restrictors are closed during normal system operation.
Note: Each system zone return line has a backflow restrictor or check valve on it ensuring that water only flows one way in the pipe and that is towards the furnace.

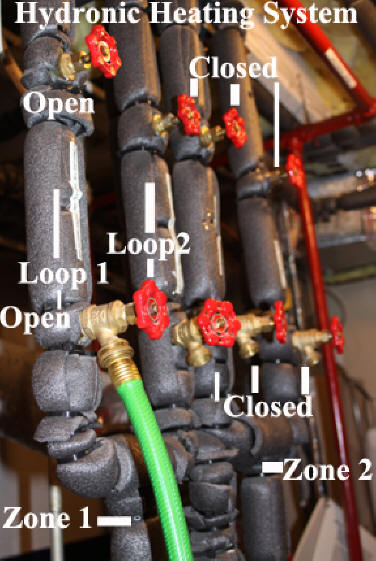
Note: the image above shows that all zone return lines or pipes return to a single pipe that connects to the circulator pump. The blue arrows indicate cold or radiator cooled system water flow. Also note that house water is put into the system via the same single pipe that collects all radiator return water.
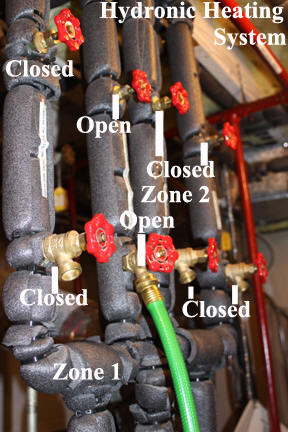
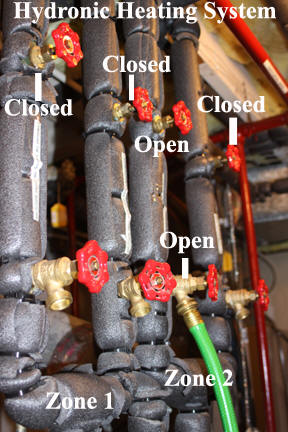
In a back flush operation, with the system turned off and system water cold, the flow of water in the system is reversed and water in a zone loop is flushed out a drain faucet.
.jpg)
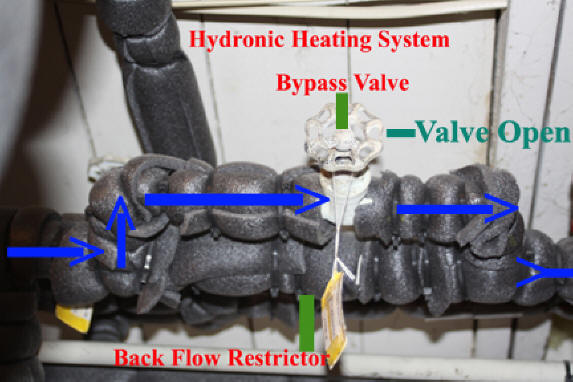
Note: image above shows bypass valve around back flow restrictor open. Open allows water to flow around the restrictor.
How to back flush your system:
1. Turn power off to the heating system. Either remove power at your circuit breaker panel or by using the power switch right at the furnace.
2. System water must be cold. No exceptions to this.
3. Determine how you are going to collect and dispose of water flushed through system. In my case, I can hook a garden hose on the drain faucet of a loop of a zone and flush zone-loop water into a nearby toilet. A bucket can be used but will be more of a hassle as potentially a good quantity of water will have to be drained or flushed.
4. Back flushing must be done down on the smallest unit of piping. For example, if you have 2 zones and no loops, then you must do one zone at a time. If you have 2 zones and 2 loops on each zone, you have to do one loop of one zone first and then the second loop of the same zone before moving to the first loop of the second zone.
5. Open all return line, back flow restrictor, bypass valves.
6. Make sure all zone control valves are closed. Try moving the lever on each zone control valve and if you meet significant resistance, the valve is closed.
7. Make sure the water inlet valve, allowing house water to enter the system is open.
7. Close all valves above the drain faucets on all loops of all zones.
8. Attach drain hose to the drain faucet on one loop of one zone and run to suitable drain or align bucket under first drain faucet.
9. Now open the shut-off valve above the drain faucet on the zone loop you are going to drain.
10.Now slowly open the drain faucet on the zone loop being drained. Water should now enter the system via the inlet pressure control valve, travel up what is normally the return line for the applicable zone, loop, and begin to push water out the attached hose or into the positioned bucket. You should hear water running in the system.
11. Allow water to back flush the open zone loop until the water flowing out the attached hose or into the bucket is clear and as described above, water out of a system that has not been either filled or back flushed in some time will have a large quantity of blackish water.
11. Once the water coming out of the drain faucet is clear, slowly close the drain faucet on the zone loop being drained. Inlet water will now continue to fill the loop with water, up to the pressure that the inlet pressure valve is set to. Be patient. It is going to take some time (like 15 minutes) for the drained zone loop to fully pressurize.
12. Now close the open zone loop shut-off valve above the drain faucet you just used.
13. Move your hose or bucket to the next loop of the same zone.
14. Open the zone loop shut-off valve above the drain faucet you are about to use.
15. Once again, slowly open the drain faucet and allow inlet water to push water in the zone loop out the drain faucet.
16. Once water coming out of the drain faucet is clear, close the faucet and again, let inlet water fully pressurize the zone loop you just flushed.
17. Close the shut-off valve directly above the drain faucet you just used and move your drain hose or bucket to the next zone loop.
18. Open the shut-off valve directly above the drain faucet for the zone loop you are about to flush.
19. Once again, slowly open the drain faucet on the zone loop you want to flush and let the water flow until the water is clear.
20. When water flowing out the faucet is clear, close the faucet on the zone loop just flushed and then close the shut-off valve directly above the faucet.
21. Move your hose or bucket to the next zone loop and open the shut-off valve above the faucet.
22. Once again, slowly open the faucet and let inlet water flush out zone loop.

23. Once the water is clear coming out of the zone loop, slowly close the drain faucet.
24. Continue the procedure above for all your zone loops.
25. Once you have flushed all zone loops, open the shut-off valves directly above all faucets.
26. Close the bypass valves on all zone return lines.
26. At this point, the upside is that you have back flushed your system and the downside is that you have introduced air into the system via inlet water .
27. Now you must get the air out of your system.
Click here for more home hydronic heating system.