Shared Knowledge
“Tivo: How to Increase a Tivo's Recording
Capacity”
9 February 2011
Summary: not a difficult do-it-yourself (DIY) project. You will need a personal computer (PC) and be willing to: open up the PC; set jumpers on a hard drive; change PC BIOS settings; connect a new drive to your PC and run some special software. If you have never had your PC open and do not know anything about IDE\SATA channels or hard disk jumper settings, then go another route in upgrading your Tivo. On the Internet, there are various sources of Tivo upgrade kits, which make it very easy to upgrade Tivo hours.
Background:
A Tivo has 1 and sometimes 2 hard disk drives. The hard disk drive(s) store recorded programs.
The serial number of a Tivo is stored on the motherboard and not the hard drive, so you can replace or upgrade a Tivo hard drive without concern as to loosing a lifetime service subscription.
Tivo is a computer that runs the Linux operating system and then the Tivo application.
You can not simply insert empty hard drive(s) in a Tivo. The hard drives must have Linux and the Tivo application placed on them before powering up your Tivo.
You can collect various Linux tools and the Tivo application from free sources on the Internet or you can buy an Internet download that will prepare your new hard drive(s) for you.
This write-up uses the bought Internet Tivo disk drive prep software.
You can use this write-up to either replace a defective Tivo hard drive or perform a recording hour upgrade.
Tools and Supplies:
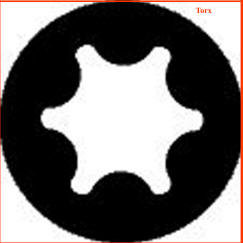
Torx screwdrivers T9 and T10 (Some Tivo's have mostly T10 screws and that is perhaps all you will need). The top cover is held on the Tivo chassis via torx T10 screws and the hard drive is mounted to the Tivo chassis with T9 torx screws. A torx screw is not a Phillips or flat blade. You will need torx screwdrivers.
A Phillips screwdriver.
New hard drive. I have not been inside one of the newer Tivo's but all Tivo's I have worked on have the older EIDE\PATA interface. EIDE\PATA drives are still available but if you a mind to, there is a way to use a newer SATA interface drive.
New hard drive drive. What size? Whatever you want to spend. $100 gets you a very large hard drive.
A PC with available hard drive power connector, a free IDE\SATA interface cable connector and a CD-ROM.
Purchase of "Instant Cake" for your specific model of Tivo. Search Internet for this software. I do not sell this software.
Software installed on PC that will let you burn an ISO image to a CD. "Instant Cake", bought above, will come as an ISO image. Some CD-burning software that comes with many PC's will do this, while others will not. There are free versions of ISO burners on the Internet.
Perhaps an EIDE\PATA dual headed interface cable or SATA cable.
Perhaps a hard drive power connector "Y", which allows you to add one one additional drives inside your PC. Some off-the-shelf PC's have a very limited number of power supply connectors.
Remove old Tivo hard drive:
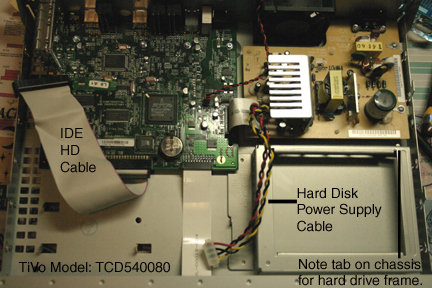
Remove the power supply connector from the hard drive (yellow, red, black cable).
Remove the hard drive interface cable (large flat ribbon) from the hard drive. This cable should pull straight out of the hard drive but be gentle and do not bend pins on connector.
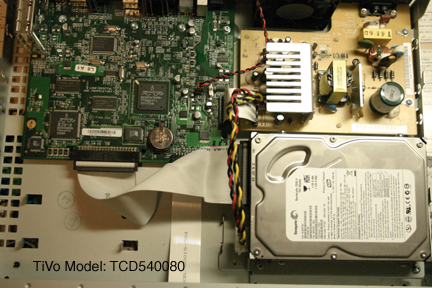
The hard drive is mounted in a Tivo frame that is then attached to the chassis.
Looking down on hard drive, you will see that 2 torx screws hold the hard drive frame on one side while the other side of the hard drive frame is tabbed into slots in the Tivo chassis.
Remove the T10\T9 torx screws and then lift the hard drive frame up and pull it off so that the tabs on the front of the frame come free of the chassis
Remove Tivo hard drive frame from old hard drive (Phillips or torx).
Prepare new hard drive:
Have a spare hard drive you swapped out of your Windows system you would like to use in Tivo? No problem but you must do a low level format on the drive first and erase all traces of Windows. Low level format tools are available on the Internet for free. Just be careful when you use one of these tools that you low level format the right drive and not your Windows operating system disk.
Burn a CD of your downloaded "Instant Cake" software.
If you do not know how to get into your PC's BIOS settings, look it up now, either in documentation you have or by using the Internet and your PC's make and model.
Restart your PC and go into the BIOS. Go to the boot order section and write down the name\number of your boot drive.
Shut down Windows, turn off and unplug the PC you are going to use to copy "Instant Cake" software onto your new hard drive.
Open the PC you are going to use.
To be safe, disconnect the motherboard interface cable to your current hard drive(s).
What you want is your CD-reader to be on one IDE ("master") or SATA channel and your new Tivo drive as "master" on the other IDE or SATA channel.
Make sure you get a power connector on your new hard drive. This may require the use of a "Y" power connector.
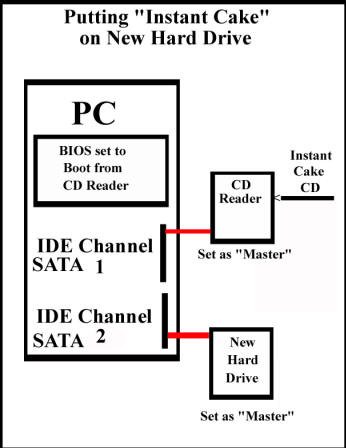
Check over your hardware setup.
Plug your PC back into a wall outlet.
When your PC begins to boot, go into the BIOS and change the boot drive order to boot from the CD reader first. There should be no other devices to boot from.
If you burned the "Instant Cake" CD correctly, "Instant Cake" will begin to run and you will need to following the on-screen instructions.
If "Instant Cake" says turn off your PC now, do just that, turn it off.
Remove the new Tivo hard drive from your PC and attach it to the Tivo hard drive frame.
Insert the tabs of the Tivo hard drive frame into the chassis slots and then using the 2 torx screws tighten the hard drive frame down to the Tivo chassis.
Reattach the hard drive interface cable. It should be keyed and thus only attach to your hard drive one way. Do not bend any pins on the hard drive.
Reattach the power cable to the hard drive. It is keyed and will only fit into the hard drive one way.
Check everything over. Hard drive firmly attached to Tivo chassis? Power cable attached correctly and firmly to hard drive? Hard disk drive connected to hard drive correctly?
Connect Tivo to telephone line or USB Wi-Fi adapter.
Attach cable or antenna to input coax connector on Tivo.
Plug Tivo into wall outlet.
Tivo should begin to power up and although it will take a while, should eventually go into setup.
If your Tivo hangs and never gets to setup, either your CD of "Instant Cake" is for a different Tivo model number or the CD was made incorrectly or you made a mistake when you ran "Instant Cake" and you will need to repeat all steps.
If your Tivo boots up like it is supposed to, you can reattach the Tivo top cover.
Put the PC you used back to its original state: reconnect hard drives; change BIOS boot order from CD reader to the original hard drive that you noted above.