
Shared Knowledge
"How to: Locate and Determine the Type of Hard Drive Installed in a Laptop"
30 November 2009
Summary: turn "off" the laptop, unplug the power adapter and remove the battery.
Tools needed:
- A small Phillips screwdriver.
- A flat blade screwdriver
Laptop hard drive location:
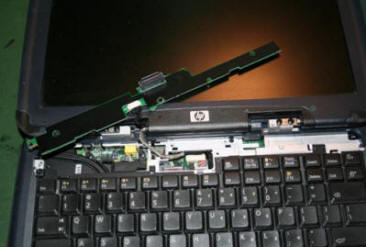
If upon examination of your laptop, you do not see an obvious signs of where the hard drive is located, it is probably is under the keyboard, which means removing the keyboard to get to the drive.

Note that on some laptops, the switch board or lights status panel (between the keyboard and the LCD) may be held in place via screws that are found in the battery compartment. Do not attempt to unsnap the switch board or lights status panel with a flat blade screw driver until you are certain it is simply snapped in place and not held by screws.
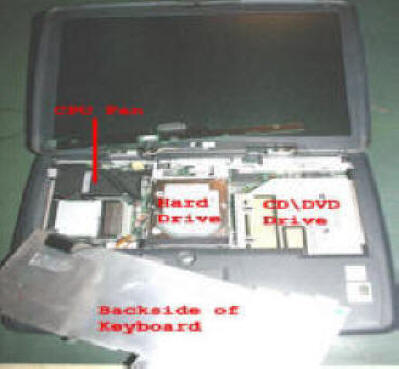
On newer laptops, the hard drive may be under a plastic cover located on the bottom of the laptop or even along the front edge of the laptop. On newer laptops, the manufacturer is aware that a user might want to upgrade or replace the hard drive and shows the location of the drive on user documentation supplied with the notebook.
.jpg)
.jpg)
Removing the hard drive from the laptop:
- If there is a plastic cover over the hard drive (located on the bottom of the laptop), remove the screw(s) holding the cover in place and then the screw(s) holding the drive. Examine how the drive is mounted and carefully lift up or pull back.
- If the drive is located behind a panel as part of the front edge of the laptop, remove the screws holding the panel in place and then gently pull the hard drive out of the laptop.
- If the hard drive is located under the keyboard, loosen all screws holding the hard drive down to the motherboard and then carefully lift it up and out.

Determine the type of hard drive your laptop is using:
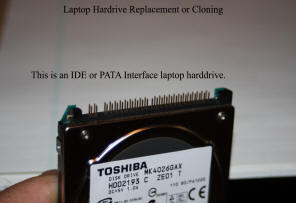
There are only 2 common types of laptop hard drive interfaces: (A) PATA or what used to be known as IDE and (B) SATA for serial ATA.
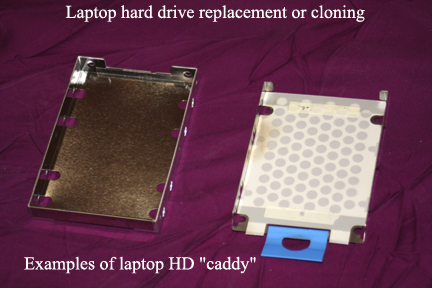
Hard drive caddy.
Now in many laptops, the hard drive is actually mounted in what is referred to as a "caddy" and you will have to remove the drive from this caddy to actually replace or clone the drive, but before you remove the drive from the caddy, note how the drive is mounted in the caddy. Is the bottom of the drive pointing up or down when in the caddy, inserted into the laptop?
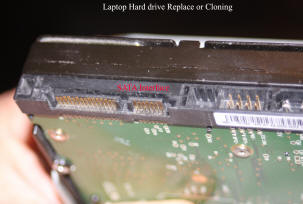
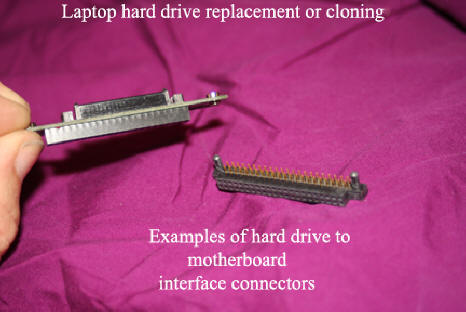
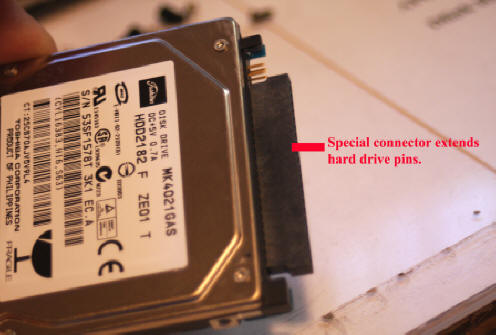
Pin direction change connectors:
Some laptop hard drives have a connector on the interface end of the drive that changes the direction of the electrical pins from directly out of the drive to a right angle down to the motherboard. Other laptops have a pin extender attached. If you have this special connector, be very, very, careful removing it from the drive. If you bend pins on the connector or your hard drive, big trouble in little China. Remove connector? To get drive out of the caddy you are going to have to have a very small Phillips screw driver. To remove the special connector on the end of the drive, a flat blade screwdriver. To remove the special connector, you insert the flat blade between the connector and the hard drive on one end and pry the connector out a little and then move the screw driver to the other end of the connector and pry it up a little. You repeat this prying action until the special connector literally falls off the drive pins. I have never seen a connector like I am talking about on a SATA drive but that is not to say they do not exist. Just be careful and go slow.
With the hard drive out of your laptop, you can procure a new drive for either a replace or clone operation. Just make sure you procure a 2.5" form factor, notebook hard drive of the same type (PATA or SATA).
"How to: Replace a Laptop Hard Drive"
"How to: Clone a Laptop Hard Drive (PATA)"
"How to Clone a Laptop Hard Drive (SATA)"