
Shared Knowledge
"How to: Install an Under-the-Counter Oven"
15 April 2009
Summary: Certainly can be done do-it-yourself (DIY) but may require some wood working and electrical. Warning: whatever depth your cabinets, do not buy an oven that is any deeper than the cabinet depth minus 6 inches or you might have install problems like I did.
Background:
17 year old Maytag under-the-counter oven control panel went bad. Extensive Internet search revealed no source for new control panel and although several sources for repair services, decided to replace entire oven.
30 inch kitchen cabinets installed, meaning 30 inches deep.
Searched for 30 inch under-the-counter oven and bought a big Bosch.
Did check that width of Bosch same or slightly smaller than old Maytag but did not pay attention to the fact that Bosch was a full 30 inches deep. Wanted a big oven and I got one. Boo me.
Tools, supplies required:
- Metal measuring tape.
- Phillips and flat blade screwdrivers.
- Electric screwdriver (perhaps could do without).
- Electric power saw (hand saw might suffice).
- Level. Needed to make sure oven supports are level front to back and side to side.
- Flashlight.
- Marking pencil
- Oven electric plug and perhaps outlet. New oven is going to come without a plug and you going to need one but best to wait until you actually have oven and can see what is required. Newer ovens require a 4 prone plug and thus in addition to new plug, you might need to swap out your old oven outlet for a newer, 4 prong type.
Remove old oven:
Old under-the-counter oven removal simple enough:
At circuit breaker box, turn off breaker supplying power to oven. As Maytag and most ovens uses 240volt, this is a good size breaker and usually marked.
At oven, confirm that power disconnected by trying to power up oven. Dead.
Remove oven door to make it easier to remove oven from under cabinets. Do this by opening oven door about 30 degrees and it should "latch" there on its own. Then with a hand on either side of the door, simply pull the oven door back towards me, up and then off completely. The door is heavy. Set door aside.
Now sitting on the floor, I examine how your oven mounted to cabinet. In my case 4 screws or 2 per side. Remove these wood screws. No screw at the top into the countertop but yours could have one or perhaps 2.
Standing, grasp the edge of the oven and begain to slowly pull it out. With door removed, actual oven is easily moved.
Once oven out a bit, place heavy rug in front of the oven on the floor to prevent any damage to floor when oven finally, completely removed from cabinet.
Continue to pull oven out until I you can use a flashlight to look in behind oven. You want to see how oven hooked to power. Most will have an oven outlet on back wall but oven could have been wired directly to cable coming from circuit breaker panel.
Slowly pull old oven out and when it gets almost clear of opening, tip front edge onto rug and then slow pull the rest of oven out such that it was now sitting on rug.
Remove oven plug from outlet and placed up on top the old oven.
Now I keep a cheap furniture dolly ($30 or so Home Depot, etc) and so placed oven on dolly, rolled it to front door and then my wife and I carried old oven up to the street for city trash pickup. Did not reinstall door but sit it beside old oven.
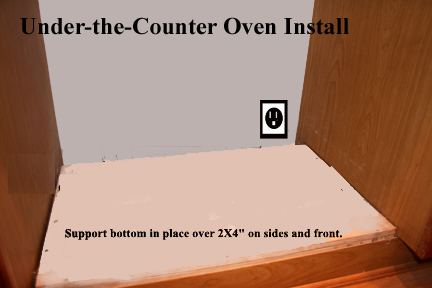
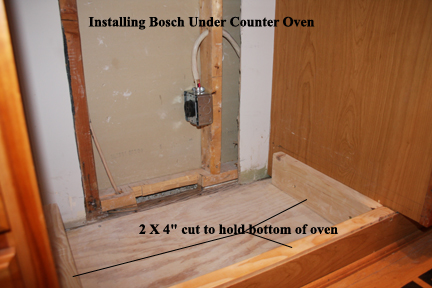
Now left with hole to accept new Bosch oven. Upon examination of hole, discovered that at bottom, installer had used a piece of 2inch X4inch lumber on either side to support the oven. Had not thought about it, but no bottom in the 30 inch deep space where no cabinet and oven is not self supporting or meaning it does not extend from under-the-counter at the top all the way to the floor..
Oven supports:
As defined above, an under-the-counter oven is not free standing, it must have supports to raise it to the proper level.
So using my measuring tape, I measured the height of my new Bosch oven and added 1\4 inch.
Then from the underside of the countertop, I measured down the oven height + 1\4 inch and found that the oven supports in place were too high and would have to be lowered.
Using an electric screwdriver, I removed the 2-per-side screws holding the oven support rails to the sides of my cabinet.
Once again, I used my metal tape measure and measure down from the underside of the countertop, oven height + 1\4 inch and made a mark on the both sides of the oven opening. Now because I was going to mount a piece of plywood on top of my oven supports, I measured down 3\4inch (3\4inch plywood) from my previous mark and made another mark. This mark would be where I needed to align my new oven support rails.
Then using my tape measure, I measured up from the subfloor to my lower mark and found it to be about 2 1\4. Ok, a 2X4 set on edge was not going to work without being cut lengthwise to a 2 1\4 inch height.
Finally, as nothing is very perfectly level, I subtracted 1\4 inch from my derived support height of 2 1\4 inch to make my support rail height 2 inches exactly. Taking 1\4 inch off the height allows me to adjust the rails for level, front to back when I install them to the sides of the surrounding cabinets. Support "rails" thus had to be 2inch in height.
30 inch cabinet needs a 30 long support rail on either side, right? Nope. To get the length of the support rails, I tape measured from the cabinet opening in the front to the drywall in the back and then, again, subtracted 1\4inch to allow for ease of install. So rail length on each side was 29 1\4 inches. 29, 28, 27, really does not matter all that much as intend to cover support rails with 3\4inch plywood piece.
Now as I wanted as much wood support thickness on each side as possible, I used a new 2X4inch board and cut 2 pieces 29 inches long. I then used a table saw to cut each support rail to have a height of 2 inches. I could have used an off-the-shelf 1X4 or other dimension lumber but chose to cut my own support rail.
Taking my support rails, I took them to the cabinet oven opening and one side, aligned with the lower mark I had made and using an electric screw driver, attached the front of the rail to the side of the cabinet. Then I used my level to level my support rail from front to back and used a screw to attach my support rail in the rear.
I took the other side rail and placed it up against the cabinet side. Using my level across the front from the rail already installed, I leveled the front of the second rail and screwed it into the cabinet side. Then using my level, I leveled the second rail from front to back and attached the second rail in the rear.
Checked everything with level and used measuring tape to confirm Bosch oven dimension versus my rail installation. All ok.
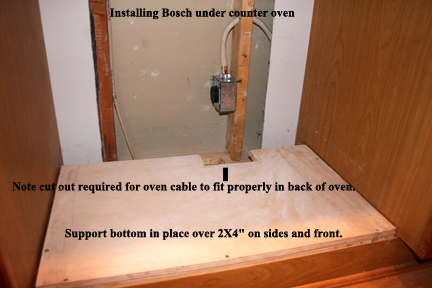
I think cut a 3\4 thick plywood panel to fit completely over the bottom of my rails from the front to the back and screwed it tight to the side support rails.
Oven electrical:
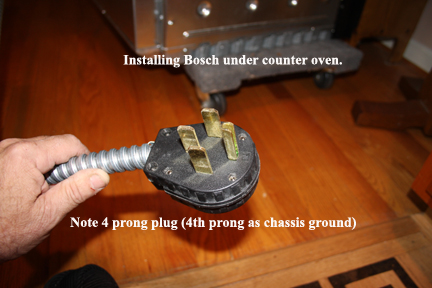
Bosch oven came with steel clad electrical cable of about 5 feet in length but no plug on the end of the cable. Looking at installation instructions, it was clear the Bosch wanted a 4 prong plug. 3 for electric and a new one on me, a chassis ground.
Looking at my installed oven outlet, it was a 3 prong, so needed both an oven plug and oven outlet.
Both readily available at large home repair stores.
Get new oven plug and install.
Remove old oven outlet and install new oven outlet.
Oven installation:
Ok, now have oven supports in place and new plug on oven and new outlet installed.
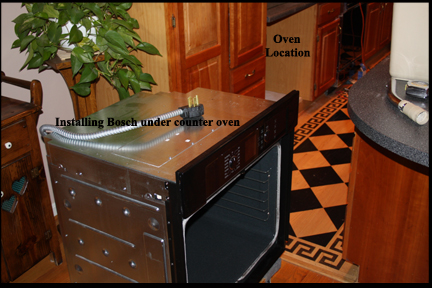
Roll new Bosch oven up to cabinet oven opening.
Remove door just like I did on old Maytag and sit it aside.
Take oven plug and insert into new oven outlet.
Lift oven up onto my oven support plywood and then slowly begin to push oven back into opening.
Now here, hopefully your oven slides all the way back and all you have to do then is attach the oven with screws at the front into the sides of the surround cabinets, reinstall door and then power up the oven from the circuit breaker.
BUT not for me.
Oven installation problems:
When I pushed my new Bosch oven back into the oven opening, it would go fairly flush on the left side but not on the right.
Pull oven out. What? Did I leave something in there that is impeding oven from going back flush? Use flash light to look in behind but see nothing, so pull Bosch all the way out of the opening and back onto dolly.
For the very first time, I measure the depth of the Bosch oven and it is exactly 30 inches.
Ah, wait. At 30 inches, no room for oven plug to plug into oven outlet. Plug and outlet must stick out a good 6 inches from rear wall.
Now it did not occur to me at the time and certainly not in the installation instructions provided with the oven, but suspect that because the power cable comes off the front upper right corner of the oven, this cable meant to go through the cabinet wall and plugged into an oven outlet in behind the next cabinet over.
Well, this routing of the oven power cable did not occur to me at the time and not sure I would have gone that route anyway.
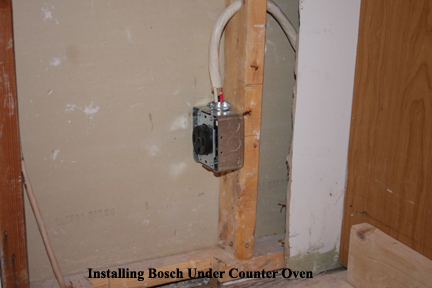
So, no choice to cut out some drywall in behind oven and move oven outlet to inside the wall so oven plug and oven outlet did not impede oven from sliding all the way back into the opening.
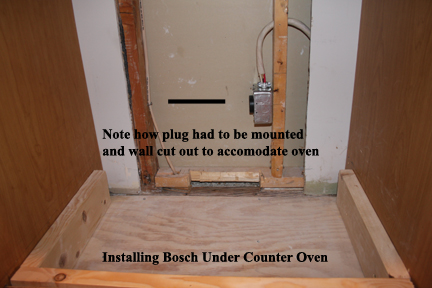
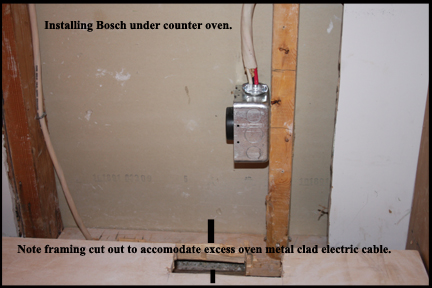
Will not go into all the details of all I had to do to get enough space in behind Bosch so it would slide flush with cabinet fronts but you can see for yourself in pictures supplied. Just do yourself a favor and do not buy an oven that is any deeper than cabinet depth minus 6 inches or so.
Oven self cleaning:
Bosch install instructions said that after install, oven should be run through several self-clean operations to remove any manufacturing residue on metal and that oven would smell during this operation. Suspect your oven will have the same instructions and "yes" oven smelled terrible during 2 self-clean cycles.