![]()
![]()
![]()
![]()
![]()
![]()
Ron Stultz
![]()
![]()
"Outside Compressor or Fan Motor Not Starting or Running"
Summary: the most common causes for the outside compressor and fan not running when they should is either: a seized fan or a blown run capacitor. Both the fan and run capacitor are do-it-yourself (DIY) replace if you are careful.
.jpg)
Warning:
HVAC has 240, death, alternating current (AC) voltage.
Do not attempt any do-it-yourself (DIY) repairs on HVAC if you have never worked with or around high voltage.
Always, double and triple check that circuits are dead. This means using a voltmeter.
Do not trust a circuit breaker.
Do not trust a quick disconnect.
Do not work on HVAC when you are tired or too hot or pressured.
Yes, it can get hot inside your home without HVAC but better to suffer through a hot house than get whacked by high voltage.
Alert:
HVAC replacement parts are available from multiple sources on the Internet, no questions asked, but most HVAC repair companies will not sell parts directly to a homeowner (liability and they want to service your unit).
I am lucky in that I live near an electric motor rebuild shop that carries HVAC motors and run capacitors they will sell to anyone.
So, if you are thinking about DIY HVAC repairs make sure you have a source for parts. You might have no choice but to pay someone to repair your unit.
Tools required:
Voltmeter. Must be able to handle 240VAC as well as have a built-in continuity tester.
A screwdriver or other thin, long, "stick" that will fit through the metal rings of the fan cover on top of the compressor unit.
Diagnosis the problem:
You probably have 2 circuit breakers related to your HVAC: one for the outside compressor unit and one for the inside air handler or blower. Before doing anything else, locate and check that these breakers are in the "on" position.
Next, set the controlling thermostat to "cool" and a temperature below current room ambient.
Note here that some thermostats have a built-in "Filter" function such that if the thermostat's liquid crystal display (LCD) says "Filter", it will not turn on the AC because it wants you to replace an inside air duct filter first.
Now go outside.
Find the quick disconnect box located near the compressor unit.
Inside the quick disconnect box you will find either a toggle switch or a plastic handle you can pull out. The quick disconnect is to allow a service man to work on the compressor unit without having to set the circuit breakers inside the house to the "off" position.
Either toggle the quick disconnect to "off" or pull the plastic handle and remove the insert. Some inserts are nothing but a metal shunt while others have fuses.
.jpg)
If your unit has fuses, with the insert out of the quick disconnect, test that you do not have a blown fuse. You do this with a voltmeter set to the "continuity test" position.
Now with power removed from the compressor unit via the quick disconnect, using your long screwdriver or thin stick, try to turn the blades of the fan on top of the compressor unit.
The fan blades should turn easily. If they do not, the fan is seized and will have to be replaced. If the fan on top of the compressor is seized, the compressor may try to run but since the coils wrapped around the compressor unit are not being cooled, the compressor will overheat and shut itself down to self-protect. See how to replace compressor fan.
If the fan turns easily, the fan could still be bad but the run capacitor needs to be checked next.
Leave the quick disconnect turned "off" or the shunt or fuse block out of the disconnect.
Now find the compressor unit controls access panel. This will usually be on one corner near where pipes enter.
This panel will be held on by a couple of sheet metal screws.
Warning. Be careful removing the access panel as bees may have nested under the panel.
.jpg)
Under the access panel, you will find a tangle of wires and 2 or maybe three components.
The main component is the relay (contactor). When you set the thermostat to a lower than room temperature, this sends 24VAC to to this relay that causes it to close, applying power to the unit fan and compressor.
jpg.jpg)
The second component under the access panel will be a run capacitor. This will be a cylinder-shaped object with several wires routed to it.
The third component that may or may not be present is a component to help with compressor start.
.jpg)
Of all three components, the one that fails most often is the run capacitor.
How can you tell if the run capacitor is bad? If either end of the "can" is not perfectly flat. If either end has bulged, the capacitor is bad.
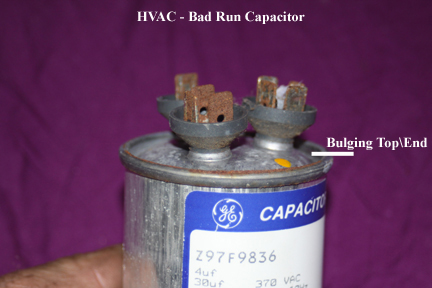
If the run capacitor has bulging ends, it must be replaced. Both ends of the run capacitor need to be perfectly flat. See how to replace the run capacitor in the compressor unit.
Update: 7 August 2012. Today, had to open a Goodman heat pump as, although compressor unit fan turning, compressor was not running. Looking at run capacitor mounted in Goodman, was not bulged. What to do? Took out run capacitor and went to get new one. While getting new one at local electric motor repair shop, they tested one out of Goodman and sure enough, capacitor for compressor, bad! Again, metal capacitor can was not bulged at either end.
If the run capacitor appears to be good, not bulged, the problem could be that the relay is not closing or the relay is not getting current by way of the thermostat or the fan is bad.
Relay:
The relay (contactor) is the block with various wires connected to it. When the thermostat is set to "cool" and a temperature below room ambient, 24VAC is sent to the relay which closes contacts, switching voltage to the fan and compressor motor. A relay is a way to use a low voltage to control a much higher voltage.
Note that relay close voltage is not controlled by the quick disconnect, meaning 24VAC is present no matter the status of the quick disconnect!
With the access panel off and the quick disconnect turned to the "off" position or the insert removed from the disconnect, take your screwdriver and place it on the face of the relay and push.
If the relay does not move, then thermostat voltage is present and the relay is closed and is good.
If by pushing with a screwdriver, the relay face plate moves at all, either the relay is not getting any voltage or the relay is defective.
Now consult the diagram on the back of the access panel and determine the color wires coming from the thermostat. Looking at all wires under the access panel, these will be the smallest diameter connected to the relay block.
Using a voltmeter set to a scale that will show 24VAC, place meter probes on the relay control terminals.
If you read 24VAC, then the thermostat is supplying voltage but the relay is bad and must be replaced.
If you do not read 24V, then there is something wrong with the thermostat control circuit. The thermostat wiring goes to the inside blower unit and then on to the compressor unit.
I have never experienced a problem with either the relay or relay voltage so can not help determining the cause of no relay voltage other than to point you in the direction of the blower unit in the house.
Bad fan:
Even though you can turn the cooling fan blades by hand, the cooling fan on top of the compressor unit could still be bad.
With the access panel off the compressor unit, carefully turn the quick disconnect to the "on" position or insert the fuse block or metal shunt. BE CAREFUL.
When you turn the quick disconnect to the "on" position or reinsert the shunt or fuse block, the compressor unit might try to do something, so do not be surprised.
If you immediately hear a loud humming noise and the cooling fan is not turning, then the cooling fan is bad and will have to be replaced. Turn disconnect to "off" or remove fuses or metal shunt. See how to replace the compressor cooling fan.
240VAC:
If after all above the unit still is not running, it is possible there is a fault in a circuit breaker or the quick disconnect but in both cases, a service man is required.
Access Panel:
Do not leave the access panel off the compressor unit. Replace it during all periods you are away from the compressor unit.