.jpg)
Shared Knowledge
"Heating, Ventilation and Air Conditioning (HVAC)"
"How to Replace the Fan Motor in the Compressor Unit"
20 July 2017
Summary: if the fan motor on top of the outside compressor unit seizes or otherwise fails, the coils surrounding the compressor will not be cooled and the compressor will shut down after a while to self-protect itself. Replacement of the fan motor is a do-it-yourself (DIY) but involves many different steps and may require cutting wires and soldering.
Bad fan in compressor unit:
Never replace parts unless you are sure or think you are sure the part is defective.
If you have not already done so, read "HVAC - Outside Compressor or Fan Not Starting or Running"
Warning:
HVAC has 240, death, alternating current (AC) voltage.
Do not attempt any do-it-yourself (DIY) repairs on HVAC if you have never worked with or around high voltage.
Always, double and triple check that circuits are dead. This means using a voltmeter.
Do not trust a circuit breaker.
Do not trust a quick disconnect.
Do not work on HVAC when you are tired or too hot or pressured.
Yes, it can get hot inside without HVAC but better to suffer through a hot house and get whacked by high voltage.
Alert:
HVAC replacement parts are available from multiple sources on the Internet, no questions asked, but most HVAC repair companies will not sell parts directly to a homeowner (liability and they want to service your unit).
I am lucky in that I live near an electric motor rebuild shop that carries HVAC motors and run capacitors they will sell to anyone.
So, if you are thinking about DIY HVAC repairs make sure you have a source for parts. You might have no choice but to pay someone to repair your unit.
Fan and fan blades replacement parts cost? $100 - $150.
Tools:
Flat blade screw driver.
Perhaps nut driver or pliers.
Voltmeter that can read 240 volts alternating current (AC).
Insulated pliers.
Wire cutters.
Soldering iron
Electric tape or heat shrink tubing.
Liquid electrical tape.
Cable straps.
Perhaps a piece of 3/4 diameter PVC pipe.
How to remove the fan motor on top of the compressor unit:
In your home's circuit breaker box, you probably have 2 circuit breakers related to HVAC: one for the inside blower unit and one for the outside compressor unit.
Find the circuit breakers related to your HVAC and move them to the "off" position.
If you have more than one HVAC unit, make sure you turn "off" the correct set of breakers.
Go the compressor unit with the bad cooling fan.
Near the compressor unit will be a quick disconnect box.
Open this box and either toggle switch to "off" position or pull outward on fuse or shunt block and remove it completely.
Find and remove the panel that allows access to compressor control components. This panel will be where pipes are connected to the compressor unit.
Be careful working around the access panel. You do not want to step on the piping coming out of the compressor unit.
.jpg)
Using a voltmeter, set the voltmeter on a scale that will show 240VAC and carefully place voltmeter probes on the 2 largest diameter wires connected to the bottom of the relay.
If your voltmeter reads any voltage at all, STOP. Either you have not found the correct circuit breakers or there is a problem with HVAC compressor wiring. Call a HVAC specialist.
On the back of the access panel you have removed, there should be a wiring diagram. Do not let the diagram intimidate you.
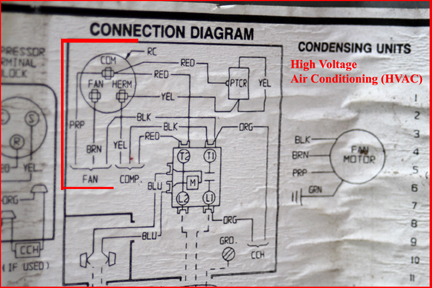
Find the "Fan" and the color wires associated with it. In the diagram above, the fan motor is shown on the left with wires: black, brown, purple and a ground.
You will note that 2 fan motor wires go to the run capacitor (RC in diagram).
Remove the screw holding the run capacitor to the compressor shell wall and slowly let it down, so you can see the bottom.
Do not touch the metal terminals of the run capacitor. Capacitors store charge and although their stored charge will not kill you, you could be surprised and stumble or hurt yourself.
On the bottom of the run capacitor, raised out of the metal will be: fan, herm and com.
Using a marker or other, mark the outside of the run capacitor for the fan and com terminals.
Using needle nose pliers, carefully remove all fan motor wires from terminals.
Pull up using the pliers as close to the terminal connection as possible as you do not want to pull wires out of push-on connectors.
When you are sure you have all fan motor wires disconnected, carefully move fan motor wires from in and around all other wires until you have all in a bundle that you can gently pushed back in the hole in the compressor unit sheet metal body.
What you want to do is get all fan motor wires on the inside of the compressor unit shell.
Now look at the sheet metal shell of the compressor unit.
The top with the fan motor is held to the sides of the unit by sheet metal screws.
Remove these screws. Some may be rusted and difficult to turn but go slow and do not destroy the head of the screw. A nut driver instead of a screwdriver often works best on these tight screws.
With the top of the compressor unit unscrewed from the compressor unit shell, however you can, gently lift the top of the compressor unit off the base of the unit.
The top is nothing but sheet metal and flimsy, so be careful. Even with the fan motor attached, the top is not overly heavy, just awkward to handle.
Once you have the top off the compressor shell, gently set it on one corner such that you can reach in and make sure all fan motor wires are free.
When you are sure the fan motor wires are free, and there is nothing preventing you from lifting up and taking the top of the unit completely off the compressor shelf, lift up the entire fan top and take it somewhere cool.
In a cool, shaded place, set the top of the compressor unit down so it is resting on the bottom of the fan motor
Take a break.
Now looking where the fan motor is attached to the center of the top, remove the 4 nuts holding the motor to the top.
The bolts associated with the 4 nuts are integral to the motor.
Once you have all nuts removed, gently lift the top off the fan motor.
On my unit, there was a plastic pipe running from the fan motor to the corner in which all fan wires were routed.
This plastic pipe had one or more straps holding it in place I had to remove.
Once the fan motor is completely free of the top, lift the top off the motor.
Ok, fan itself. Why not reuse the old fan on a new motor? Well, I tried for a while to get it to come off the shaft and in the end gave up.
Place where I bought new motor said, virtually impossible to remove fan as it gets rusted to shaft.
You can try to remove fan blades but new fan is only like $20 and in my mind, not worth the effort.
No matter, reuse old or buy new, pay attention to how fan is on motor shaft? Which way is the fan blade pitch?? You want to install a new fan or the old fan in the same way.
New fan motor and fan:
On the bum fan motor, should be a label that defines its horsepower. This is the information you will need to buy a new motor.
Do not throw away old motor at this time.
In my case, I took the entire motor and fan attached to my local electric motor repair, supply place and bought a new motor and fan.
No matter how you come by a new fan motor, the motor is going to be generic, meaning it probably can be wired to run either clockwise or counter wise and color of the wires may not be the same as the color of the wires on your old fan.
Additionally, the length of the wires attached to the new motor may be way longer than you need.
The new fan should come with some sort of instructions about how to move a connector to make the fan run one way or the other but if not, make sure you find out so you can setup as you need it.
Wiring the new fan:
The new fan motor should come with a limited wiring diagram of how the 3 wires are to be connected to power.
Again, these wires will not have any sort of connector on their ends, so you will have to cut off some length of wire from the old fan motor with the connector on it.
Now lay your old motor down and measure the length of the wires from the motor to connectors.
Using the old fan, cut the 3 wires such that you have the connectors and about 2 feet of wire.
Now lay out the 3 wires of the new motor and measure their length.
You want the new fan motor to have wires the same length as your old motor, so using wire cutters, cut the new fan motor wires 1 foot shorter than the total length of the wires of your old motor.
Before you cut wires, measure and measure again. You understand that you are going to attach the wires from the old motor with connectors intact to the wires of the new motor and that you want the total length to be the same as was on the original old motor.
Measure again and think.
When you are sure you know where to cut the wires on your new motor, cut them.
Now position the new motor under the top and if you have a plastic tube running from the motor to the end of the top, work the 3 wires through the tube.
Now using the nuts you removed getting the old motor out, reattach the new motor to the top.
If you had some sort of straps holding the plastic tube in place, reconnect them.
You should now have the new motor attached to the top and the 3 wires hanging out of the plastic tube.
Now consult the wiring diagram provided with the motor.
What you want to do is figure out which of the 3 wires gets what color wire cut from your old motor.
This can be confusing, so go slow.
Now strip off about an inch of insulation of the new motor wires and about an inch of insulation off the old motor wires.
Now here, you might be temped to use twist on wire connector but I do not recommend.
Twist the stripped end of the new motor wire to the stripped end of the old motor wire, making sure you have the right color old motor wire connected to the correct color new motor wire.
Once twisted together, using a soldering iron, solder the connection.
Repeat strip, twist and solder for the other 2 fan motor wires.
Double check that the correct color wire of the old fan motor is soldered to the correct new fan motor wire.
Now using liquid electrical tape, coat the soldered junction of each of the 3 wires.
Take a break.
Now coat each soldered wire again with liquid electrical tape.
Once the liquid electrical is dry, use regular electric tape to tape each wire connection separately.
Once all wire connections have been taped, bundle together and use cable straps at each end to ensure the electric tape does not unravel over time.
Now install either the old fan blades you removed from your old motor or the new blades you bought. Make sure you put the fan blades on such that the pitch of the blades is the same as they were on your old motor.
The new motor probably will have a longer shaft that your old motor, so move the fan blades up to about the point on the shaft that equal where the fan was installed on the old motor. Find the flat spot on the shaft, if it has one, and tighten the set screw down tight as you can get it.
Top back on compressor unit:
Go to your inside circuit breaker box and double check that the breakers for both your outside unit and inside blower are in the off position. Do not trust that someone did not came along and thinking the AC was off, threw the breakers to the "on" position.
Take the top of the compressor unit with new motor installed back to the outside compressor unit.
Make sure the quick disconnect is still in the "off" position or the fuse\metal shunt unit is completely out of the disconnect box.
Set the top onto the compressor shell such that it is balanced on there but you can reach in and poke all motor wires through the hole in the compressor shell to get the wires on the outside control area of the shell.
Once you have all wires through the compressor shell hole, move the top such that it goes down over the 4 corners of the compressor shell. The sides of the compressor shell will move some, so go slow.
Once you have the top down on the compressor shell, do not screw it down just yet.
Now move to the access panel area and reconnect the wires coming from your new motor to both the run capacitor and the switched side of the relay. Consult the wiring diagram on the back of the access panel.
Once you think you have the fan wires back in their proper place, walk away and take a break.
Now double check that you have connected the 3 wires of your new fan motor to the run capacitor and high voltage correctly.
All push-on connectors tight on terminals?
No other wires in the area disturbed or accidentally removed?
When you are sure the run capacitor wiring is correct, reinstall it back under the strap and tighten the screw holding it in place.
Now double check everything again.
Testing:
Move the quick disconnect to the "on" position or reinsert the fuse/metal block.
Go to your circuit breaker panel and move both breakers related to the HVAC unit you have been working on to the "on" position.
If either breaker immediately trips, you have a wiring problem and move both breakers to the "off" position. If this happens, take a break before looking again at the wiring at the compressor unit.
At the thermostat connected to the unit you have been working on, set it to cool and then to a temperature below room ambient.
Go outside.
With luck, your new fan motor should be running and if not immediately, soon, the compressor motor located in the bottom of the unit.
Note that when a fan fails, the compressor overheats and shuts itself down as self-protection. Now when you start the compressor after fan motor replacement, the compressor might have to try to start several times before it starts and stays running.
Now, check air flow.
The fan on top of the unit pulls air in through the coils and expels it out the top.
If your fan is sucking air in from the top, the motor is not running in the correct direction.
Go inside and move the 2 circuit breakers related to this unit to the "off" position.
By the compressor unit, move the disconnect to the "off" position or removed the fuse\metal shunt block.
Now lift up the top of the compressor unit so you can get to the fan motor.
Now change the direction of the fan motor by moving the short jumper wires on the outside of the motor.
Put the top back down over the compressor shell.
Place disconnect in "on" position or reinsert fuse\metal shunt block.
Move inside circuit breakers to "on" positions.
Now check that your new compressor fan motor is blowing air out the top of the unit.
If air is still not blowing correctly, either you have failed to reverse direction of the fan motor or the fan blades are installed incorrectly on the motor shaft.
If the new fan motor is blowing air out the top of the unit and the compressor is running, screw down the top to the compressor shell.
Now turn the quick disconnect to the "off" position or remove the fuses\shunt.
Now place the access panel back over the corner of the compressor shell and reattach via the sheet metal screws.
Place the quick disconnect to the "on" position or reinsert the fuse\metal shunt.