Shared Knowledge
"Heating, Ventilation and Air Conditioning (HVAC) - Pressure Gauges Basics
July 2017
Summary: If you going to attempt HVAC repairs yourself must have HVAC pressure gauges. Gauges come in various configuration and are relatively straight forward to use but in this document, I do provide some insight on how to use.
Background:
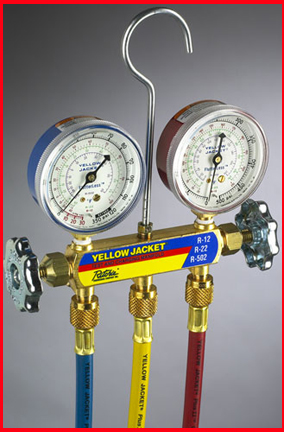
What is shown above is a pretty standard HVAC gauge set.
The blue gauge on the left is connected to the low pressure (larger diameter pipe coming out of compressor unit) side of the compressor.
The red gauge on the right is connected to the high pressure side (small diameter pipe) of the compressor.
The handles, valves, on each end of the gauge set are normally closed.
The middle or center port on the gauge set shown above allows anything attached to it to be connected to either the high or low pressure piping.
Basic operation:
To properly use gauge set, you must know the type of refrigerant in your AC or heat pump. Could be R22 or any of the new types of coolant.
These gauges show temperature for all regularly used refrigerants in various colored bands.
The use gauges, you first remove the caps over the vent ports on the high and low pressure compressor pipes.
Removed caps are fitted over valve connections on the back of the gauge set.
Connection of gauges are always done with compressor turned off. Best to remove or otherwise shutoff the quick disconnect switch located near the AC compressor unit.
When attaching gauge hoses to high and low pressure pipes, use gloves. Any refrigerant that leaks could "burn" your bare skin.
Once high and low pressure lines of gauges are attached to appropriate compressor ports, both gauges will read some Fahrenheit temperature.
Once attached tightly to the high and low pressure pipes, the compressor should be started and the gauges watched carefully.
The target high and low pressure temperature varies from manufacturer to manufacturer and would be best if you know what exactly these values should be for your specific make and model.
Rules of thumb: low pressure side has to be above 32F or the evaporator coils in the air handler will freeze up and very little air will come out of the air vents in your home. High pressure side should be a minimum of 20F above outside ambient air (if 80F outside, high side should be 100For 20F above ambient).
Adding Sealant or Refrigerant:
Cans of sealant are sold and you can buy them.
The can of sealant attached to the middle port.
Read directions carefully on the sealant can.
Once the can is properly attached to the middle port, with the compressor running, you open the blue or low pressure value.
As the low pressure port is the suction line of the compressor, whatever is attached to the middle port will be sucked into the system.
NEVER OPEN THE BLUE OR LOW PRESSURE SIDE VALVE WITH THE MIDDLE PORT OPEN TO OUTSIDE AIR!
Once the sealant can is empty, you shut the blue valve completely and remove from the middle port.
R22a refrigerant or a variety compatible with the refrigerant in your system is sold and you can buy it. As with sealant, it comes in a can.
As with the sealant, you attach the can of refrigerant to the middle port and then slowly open the low pressure or blue valve.
As you add refrigerant slowly, watch the temperature of the low pressure or suction side.
Suggest that once the low pressure side gets above 32F, you close blue handle and then wait a while and watch low pressure temperature.
Target temperature is around 40F.
If you need to add more, slowly open the blue valve.
Point here is, you do not want to overfill the system and takes a while for refrigerant to stabilize in the system on low and high pressure side.