Shared Knowledge
"BMW Z3 - Replace Switch on Steering Column"
18 March 2014
Summary: do not have to remove steering wheel BUT must remove dash under steering column and difficult to remove and install because how dash fits in behind plastic of center console.
Background:
BMW Z3: 1997; 2.8 Liter, 60,000 miles.
Had intermittent turn signal and thought it was switch on steering column.
Replaced switched and learned not an easy replace.
Replacing a switch on the steering column:
Remove top and bottom covers over steering column.
These are snapped together and held in place by Phillips screws into a type of hallow-wall plastic anchor.
Snap together: be careful in unsnapping top and bottom halves. Easy to break one of the snap tabs.
Removing the top cover is a little difficult because of tight fit but move around until you get it out.
Switches on the steering column are simply held in place by thumb depress-type latches.
Unhook battery. You are going to be in and around airbag on steering column.
Now you must remove the section of the dash under the steering column.
First use a small flat blade screw driver to pop off the small plastic covers on the Phillips screws holding the lower dash in place.
Use a Phillips screw driver to remove all Phillips screws.
Remove the plastic covers over the 2 screws on the side of the center console and remove the Phillips screws.
Where the dash meets a plastic trim piece at the back of the foot well, find (2) large plastic screws that you remove with a flat blade screw driver. This turn about a quarter turn or so and are loose and fall out.
The plastic trim piece at the back of the foot well just sits in there and should be removed, straight out.
Check the dash for Phillips screws and remove.
Now the hard part.
The lower dash has a lip on it on the console side that fits up behind the center console and is held in place by the (2) Phillips screws you removed located on the center console.
The problem is, I could not find a way to remove the plastic side panel on the center console.
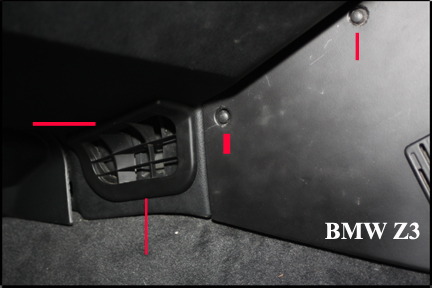
In addition to the "lip" the dash also has an air grill built into it that fits over duct work up under the center console.
SO, to remove the lower dash, you have to lift move the dash down away from the center console and lift the bottom off and away from the duct work.
The image below show the air grill built into the lower dash.
Removal is not easy as the center console plastic side does not want to bend and you sure do not want to break it.
You need to slide the dash lip down off the center console plastic.
Once you have the dash clear of the center console, remove it and check the back side to see the status of the grill work.
With the lower dash cover removed, now need to remove the combination foam and metal support.
You will need a ratchet, an extension and 9 millimeter (mm) socket.
The 9mm on the console side are a little tough to get to but if you sit in the driver's seat and have a decent work light, you will be able to see the bolts and get your socket on them.
With foam/metal support out of way, you now have the underside of the steering column exposed and you will see that all cables to and from the steering column switch area are cable strapped around the column.
You will have to gently cut these straps to get the wires loose that go to the switch you are going to replace.
Unhook switch connector, remove switch from column and install new switch and connect it.
Using new cable ties, make sure all cables, wires are tight around steering column.
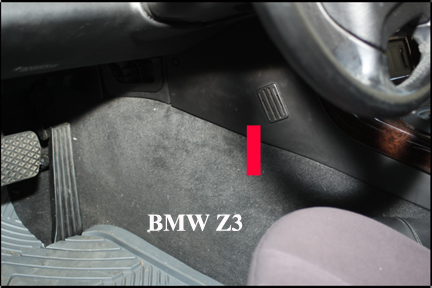
Note here: if you look, you will see that there are relays mounted on the outside wall of the foot well. Not sure the function of these other than one is the "crash relay".
Reinstall dash:
Check your new switch and make sure it is latched into the steering column and that its connector is tight to the wiring harness under the dash.
Now check the screw clips everywhere to ensure they are lined up with their holes.
You will note that along the front edge of the upper dash, there is a piece of plastic that holds clips for your horizontally placed dash screws but will notice this plastic is itself held to dash via Phillips screw that go vertical into dash. Make sure the Phillips screws hold the plastic in place are tight.
On the right side of the steering column is a special plastic piece, that like the other side, is held to the upper dash by a Phillips screw going vertically into the dash. My note here is that the limited plastic of the upper dash that holds this special standoff is very thin and brittle and you must be careful when you move lower dash up in place you do not break the standoff away from the upper dash
Reinstall metal/foam support.
Take plastic trim piece you removed from rear of foot well and put it back in place. Insert it and with a good work light, you will see how it fits onto metal of the foot well. It is loose and will be until the lower dash is fully installed.
Now take lower dash and check that clips are on the 2 holes that go in behind the plastic of the center console.
If need be, use pliers to close the clips so they are tight on their holes.
Now reinstalling the lower dash panel:
I struggled getting the lower dash in behind the center console and the air grill reattached to dash duct work. Either the clip on the upper hole slipped off or I could not get the grill work to properly mate over the duct in the dash.
So here is what I did.
Looking at the lower dash, I saw that the grill is actually a face plate that sticks through the lower dash and a separate piece that mates over the dash duct.
So I removed the piece that fits over the duct work and using foil-back taped like used in attic air conditioning installations, taped the grill work to the duct.
I then cut off all prongs on the lower dash grill such that there would be nothing to bind the lower dash as I slide it up behind the center console.
As the duct work is held in place by a Torx screw to the center console, it is not going to move and thus neither is the air grille I taped to it.
Now moving the lower dash into the foot well, I slipped the upper edge of the dash in behind the side panel of the center console and pushed the "lip" upward until it was fully up and in place and with all prongs off the grill removed, the bottom went over the duct work easily.
With the lower dash more or less in place, I made sure that that plastic panel in the back of the foot well was above the lower dash piece inserted. I mean by this that the plastic panel sits on an edge of the lower dash.
With the lower dash more or less in place, swung it up so it mated with upper dash along the top edge and began installing Phillips screws.
As to the (2) Phillips screws through the side panel of the center console, I was not surprised to find the upper clip had moved slightly but by using a screw as a sort of pick, probe, moved the clip more or less into the hole.
With all Phillips screws reinstalled, put back plastic screw covers.
I know, I know, I modified the lower dash when I removed the grill work duct piece but no matter how much I tried, seemed like lower dash just did not want to go back in properly with duct piece still attached to lower dash. Maybe you can get it. I hope so.