![]()
![]()
![]()
![]()
![]()
![]()
Ron Stultz
![]()
![]()
"BMW Z3: How to Replace the Thermostat"
Summary: Can do-it-yourself (DIY) but must have 32mm thin wrench to get fan out of way and fan must absolutely be loosened and moved couple inches away from thermostat housing.
Background:
BMW Z3, 2.8l, model year 1997, 49,000 miles. Bought new.
Water temperature gauge struggles to ever get out of the blue or cold zone. Wife's car and do not drive it much but know that once upon a time, temperature gauge, when car warm, was pretty much in the middle of the gauge.
No coolant leaks, my theory was that it was a stuck open thermostat.
As coolant flushed several times over the years, did not do coolant flush when replacing thermostat.
As hoses were replace 3 years ago and looked sound, did not replace hoses.
Tools and Supplies Needed:
Obviously a new thermostat. A little confusion here as apparent there are at least 2 different opening temperature versions for the Z3. I bought the 92degree Celsius (C) version, which is what the dealer told me should be used. I bought from over the Internet rather than pay dealer markup for the identical thermostat.
Thermostat gasket? Was not clear when I ordered new thermostat if gasket included with thermostat or not so ordered a new gasket. Well new thermostat came with a gasket, so I wasted a couple $'s on a thermostat gasket I did not need.
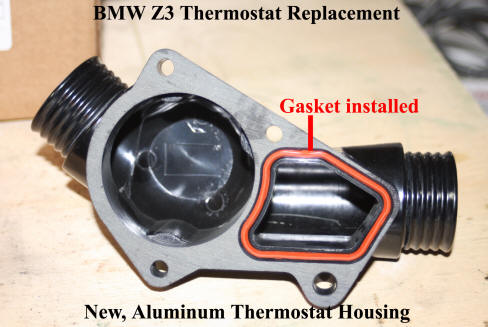
Thermostat housing? The BMW factory thermostat housing is plastic and I have read reports that they can crack or otherwise fail and leave the driver stranded. Since I had to take thermostat house off Z3, thought I would replace with top-of-line aluminum.
Thermostat housing gasket? When I ordered new aluminum thermostat housing, was not clear if gasket included or not so I ordered one. Turns out that new aluminum thermostat housing came with a gasket.
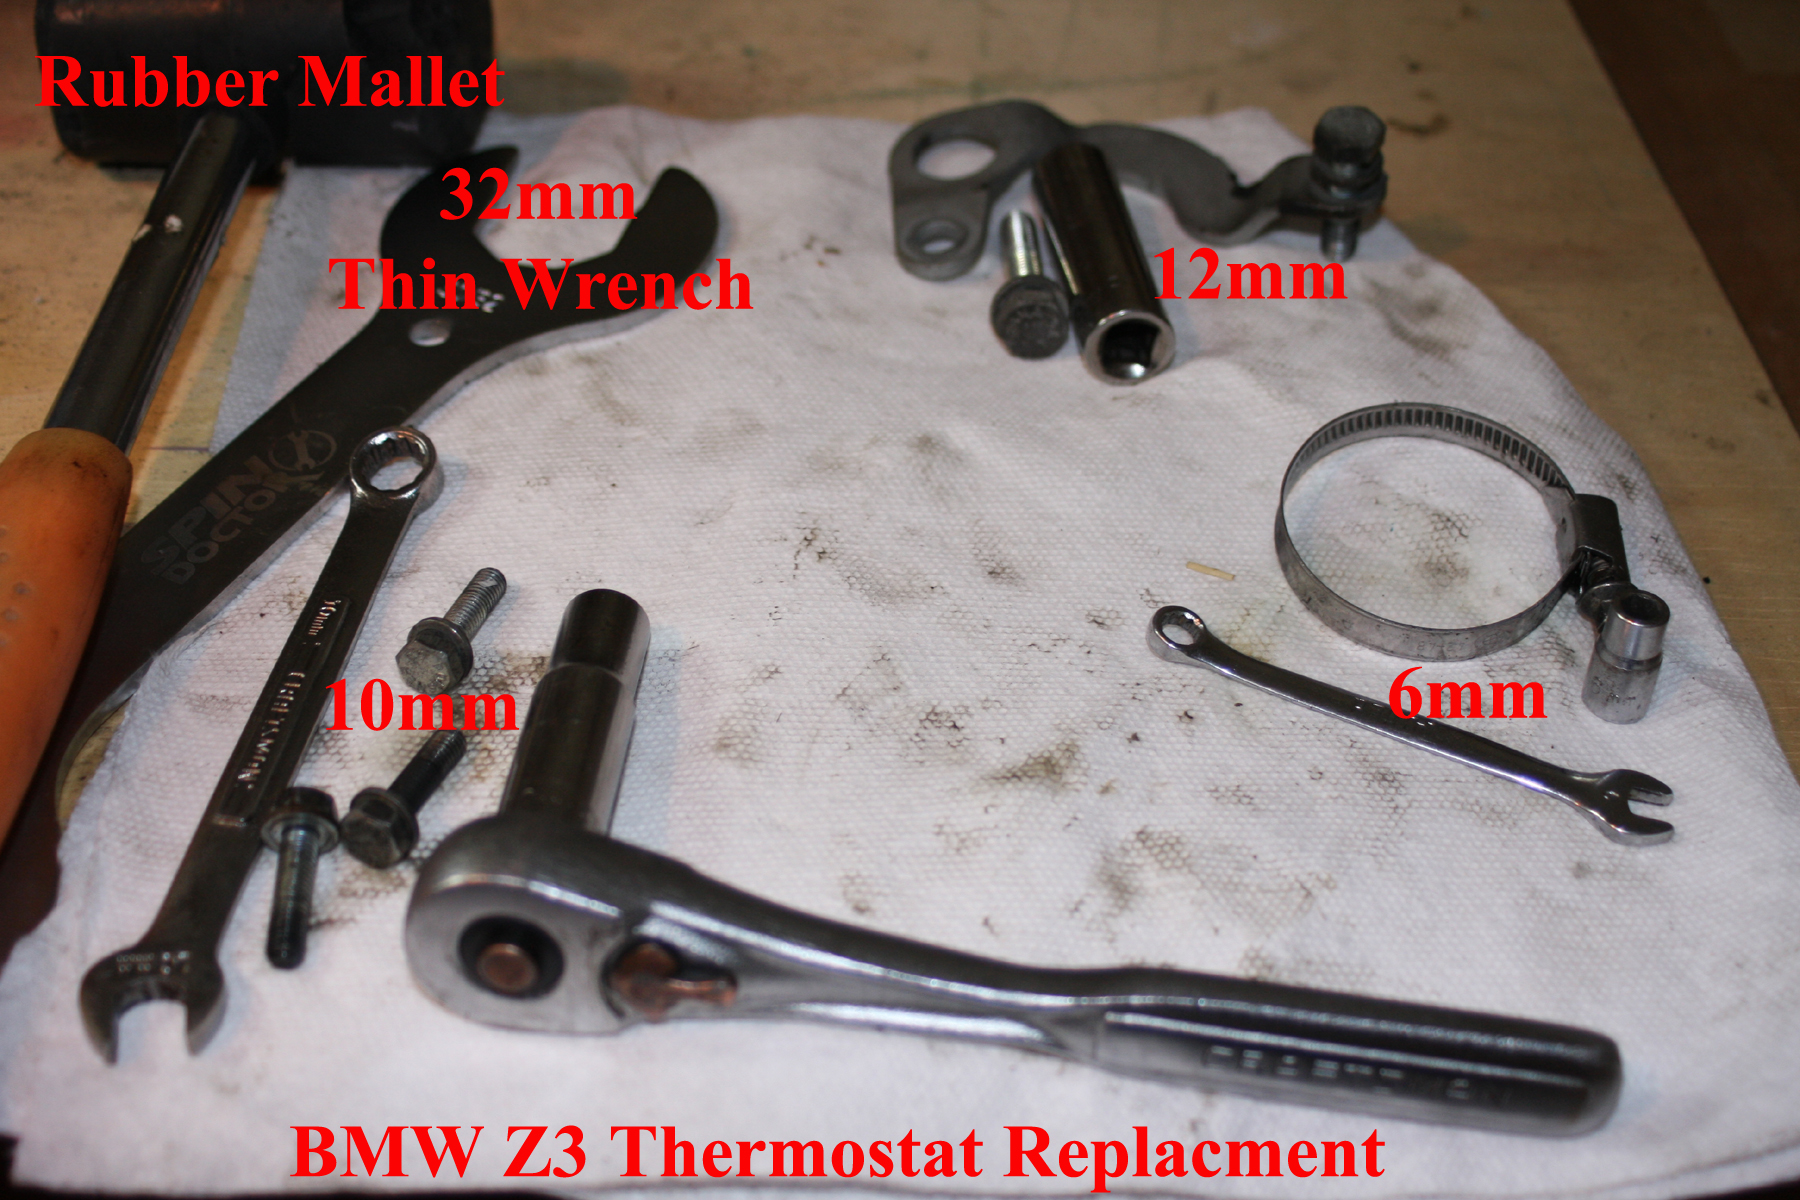
6mm wrench (factory hose clamps have 6mm heads on them)
6mm socket and a very small ratchet that can hose the 6mm socket without any sort of adapter (just not room for adapters).
10mm deep socket and ratchet that can host without any sort of adapter.
12mm deep socket and associated ratchet.
32mm, thin, wrench. (I bought for $15 at a bicycle shop.) And what exactly is a "thin" wrench? Wrench thickness tends to go up as a function of size, meaning a 10mm wrench is thinner than a 19mm wrench which is thinner than a 1inch wrench. A 32mm regular wrench is going to be so "fat" that you might have problems getting it to fit into the small space between the fan and the thermostat housing. A thin wrench is just that, almost like a stamped out, flat, wrench.
Rubber mallet or hammer.
Work light. A flashlight also helps locate the 10mm bolt you are going to drop.
Paper towels or rags.
Coolant catch bucket or other open container. I did not use as assumed would be very little coolant to leak and I was more or less correct. Coolant leak-out due to thermostat replacement, perhaps a quart, maybe 2.
Replacement coolant. I use Prestone fifth-fifth or it is premixed 50% antifreeze and 50% water.
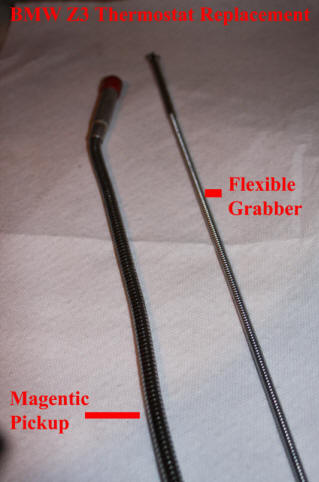
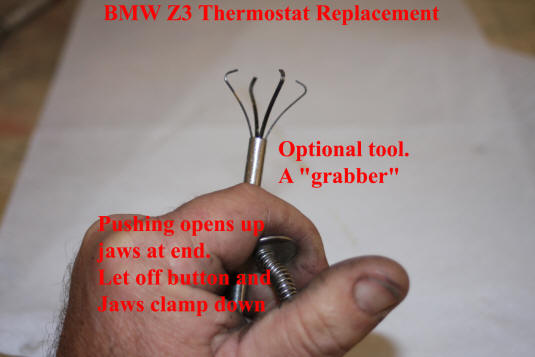
Optional Tools:
If you have never dropped a bolt "down in there", you will not need a magnetic pickup or a "grabber." For years I did not have these 2 tools but wished I had as would have saved me a lot of grief looking for or trying to reach a dropped bolt or nut or something.
Total Cost:
$93: 92 Centigrade thermostat, new aluminum thermostat housing and 32mm thin wrench. Other than 32mm thin wrench, I had all other tools required and top-off coolant.
How to Replace the Thermostat:
Park on level surface. Note that even if you try to catch coolant in some sort of open container, I would be willing to bet that some antifreeze will make its way to the ground AND all sorts of animals love to lick up antifreeze AND, of course, it is really not good for them. So take care with any pets you have around. Kitty litter is good on absorbing any sort of liquid, messy, but good.
Work on cold engine.
Pull park brake: tight, well.
Jack up car on passenger side front. Jack up enough to get your coolant catch bucket or other under the front of car, directly below where hoses attach to thermostat housing.
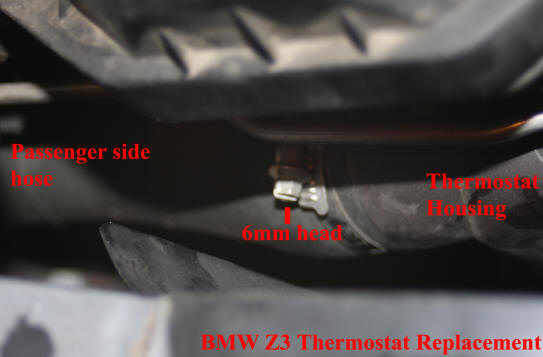
The thermostat is located in a bolt-on thermostat housing. The thermostat housing is more or less, dead center of the engine, in the front. It has 2 coolant hose connected to it. One hose from the driver's-side and one hose from the passenger-side.
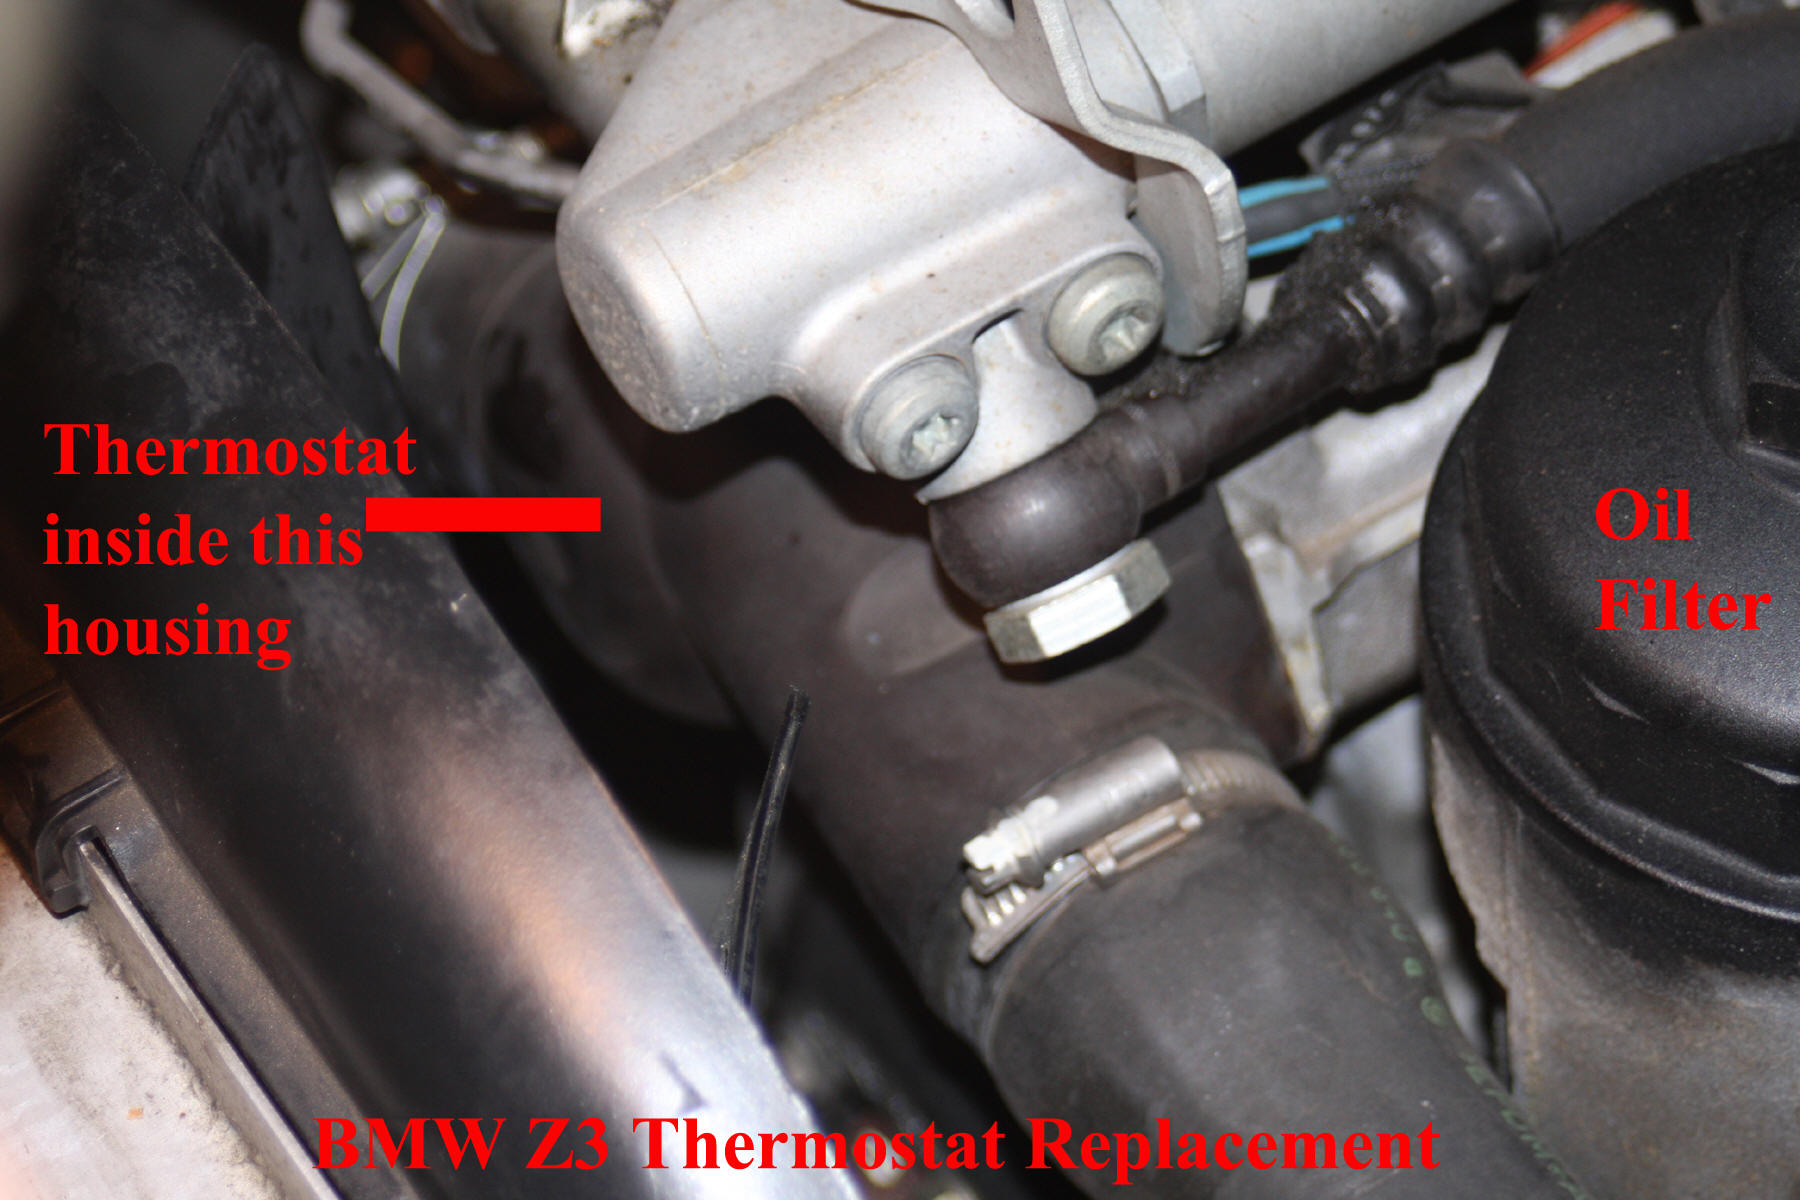
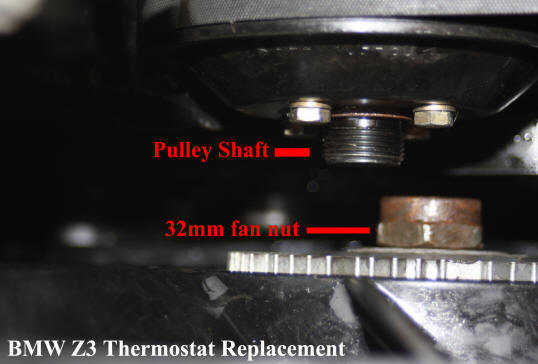
Right in front of the thermostat housing is the radiator cooling fan and it is so close to the housing, it makes it impossible to remove the (2) lower housing 10mm bolts without moving the fan forward a couple of inches. The cooling fan is connected to a threaded shaft that comes out of the water pump pulley. The cooling fan can be separated from the pulley shaft by using a 32mm, thin, wrench on the fan side of the fan/pulley junction and pushing the top of the wrench towards the driver's-side of the car or clockwise.
Observation. On my Z3, I got lucky when I parked to begin work as when I looked down to where the fan threaded to the shaft coming out of the pulley, there was a small, white, paint mark across the junction of the pulley shaft and fan. I took this to be some sort of alignment mark. If you do not see a white paint mark like what I am talking about, it might be underneath the junction, where you can not see it. Thus before you disconnect the cooling fan from the pulley threaded shaft, use the 32mm think wrench to try to move the pulley and thus, the fan, around
To get my cooling fan to separate from the pulley shaft, I had to place a flat blade screw driver between 2 of the 10mm bolts holding the water pump pulley in place and then pushing hard on the 32mm thin wrench. Even then, I had to strike the top of the thin wrench with a rubber mallet several times before the connection became loose.
Once the cooling fan has loosened from the pulley shaft, you can turn it by hand until it disconnects. Do not let the fan simply drop as it could damage your radiator or perhaps break a blade on the fan.
Because there is a shroud around the radiator, you will not be able to complete lift the cooling fan out of the Z3 but you do not have to.
If you have a very small bucket or other open container that will fit between the disconnected cooling fan and the junction where the driver's-side hose connects to the thermostat housing, place your container under the hose connection and loosen the hose clamp. In my case, a 6mm wrench worked on the hose clamp head. If you have a larger open container that will fit under the Z3, place it on the ground, more or less under where you are going to remove the driver's-side hose from the thermostat housing.
Once the hose clamp is loose, you can slide it down off the thermostat housing and leave it on the hose.
Now using your hand(s) and not anything sharp that might puncture the hose, wiggle the driver's-side hose off the thermostat housing. As you wiggle and pull back, coolant will begin to leak from around the hose and then out of the thermostat housing.
Once you have the driver's-side hose off the thermostat housing, gently push the driver's-side coolant hose, up under the Z3's air filter. All you want to do here is to get the hose up and out of the way.
Now move to passenger-side of thermostat housing and loosen hose clamp there. Again, a 6mm wrench and socket and ratchet worked for me but if your hose clamps have ever been replaced, 6mm might not be correct. Because of limited space, I could not get a screw driver to go over head and be able to turn it. Fan loose helps but still tight quarters to get your hands into.
With hose clamp loose, let it slide down hose.
I doubt you will have room to get any sort of open container under the hose-thermostat housing junctions, but you can try. Otherwise try to position an open container under the Z3 in the area of the junction.
Now here, I had a hard time getting the passenger-side hose to pull off the thermostat housing. In the end, I had to use the blunt end of a long torque wrench to push downward. Of course, once the hose pulled loose, coolant drained out and down.
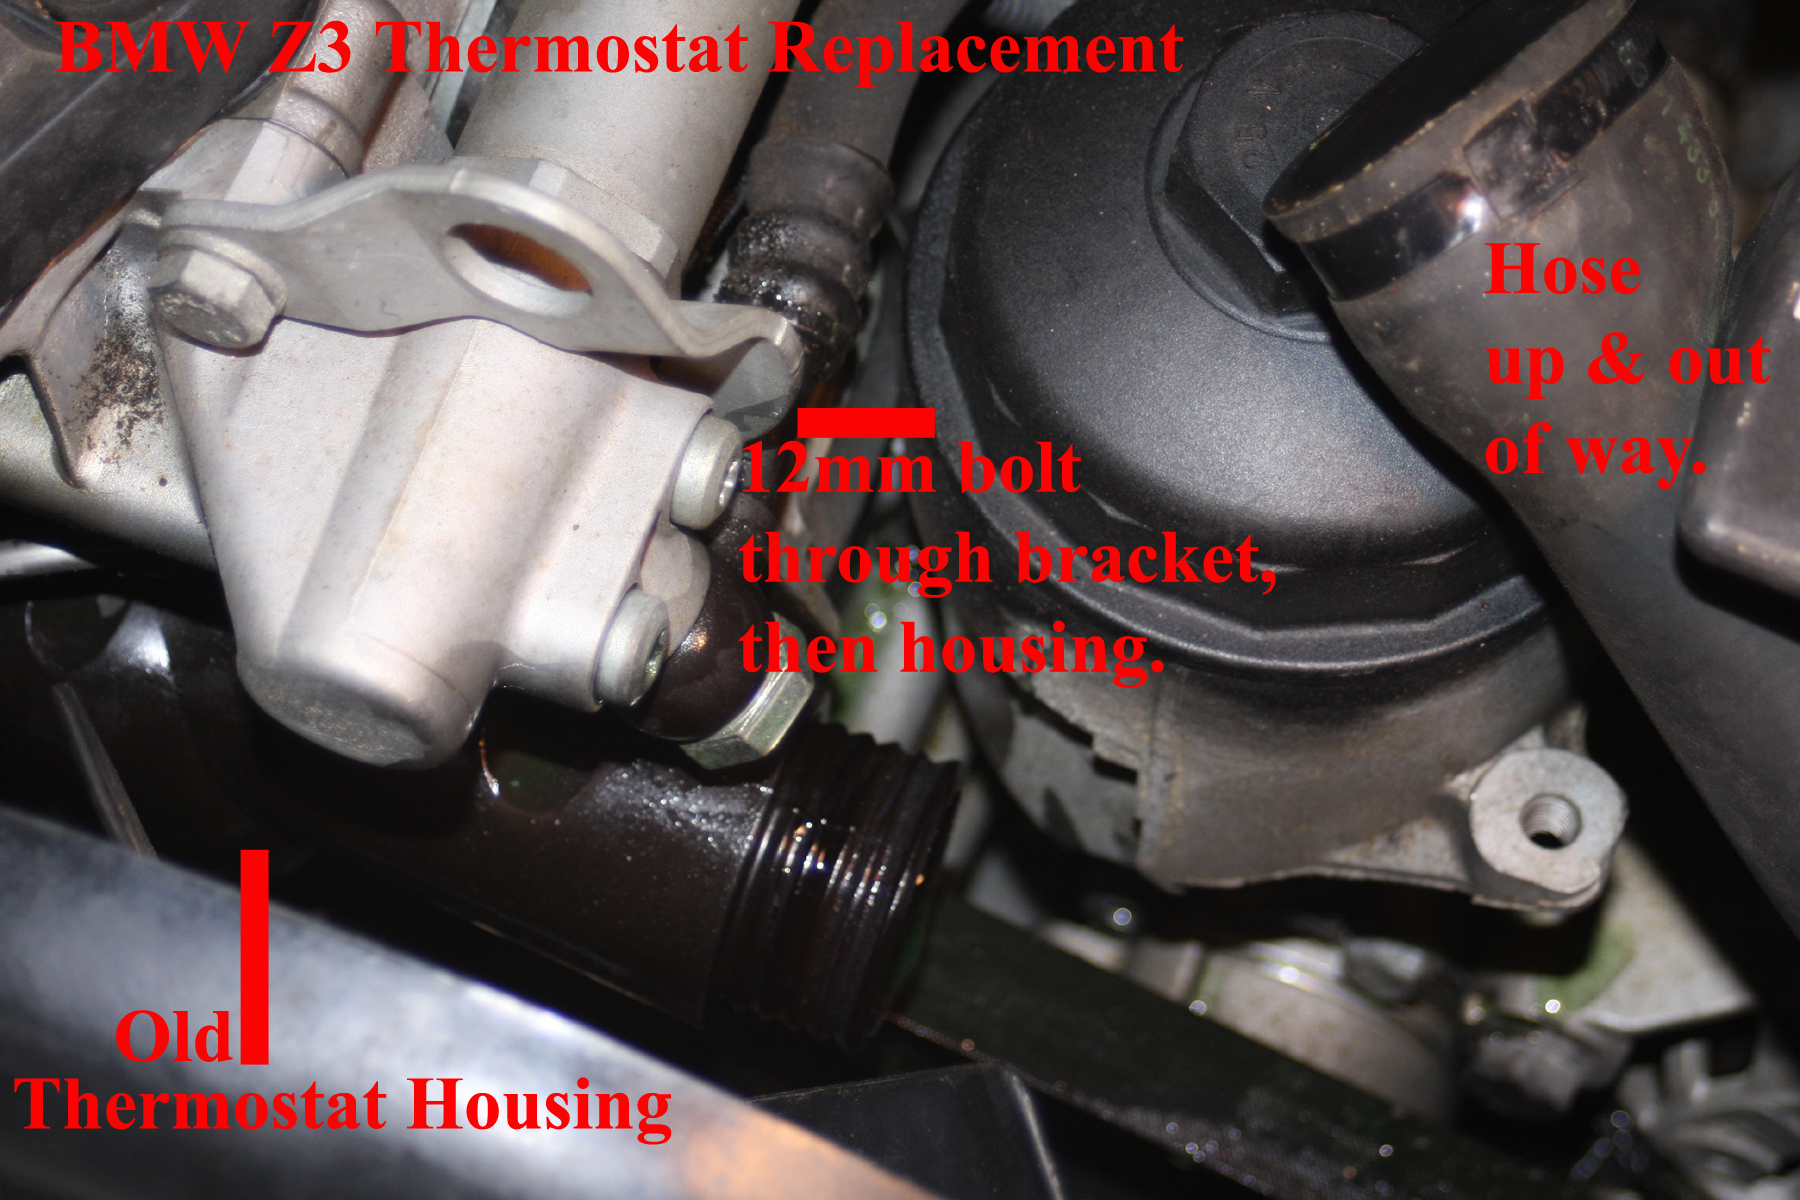
You are now ready to remove the thermostat housing. The image below shows the location and socket size required for each of the 4 bolts. The bottom 2 bolts can not be seen and thus you will have to feel your way to their heads. With the fan loose and back several inches from the housing, I had no problem getting all bolts removed. Note here that the 12mm bolt. at the top, closest to the driver's-side, actually goes through the arm of a clamp that is configured around other engine piping and you will have to completely remove this metal arm at both ends to be able to remove the thermostat housing. To loosen all thermostat bolts, you turn counterclockwise.

I suggest you remove the bottom 2 bolts first and then the top. This way, the housing will not suddenly fall when you remove the last of the bottom bolts.
Remove thermostat housing slowly. In my case, the thermostat housing removed rather easily but the thermostat was stick into the engine. When you start pulling the thermostat housing away from the engine, if you can tell the thermostat is coming with the housing, hold the thermostat in place with one hand and remove the housing.
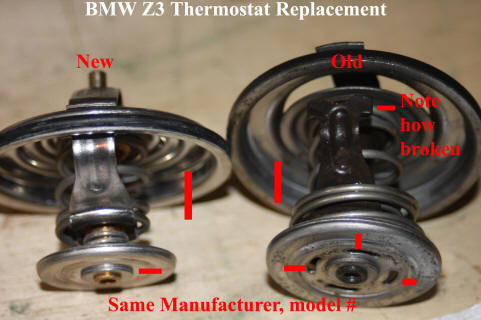
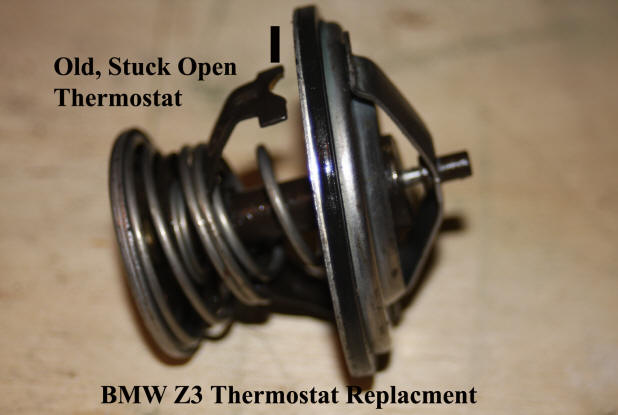
Observation. I do not know why but there is an arrow stamped into the top rim of the thermostat. Before you remove the old thermostat, observe where the arrow is located and where it is pointing. You are going to want to put the new thermostat back into the engine in the same arrow orientation. In my case, the thermostat arrow was dead center of the thermostat hole and pointed to the driver's-side. With this orientation, the metal tabs of the thermostat run vertically to the thermostat hole.
Remove the old thermostat. In my case, it did not want to budge out of the engine hole and I had to encourage it by using a screw driver. BUT I did not pry at the edge of the engine hole, rather I used the screw driver on the top of the old thermostat. Not that it matters but below shows image of old thermostat and how it failed. Metal arm with "V" in it, should be connected to top of thermostat but is not.
Take new thermostat and install new gasket on it. Gasket goes around the outside top such that it will mate to the thermostat housing.
With new gasket on old thermostat housing or new gasket on new thermostat housing, using the housing-with-bolts defined picture provided above, first install the new thermostat into the hole, making sure the arrow orientation is identical to the thermostat you removed and then holding the new thermostat in place with a finger, place the thermostat housing up on the engine face and over the new thermostat.
The new thermostat is placed into the hole in the block, metal against metal. This means the rubber gasket side goes towards in inside of the thermostat housing.
Once thermostat housing is more-or-less in place, insert a 10mm bolt into the thermostat housing top mounting hole closest to the passenger side. Hand tighten. Never use a ratchet to insert and start any bolt. There is way too much chance of you cross threading the bolt. Only hand tighten 10mm bolt at this time!
Now take the metal support bracket and fish it around other engine piping until the bracket arm is in front of (meaning: engine, thermostat housing and then metal support arm) the thermostat housing and place the longer of the 2, 12mm bolts into the mounting hole and hand tighten. Here, you might have to shift the thermostat housing slightly up or down to get the bolt to start threading. Again, hand thread and do not tighten at this time.
Place other 12mm bolt into metal support bracket and hand thread it engine. Do not tighten at this time.
Take a break and clean your hands of any coolant that has gotten on them.
Now hand insert (might have to insert into socket and then hand socket into place) all other thermostat housing bolts.
When all thermostat housing bolts in place, use a ratchet to tight all up tight.
Move driver's-side hose back over end of thermostat housing and tight hose clamp.
Move passenger-side hose back onto thermostat housing. Here, I found this a little difficult but patience won the day. Once hose on housing, slide hose clamp up over hose and thermostat housing body and tighten hose clamp,
Check everything over. Thermostat housing have all bolts and all bolts tight? Both hoses tight on to thermostat housing and hose clamps firmly in place?
By hand, lift up fan and align with threaded shaft coming out of pulley and thread the fan back onto the shaft. Here, you turn the fan in a counterclockwise direction. Might take a minute or 2 to get fan to thread on but it will. Once first couple of threads started, simply spin fan to get it to draw up tight.
Observation. Remember. when fan was removed, there was a white paint mark across pulley shaft and fan shaft? You now want to use the 32mm thin wrench to get the fan to align to the paint mark on the pulley shaft.
Use paper towels to wipe coolant off anything and everything.
Take cap off coolant reservoir and using BMW coolant or my Prestone Fifty-Fifty, fill the reservoir with coolant/
Take a brake. Clean up your tools and put them away. Hand wipe off surfaces that have coolant or your hand prints on them.
Coolant should slowly go down in reservoir.
Inside Z3, turn climate control to full heat.
Open garage door, if not already open, and start car.
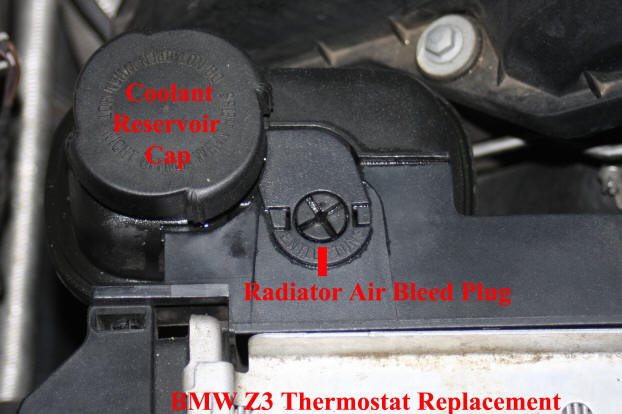
Use a large flat blade screw driver to remove the radiator air bleed plug.
With Z3 running, watch level of coolant in the reservoir and add as needed to keep coolant at least to the "cold" level mark. Here a flashlight really helps to see coolant level on side of reservoir.
Let engine heat.
After a while, bubbles will begin to come out of the radiator air bleed hole.
Continue to let engine head, adding coolant to reservoir as needed.
Do not get into car and rev engine. This will only result in coolant being bubbled out of either the reservoir or radiator air bleed hole and getting all over your engine compartment.
Eventually, all bubbles will disappear from the air bleed hole and coolant will be begin to run out of this hole. When this happens, reinstall the radiator air bleed hole screw.
Using a flashlight or workshop light, check for leaks. Leaking around hose connections? Out bottom of thermostat housing?
If reservoir has enough coolant in it, place cap back onto reservoir.
Continue to let engine run while you continue with tools cleanup and put away.
Get into Z3 and move away from where you have been working on it. Park it and let it continue to run.
Clean up any spilled coolant and at the same time, check constantly the dash, coolant temperature gauge. Gauge should move upward as car heats but not go over gauge center marker. If the coolant temperature begins to rise about the gauge middle mark, shut down engine immediately as something is wrong.