Shared Knowledge
"BMW Z3 - How to Replace Catalytic Converter"
9 February 2010
Updated: 5 November 2010
Updated 1 Dec 2010
Summary: a "bolt-on" replacement can be done "do-it-yourself" (DIY) but not an easy task due to weight of replacement converter, limited space under Z3 and "alignment" issues.
Update: 26 November 2010. With 49 state legal aftermarket converter had check engine light (CEL) problem I could not solve as could not find intake or exhaust air leak. Finally took car to independent repair facility and they confirmed converter no good!!!!!! So, do yourself a favor and only install the BMW converter. I know it costs more than after market but going to save you a lot of grief.
Background:
BMW Z3, 1997, 2.8L, 45,000 miles. NO CHECK ENGINE LIGHT.
Significant catalytic converter rattle at cold start up.
BMW, EPA required, warranty on catalytic converter is 8 years or 80,000 miles.
Known problem with 1997 converter insides breaking loosing and rattling but BMW would not deal with rattle free of charge for me as outside extended warranty period.
Dealer wanted $2300+ for converter replacement.
Internet search revealed many sources of BMW converters. Some replacements require the old converter be cut out of the piping and the new wielded in. Others are advertised as "bolt-on" with no cutting required.
After Internet examination of many websites offering replacement bolt-on converters, decided to not buy BMW factory version @ $1800 but to buy an EPA approved for all states except California, "bolt-on", from Converterwarehouse.com.
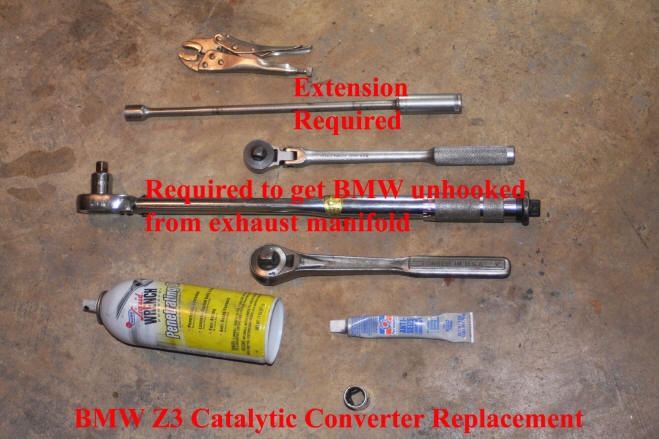
Tools, Supplies Needed:
- Long handled ratchet.
- Long socket extension.
- Shorter handle ratchet.
- Vice grips.
- 13mm socket.
- (2) 13mm wrenches.
- 15mm deep socket.
- 7/8inch open end wrench.
- Spray can of penetrating oil.
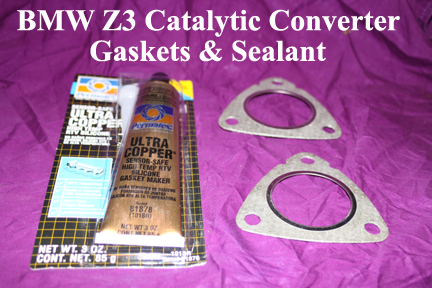
- Tube of anti-seize "grease".
How to replace the catalytic converter:
(1) Park on level ground. Set handbrake. Jacked up front of car on passenger side. As always, car being up on the BMW or hydraulic jack is inherently dangerous. Use jack stands or otherwise block something under car so it can not fall on you while you working under it.
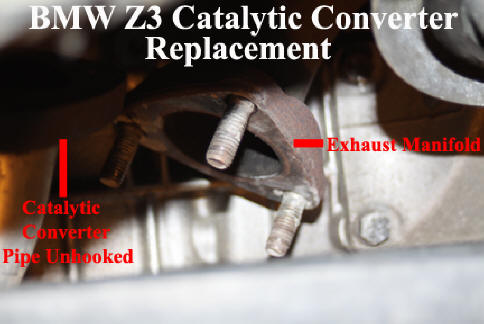
(2) Unhooked catalytic converter from muffler. There is no special gasket between the converter and the muffler. The converter pipe fits inside the muffler pipe and the rings\flanges on both are bolted together. Here, I found one bolt and nut easy to remove and one that was not. Since I bought new assembly hardware from BMW, I used vice grips on the stuck nut and a long torque wrench for leverage on the bolt head and twisted the nut off. Here, the bolt head and the nut are 13mm.
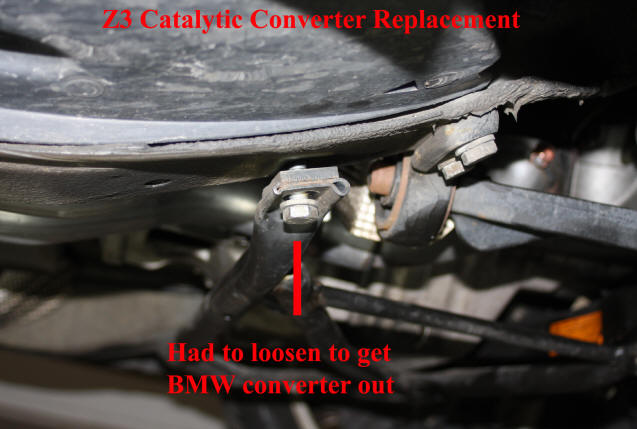
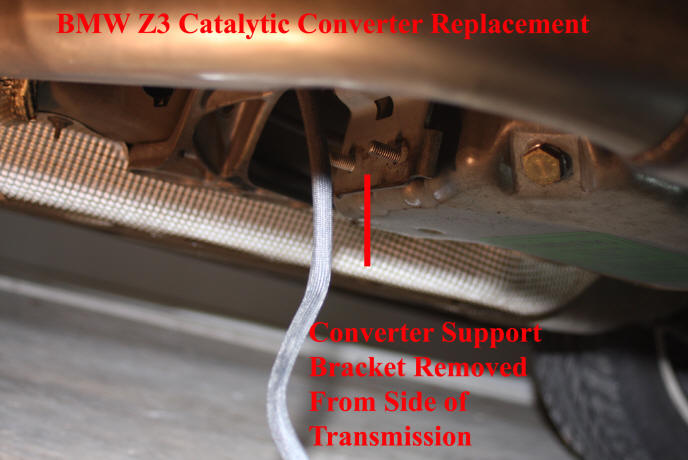
(3) Loosened but did not remove catalytic converter support bracket attached to side of the transmission. 13mm.
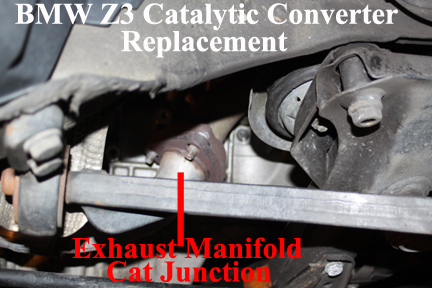
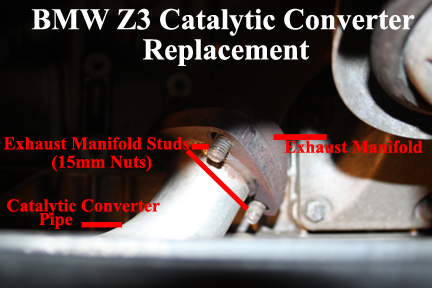
(4) Moved to front of car and sprayed penetrating oil on all exhaust manifold studs and catalytic converter nuts (6). Let oil sit for several hours.
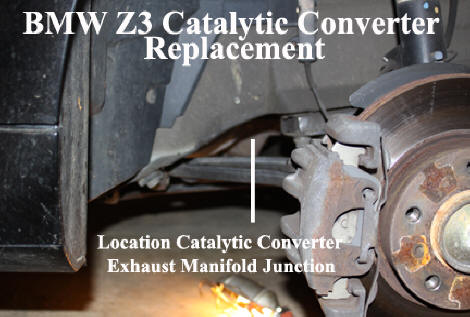
(5) Using a long extension, a long handled torque wrench and a 15mm deep socket, removed all nuts holding converter pipes in place. The 3 nuts on the engine side converter flange were fairly easy to get to with the long extension but the nuts on the converter flange closest to the passenger side tire were more difficult. All were tight but once broken loose, came off fairly easily. If you are far enough under the car, you will be able to see all studs and nuts clearly.
(6) Removed lower half of converter support clamp, mid converter.
(7) As I bought new oxygen sensors to be installed with the new converter, traced oxygen sensor wires to wiring harness connector and separated sensor connector from wiring harness connector. Here, I had to hold the body of the wiring harness connector and pull on the sensor connector plastic end. I did not pull on wires. The connectors separated rather easily.
(8) With converter free from muffler and support clamp, tried to move converter down away from exhaust manifold but could not clear bolt studs on engine side exhaust manifold.
(9) Did not want to, but removed one bolt holding a chassis support in place, dropping down the support only 1 inch perhaps but after moving to the rear of the converter and wiggling it, it became free in the front and with a slight twisting motion, the converter came back, down and out. Took out old gaskets still in place over manifold studs. (Nut for bolt removed from chassis support is wielded to frame so no concern over trying to hold nut in place while reinstalling support bolt.)
(10) Just to be sure, with BMW converter out, took a look and listen to actual converter and insides completely broken away from whatever supports it had in there and rattling at the slightest pound of my palm! Time to remove BMW converter from Z3? Perhaps 1 hour or slightly longer (I am always very slow so as to not strip a bolt or make a mistake of some kind.)
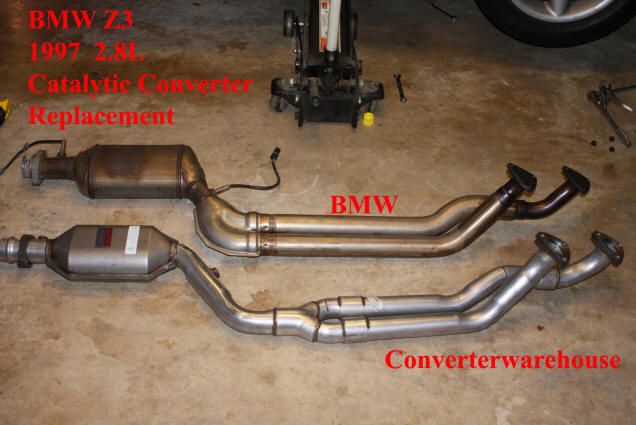
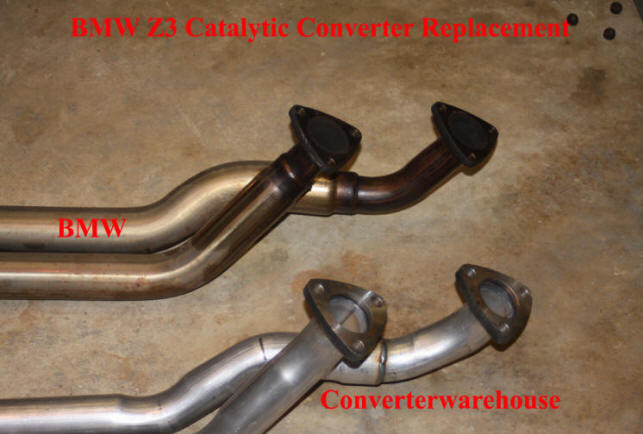
(11) Laid BMW and Converterwarehouse Z3 converter side by side and noticed difference to include: Converterwarehouse actual converter much smaller than BMW; pre converter oxygen sensor port on Converterwarehouse is much further forward than on BMW; Converterwarehouse converter routes both exhaust ports to a single pipe much sooner than the BMW. ???? Another Internet search and examination of what images there are provided of replacement "bolt-on" catalytic converters reveals all, or most, bolt-on replacements appear identical to the Converterwarehouse converter.
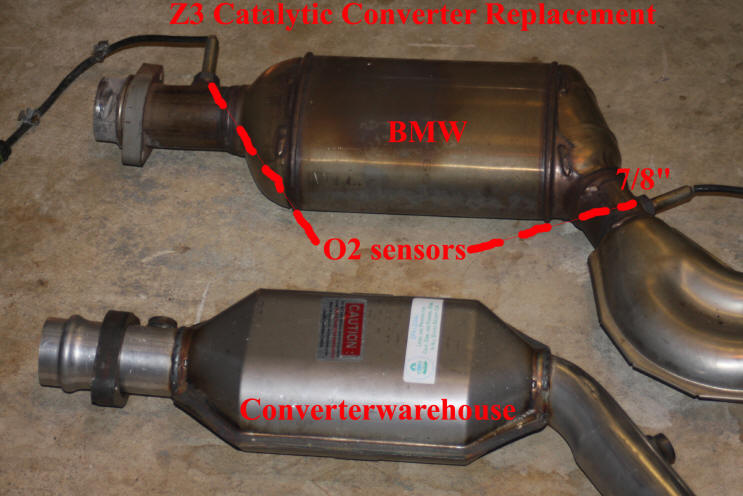
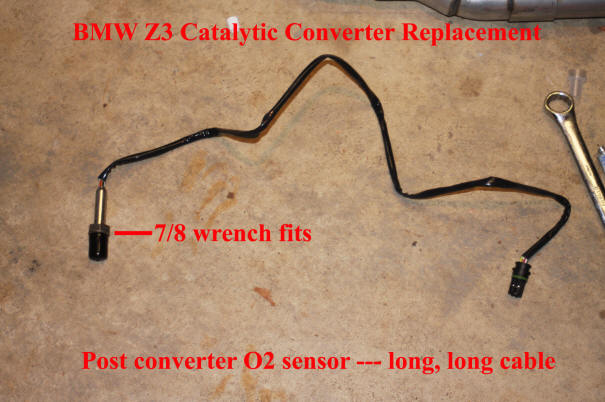
(12) As bought new oxygen sensors, mounted both into new converter. Found 7/8" wrench would draw each sensor up tight in the converter. No problem mixing up the 2 sensors as the post-converter sensor has a much longer cable than the pre-converter sensor. I did use anti-seize compound on the threads of each sensor and was careful not to touch the actual sensor.
(13) Took Converterwarehouse converter under car and routed front end over the chassis support bracket.
(14) Placed muffler end of converter into muffler pipe and loosely attached flange bolts to hold converter in place.
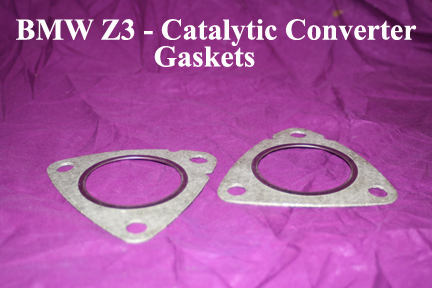
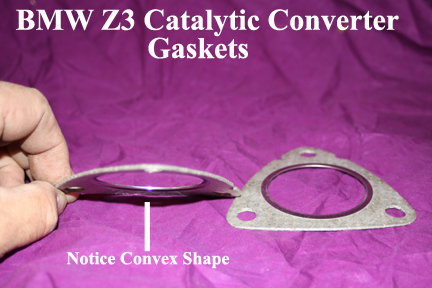
(15) Went to front of car and placed new gaskets over exhaust manifold studs and began trying to get new converter to mount over exhaust studs. But no matter how I tried, I could not seem to get all converter flange holes to align with manifold studs.
(16) Received the wrong converter from Converterwarehouse? Have one of those mixed breed Z3's with a 1996 converter or some other odd thing?
(17) Hassle front end for a long time without success. Have to try something different, so unhook converter from muffler. This allows for more wiggle room up front but makes the converter much harder to hold up. Still could not get converter holes to align with exhaust studs.
(18) Look and understand. Appears will align if I only can get another 1/2inch wiggle room at the most. What is impeding converter movement? Decide post-converter oxygen sensor might be in the way when I try to move converter around, so take post-converter oxygen sensor out of converter and set aside.
(19) Get holes in converter flange to slip over studs on engine side exhaust manifold flange. Take one new bolt and get it to thread on one stud. Use extension to draw up nut a little.
(20) Try moving converter left and right, up and down, to get it to slip over the studs in the other exhaust manifold flange but no go.
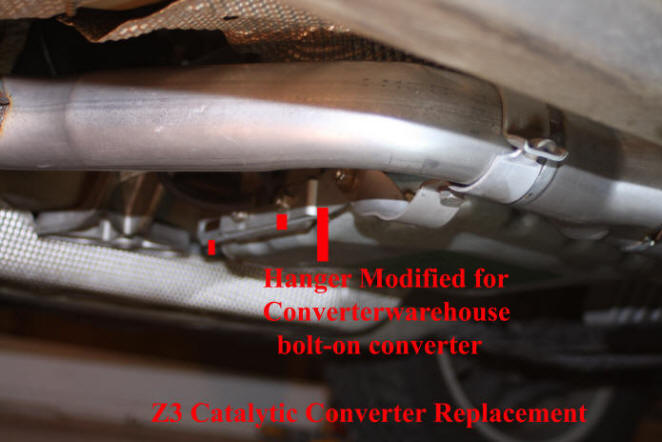
(21) How dumb of me. Converter from Converterwarehouse not going to mount correctly into mid converter support bracket as BMW still has 2 pipes at that point whereas Converterwarehouse converter only has one. So remove support bracket completely. Again, only looking for perhaps 1/4 to 1/2 inch of converter movement to get it to align on all exhaust manifold studs.
(21) Back up front again, wiggle and closer but still not all aligned. Decide to get another nut on flange that is aligned and once again, use extension to draw up nut a few turns.
(22) Looking directly up on flange that is not aligning with exhaust studs, see that converter must be moved towards the passenger side of the car and so move back away from the front of the car and begin gently pushing the converter towards the passenger side of the car and then, pop, and converter pops over all 6 studs on the manifold flanges! Finally!
(18) Place new nuts over all 6 exhaust manifold studs and using extension, 15mm deep socket and long handle torque wrench, begin drawing all nuts up tight. Probably not required but draw each nut only a little before moving to another and repeating. Torque all nuts to 40 foot pounds.
(19) Go to rear and pushing muffler assembly back only a little, get converter pipe inside muffler pipe. Take new bolts and run through flange on converter and flange on muffler and place nuts on both bolts. Here, I used (2) 13mm wrenches to tighten one bolt and nut and then moved to the other and tightened so as to get a nice even fitting all around. Tightened until the 2 flanges were almost flush and fear of stripping if more tightening.
(20) Mounted post-converter oxygen sensor into converter. Not sure if removing it really helped me get front to align or not, but with 7\8inch wrench, easy enough to get sensor to mount tightly to converter.
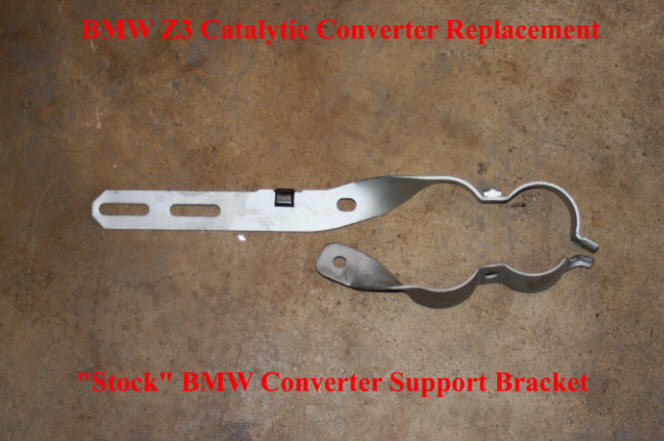
(21) Bothered me that BMW support clamp that held up the BMW stock converter would not work with the Converterwarehouse converter. So looking at the support and the pipe of the Converterwarehouse converter, gleamed that if I drilled another hold in the support clamp and moved it away from the converter pipe, I might be able to get the support clamp to actually work on the new converter. So drilled hole in support clamp, mounted back onto transmission and then mounted lower support arm to upper arm. With the bolt that once went in between 2 pipes of the BMW converter, mounted to the upper clamp, I got the BMW support clamp to actually hold some of the converter weight.
(22) Reconnected both oxygen sensors to the wiring harness.
(23) Tightened back up the one bolt I had removed from the support structure up in front of the engine.
(24) Checked everything. Seemed tight: converter and all nuts.
(25) Let Z3 down off jack and started it up. No converter rattle at all and no dash alert as to an oxygen sensor problem. Went to rear and tried to plug exhaust pipes but significant pressure and no sound of exhaust leak anywhere.
Costs?
Converter & new oxygen sensors, from Converterwarehouse: $629.51
New mounting hardware from BMW: $119.48
Penetrating oil and anti-seize lubricant: $ 7.33
Total: $756.32
Total Time?
I am 64 years old and slow and prodding and had to learn as I went along. So, total was a least 6 hours with the bulk of that trying to get converter to align to exhaust manifold flange studs.
Warning:
Since aftermarket converter install, have had problems with check engine light (CEL) coming on after 80 miles or so. Error message is "Catalytic efficiency below threshold." Only diagnostic trouble code (DTC) displayed, recorded, by engine control unit (ECU). Still working to confirm that aftermarket converter going to actually work on the BMW Z3. And this highlights a potential big problem if you replace the converter yourself with an after market converter. If you have a problem and can not solve (and going to be difficult with out having some sort of BMW scanner tool) when you take to dealer, they going to want to replace CAT again!
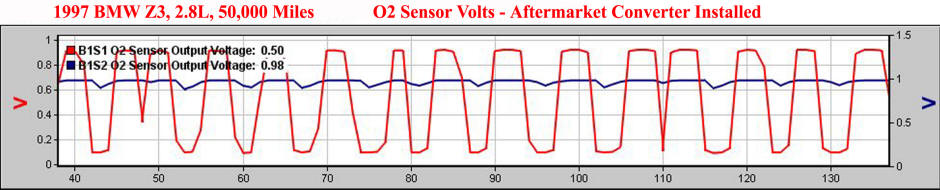
Note: red line is pre cat O2 sensor and waveform is more or less correct with sensor switching between fuel rich and then lean and then rich again. Blue line is post cat O2 sensors and is only monitoring efficiency of converter. The actual output voltage does not matter but it should not vary or track what the pre cat O2 is doing. Notice how the post cat O2 sensor dips. This is causing the check engine light (CEL).
Update 26 Nov 2010: After struggling with CE light, finally took to independent repair facility and after confirming no exhaust or intake leaks and all ECU parameters in bounds, they have concluded converter never going to work on Z3. Thus having to replace again and this time with BMW converter. I know, you say, you can find a after market converter than will work. I hope you do but be warned.

Note: above shows the volts out of the pre and post cat O2 sensors after a new genuine BMW converter was installed. To be clear, the only thing changed was the aftermarket converter was removed and the genuine BMW installed. No changes were made to the engine and the very same O2 sensors were used. As shown above, the post cat O2 sensor is now stable in output like it should be.