Shared Knowledge
"BMW Z3 - Brake Pad Wear Sensor"
5 June 2013
Summary: if brake wear sensor light comes "on" and stays "on, check brake pads. If brake wear sensor light is intermittent and you have checked pads and they are ok, most likely is connector problem. Replacement of brake pad wear sensor is easy do-it-yourself.
Background:
1997 BMW Z3: 58,000 miles; all brake pads good (visually inspected through magnesium wheels).
Brake pad wear sensor light coming on intermittently.
Overview:
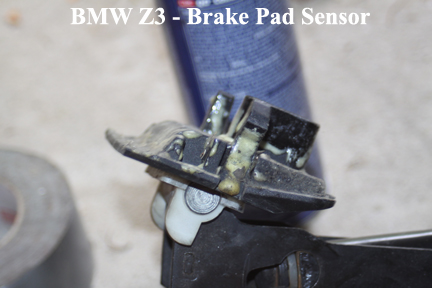
The brake pad sensor is nothing more than a wire with a plastic head on one end and a connector on the other.
The connector end of the brake pad wear sensor cable connects to the car's wiring harness.
The connector end of the brake pad wear sensor is housed in a connector box mounted to the chassis.
The connector used to connect the brake pad wear sensor to the wiring harness uses very small "pins" the size of sewing needles.
The plastic head of the brake pad wear sensor is mounted in a slot in the inner brake pad.
There is a small metal clip on the brake pad wear sensor that helps hold the sensor head in place.
The brake pad wear sensor is nothing more than a wire. When the brake pad wears down it, eventually the rotor begins to chew into the small metal clip emitting a noise and then eventually chewing into the plastic head and breaking a normally closed (NC) circuit. When the car detects an open circuit on a brake pad wear sensor, it turns on the brake pad wear sensor light in the instrument cluster.
OR...if the pins in the brake pad wear sensor do not make a solid electrical contact with the wiring harness connectors, the car will "think" the wear pad sensor wires has been broken or chewed through and try to turn on the brake pad wear sensor light.
Sitting in the driver's seat, there are 2 brake pad wear sensors on the 1997 BMW Z3: on the front left and on the right rear.
If the front or rear brake pads are thin and the brake pad wear sensor has been damaged, the sensor will have to be replaced as it is a "one-shot" device.
If you are getting an intermittent brake wear sensor light and you know the brake pads are good and not the problem, you need to clean the contacts in the brake wear sensor connectors.
As the brake pad wear light on the instrument cluster does not indicate which pads need replacing or which connector contacts need to be cleaned, you will have to check the front left and right rear.
Park on a level, flat surface, like a garage.
Pull the park brake.
Accessing the front left brake pad wear sensor:
Using lug nut wrench or a torque wrench, "crack" or loosen the lug nuts on the front left wheel. Only crack these and certainly do not remove!!! If the front left wheel has never been off the car, the lug nuts may be on very, very tight. In the worse case, you might have to use a torque wrench fitting with a piece of pipe to lever loosen the lug nuts.
Using the car jack, insert into the jack point on the left side. Make sure jack head inserts fully and completely into the jack point and then slowly crank up jack, lifting car.
Once front left wheel is free of the ground and you are sure the jack is solid and the car can not move backwards at all, remove the lug nuts and then the wheel.
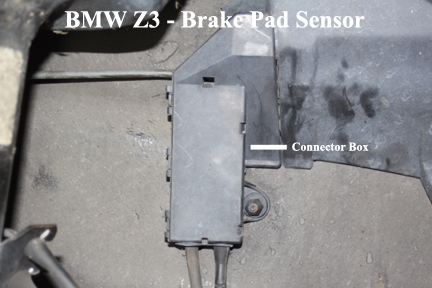
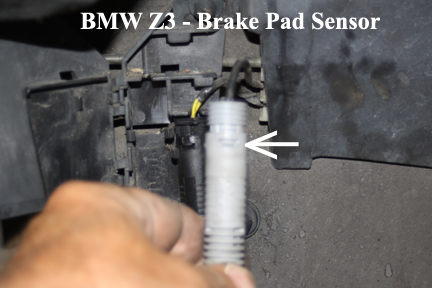
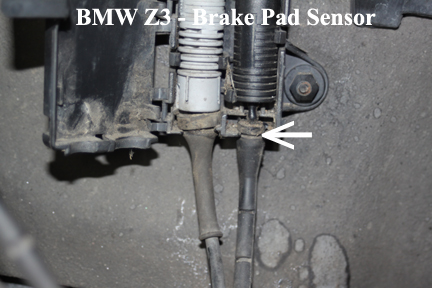
Now looking straight into the wheel well, you will see the small connector box mounted to the chassis.
To open the connector box, pull on the right side of the box and it will swing on the hinges on the left.
Note: if the cover is missing on the box, you should buy a replacement box or at least use duct tape or other to cover the face of the box.
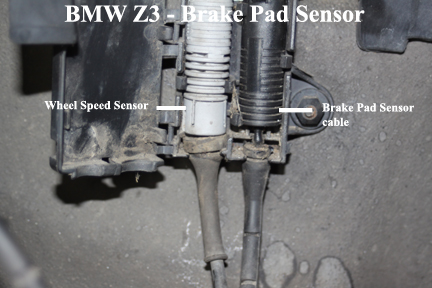
Inside the connector box there are 2 connectors: one for the wheel speed sensor and one for the brake pad wear sensor.
The brake pad wear sensor is the black connector.
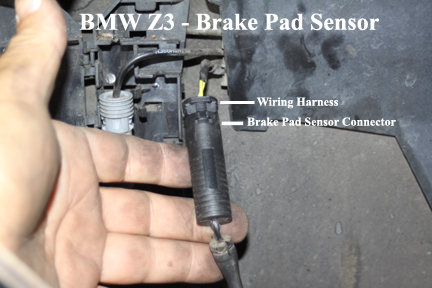
To clean connector pins or to replace entire brake pad wear sensor assembly, you will have to unhook the sensor cable from the wiring harness connector.
To do this you must depress a small tab that is part of the wiring harness connector head while pulling the wear sensor connector downwards. Never pull any connectors just by the wires. You must pull using the plastic connectors.
In the image above, I am showing the wheel speed sensor BUT the same sort of depress and pull is applicable to the wear sensor.
If you need to replace the sensor, unhook the plastic head from the inner brake pad.
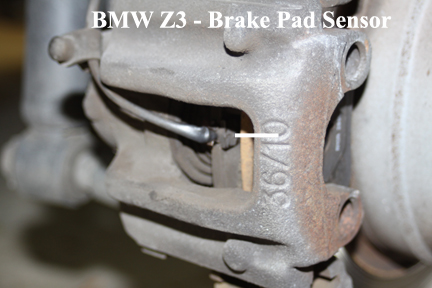
To remove plastic head of sensor from inner brake pad, pull straight out on the sensor head.
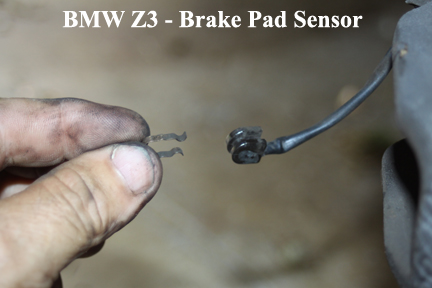
When you pull the brake pad sensor out of the brake pad, make sure you also get the small cooper clip. The clip just helps keep the sensor head in place.
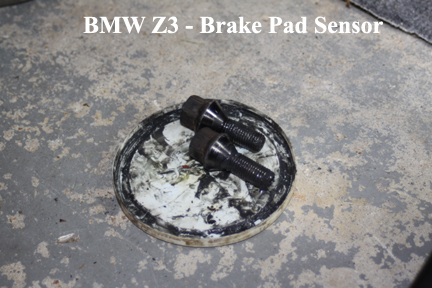
To replace brake pad wear sensor, now unhook from clips holding it in place to the caliper.
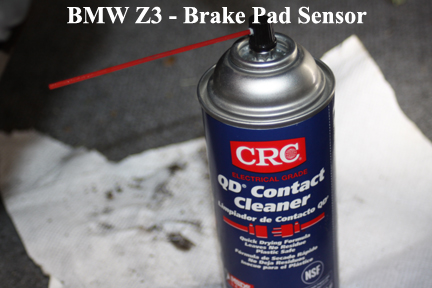
Now use a can of contact cleaner and shoot cleaner up into the wiring harness connector and let it dangle down to let cleaner drain out of it.
Also spray the brake pad wear sensor connector and again let the connector dangle so excess contact cleaner drains out of it.
While you have the connector box open, go ahead and separate the wheel speed sensor from the wiring harness and also spray cleaner on the wiring harness connector and wheel speed sensor connector pins.
Once you have let excess contact cleaner completely dry, slowly insert the brake pad wear sensor connector into the wiring harness connector. Black connector to black connector. You should attempt to line up connector tabs before inserting. If you must turn one connector or the other, do so slowly and when aligned, push connectors together so the tab latches.
If you took apart the the wheel speed connectors, reconnect them now, again, aligning tabs and making sure the tab snaps tight.
Now reinsert the wheel speed sensor connector and brake pad sensor into the wiring box.
Make sure get the rubber grommet that is part of the wheel speed cable and brake pad wear sensor properly seated in bottom of the connector box.
Now snap connector box cover back in place.
Replace wheel on car.
Tip: if lug nuts are dry, a little wheel bearing grease will help get them off the next time lug nuts are removed.
Insert lug nuts and tighten by hand.
Begin to lower the car off the jack but only until the tire begins to make contact with the floor.
Now begin to tighten lug nuts in a crisscross pattern. Use a torque wrench if you have one and set to at least 120 foot pounds.
Lower jack.
Tip: I have never used a jack point on the Z3 where the plastic jack chassis insert did not come out with the jack head!! The plastic jack point insert can easily be reinserted into the chassis
Accessing the left rear brake pad wear sensor:
Maker sure hand brake is pulled, tight!
Using a torque wrench or lug wrench, crack the lug nuts, but not too loose and DO NOT REMOVE.
Insert jack in rear right jack point and slowly raise car.
Once the car begins to lift the right tire off the ground, go very slowly as sometimes the car will try to move on the jack.
Once wheel off the ground, remove lug nuts and remove wheel.
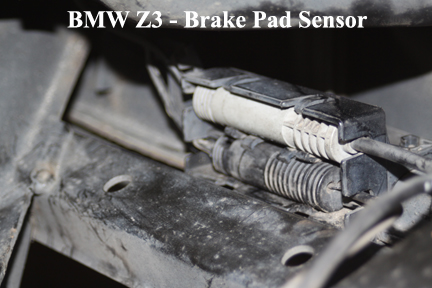
The brake pad wear sensor and wheel speed sensor connectors are in a connector box, positioned horizontally toward the front of the car.
Note that I found the right rear connector box did not have a box face cover!!
Lift box connectors out of the box.
The brake pad wear sensor is the black connectors.
There is one connector on the wiring harness and one connector on the brake pad wear sensor cable.
To separate the 2 connectors, find the tab on the wiring harness connector and depress it while pulling the brake pad wear sensor away.

Replace brake pad wear sensor cable if needed.
Now use contact cleaner on the wiring harness connector and the brake pad wear sensor connector.
Since you have the connector box open, go ahead and clean the contacts in the wheel speed sensor connectors.
Once all contact cleaner has drained out of the connectors, reinsert brake pad wear sensor connector into wiring harness connector,
Also reconnect the wheel speed sensor connectors.
Place both connectors back into the connector box making sure the rubber grommet part of each cable sits correctly in the edge of the connector box.
Close connector box lid and snap into place.
Check everything over.
Replace wheel and hand insert lug nuts and hand tighten.
Carefully torque lug nuts to > 100 foot pounds in a crisscross pattern.
Double check all lug nuts.
Lower car down off jack.
Connector box cover:
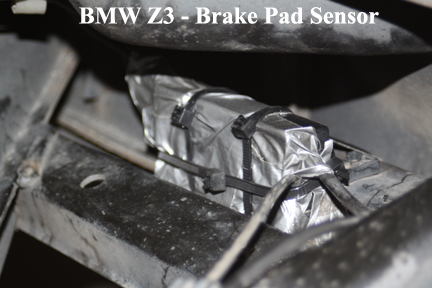
As defined above, there was no cover on the rear connector box.
It should be replaced but until I get to it, I covered the face with duct tape and then cable strapped it into place.