Shared Knowledge
"BMW X5 - How to Replace the Rear Hatch Switch"
20 March 2009
Summary: Relatively easy do-it-yourself (DIY) if wiring harness connector is in good shape, otherwise going to have to cut and solder and more difficult.
Background
X5, model year 2001, 4.4L. Always garage kept (i.e. out of rain 90% or more of time.)
During a recent extended rain where car was actually in the rain for 48 to 72 hours, switch that opens the rear upper hatch began to work intermittently. Once before, right after I bought the car, had to reseat the rear hatch switch and license lights assembly (rear assembly) rubber insert covering the switch but other than that, no problems.
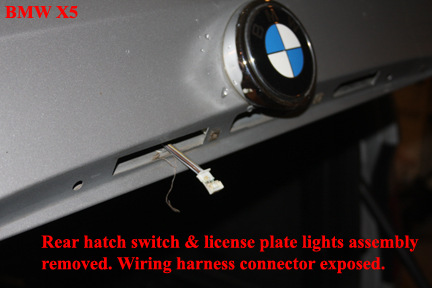
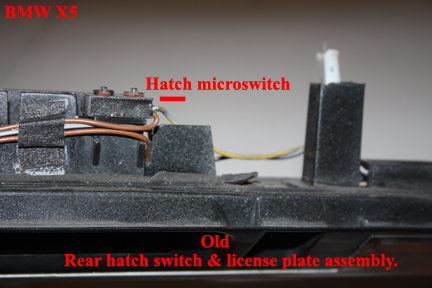
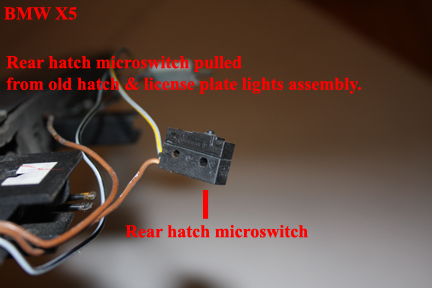
Ok, perhaps the rubber switch cover just needed to be taken out, cleaned and set back in, so I pulled out rubber cover to find it wet on the back side. Not good. Looking up into hole in rear assembly, could not see hatch switch. Could see plastic pivoting arm that rubber cover pressed on to activate switch but no switch in view. With rubber cover removed, pressing directly on the pivoting arm did not change the intermittent nature of rear hatch opening operation.
Ok. Obviously I needed to replace the rear hatch switch.
Go to dealer parts counter and ask for rear hatch switch. Parts guy looks on electronic diagram and says switch not in stock and would be special order but he does have entire rear assembly and perhaps I could buy new and remove switch from it and place on my old rear assembly. Or I could simply use new assembly but I would have to get it painted to match car color as it comes only primed. OK. Not what I had in mind but on some repairs, just have to start and keep moving forward.
So parts guy gets complete assembly out of stock and for $100 or so, I head home.
How to replace the rear hatch assembly in the BMW X5
What follows is how I actually did replace the rear hatch switch. Perhaps you will follow and do it yourself or perhaps just reading will give you an idea of why it costs so much to have dealer perform repair.
1. Using a T20 Torx screwdriver, removed the 4 screws holding the rear assembly to the hatch. As expected when I pulled rear assembly away from hatch, found wiring harness connector going into rear assembly. Ok, just pull wiring harness connector out of rear assembly connector. Well, yeah, but, could not get wiring harness connector to disengage rear assembly connector. One of those, one time insert type connectors? Pulled and wiggled but no use. Went and looked at new rear assembly. Perhaps I could remove hatch switch from new and place on old without removing old from wiring harness connector. Well new rear assembly was completely sealed on the back. Complete new design over the rear assembly I had and although I might have been able to cut into the new and get at switch I needed, really did not want to do that unless I had to, so back to separating the wiring harness connector from my old rear assembly.
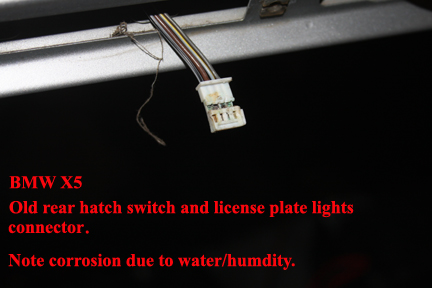
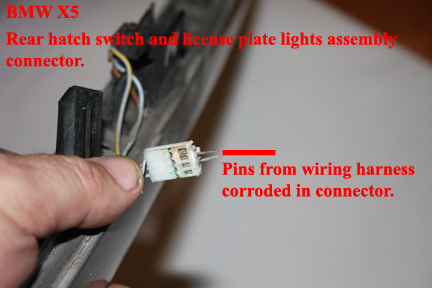
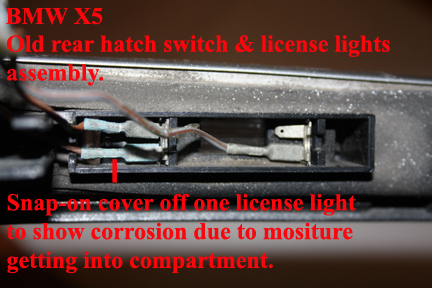
2. Worked connector for a while without any success and so made decision to replace old rear assembly with new and began cutting way plastic tower surrounding rear assembly connector so I could get more directly at the wiring harness connector. Well I cut and cut until both connectors were completely free and upon inspection I could see nothing holding the 2 connectors together other than significant electrical corrosion from connection being wet or being exposed to dampness. So I pull and pull until finally connectors separate but upon investigation, 2 of the 4 rear assembly pins have broken off in the wiring harness connector! Great, just great. Get a dental pick I have and try to get broken pin out of wiring harness connector but quickly became obvious I am going to have to replace wiring harness connector. Besides 2 broken pins stuck in connector, entire connector had just too much corrosion on electrical pins to use connector again. (In the end, fairly sure rear hatch electrical switch problem was caused by corroded connectors junction and not a faulty switch.)
3. Need new connector. Maybe dealer has one or maybe not. Take new rear assembly into my home office and pull out bag of spare computer internal audio cables used to connect a computer internal DVD player to the audio input connector on the motherboard. Need a connector with 4 pins and quickly find a connector with 4 pins although only 3 wires are inserted into the connector. Try this old audio connector on new rear assembly connector and it fits fine other than not having a key on one side to make wiring harness insert only one way. So from another audio connector cable, I pull a pin and insert pin into 4 pin connector I am going to use. (Obviously not everyone is going to have this connector handy. Dealer must sell them and hopefully with a pigtail so you can attach easily.)

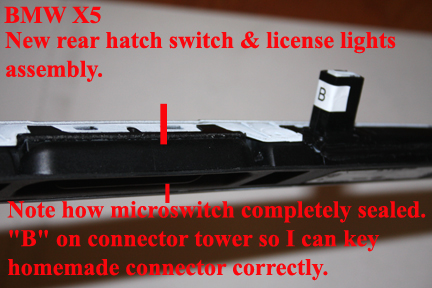
4. Go look at wiring harness connector and find pins from right to left are attached to wires color coded: black, yellow, brown and black with white. Using my new connector, make labels for each wire so when I replace broken wiring harness connector, will attach wires correctly. Also look at old rear assembly and determine how its connector was keyed and make a label for new rear assembly connector indicating where the black wiring harness pin goes (far right pin).
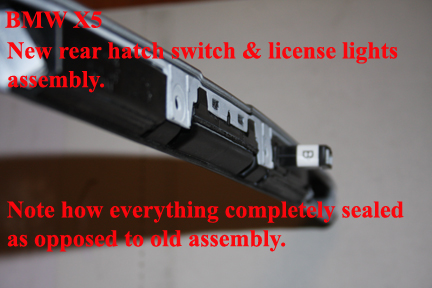
Obviously the initial design of the rear assembly was functional but just could not stand up to the elements long term and so to BMW's credit, the design of the new rear assembly is significantly better in that it is completely sealed other than the rear assembly to wiring harness connector (which in my mind was the source of my problems to begin with).
5. Disconnected battery. Now take wire cutters and cut off old wiring harness connector as close to old connector pin connections as possible. Although there is plenty of room in the rear hatch for lots of wiring harness wire, BMW decided that just enough, was, well, enough. Strip insulation off each wiring harness wire and then connect my new homemade connector following the wire color code. Heat up soldering iron (I always solder when I can as opposed to those screw on wire caps) and solder each junction.

6. Using liquid electrical tape, which comes in a can with an applicator, I apply liquid tape to each junction. Liquid electrical tape is great stuff as it seals completely and stay flexible.
7. Take old rear assembly to local auto parts store and find paint that matches as closely as possible. Tape up new rear assembly and spray paint. Every couple of hours apply another coat. My X5 is silver and thus not terribly hard to match up. If you have an exotic color, might be impossible not to take rear assembly to BMW body shop for painting. And if you take your X5 to dealer to get rear assembly switch repaired, they are going to replace with new and have to paint, thus the high cost when the actual switch or rather the connectors probably cost < $2. Apply many, many, fine coats to new rear assembly. When I satisfied that I have applied enough paint, hold new assembly up to car and see I must apply some sort of clear gloss finish. So go to local Home Depot and buy specialty lacquer and again apply many, many, fine coats.

7. Let liquid tape application set overnight. (Doing painting described above during this period.) To be sure new wiring harness junctions are completely sealed so as to not short against the rear hatch metal or each other and make sure junctions are sealed from moisture, I wrapped each junction with black electrical tape and then used small cable ties to make sure each end of the tape job could not come lose as black electrical tape tends to do over time.
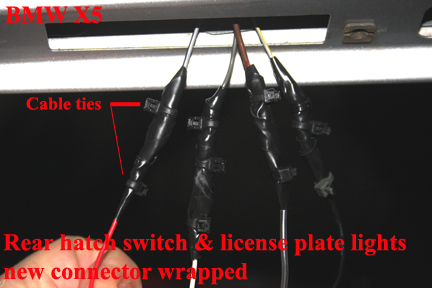
8. Took new rear assembly to car and plugged my homemade connector into connector on assembly making sure my marked black wire went into the furthermost right pin. I pushed the wiring harness connector down tight. Then took electrical tape and starting on rear assembly connector outer plastic tower, wrapped up and around and over the junction of the 2 connectors and continued until I had wrapped an inch or 2 above the connectors, wrapping the wiring harness wires. I then used cable ties at both ends to make sure electrical tape could not come lose. With wiring harness to rear assembly connector junction completely taped, I hope this will keep from a repeat of the corroded electrical pins. Do like the design of the new rear assembly but some sort of rubber boot or sealer should have been included to cover the wiring harness to rear assembly junction.
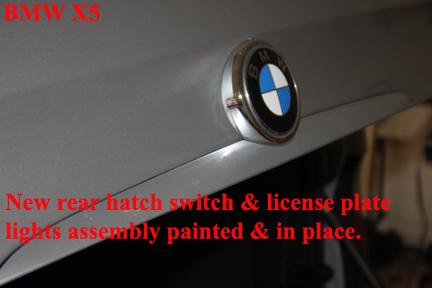
9. Carefully folded the, now longer, wiring harness wires up into the cavity in the rear hatch and using the 4 torx screws attached the new rear assembly. Had 2 screws in place when I noticed that the rear assembly was not lined up correctly with the rear hatch BMW emblem, so loosened screws and gently moved rear assembly into correct position and then screwed in remaining 2 screws.
10. Reattached positive battery terminal and no sparks. Good start. Went around to rear hatch and tried switch. Worked. Turned on headlines and checked and both license plate lights were lit. :)
.jpg)
In the end, whole job took an overnight but that mainly was to apply thin layers of paint and lacquer to new rear assembly and let liquid electric tape drive. Actual working time was no more than an hour.
So you can do this yourself but there is the potential connector corrosion problem to deal with and also the painting of the new rear assembly. Have heard that dealer wants around $100 to install $100 new rear assembly but this probably does not include wiring harness replacement (if needed) and the painting of the new rear assembly to match the color of your car.