Shared Knowledge
"BMW X5 - How to Replace the Oil Separator"
9 September 2008
Updated 27 January 2014
Summary: getting oil separator in and out is not big problem but if clogs in pipes, then full repair is more difficult. Certainly do-it-yourself (DIY) if you have tools and patience. The key is to remove cabin air shroud from fire wall.
Background:
Crankcase ventilation valve = oil separator.
The oil separator uses vacuum from the intake manifold to pull exhaust gases that are a result of combustion leaking past piston rings out of the crankcase, separating any oil out and returning gases to the intake manifold. Any oil that is separated is return to the oil sump.
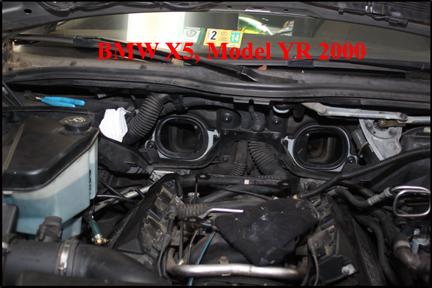
BMW X5, model year 2000, 4.4i.
Oil separator replaced at 105,000 miles when blowing white smoke at each cold engine start. This was oil separator failure.
Oil separator replaced at 187,000 miles when oil would not appear on dipstick after engine hot. This occurred after bitter cold spell and "mayonnaise" clogged separator. "Mayonnaise" is a combination of oil and water that occurs if the engine does not get hot enough to rid itself of water, a bi-product of combustion.
No coolant disappearing either time.
Tools and parts needed:
New oil separator. $30USD or so.
Hoses? Probably not. If hoses are not torn or have a hole, then may need a clean out but can reuse.
Hoses? New hoses are $30USD each.
10 millimeter (mm) socket with ratchet and 10mm wrench.
Perhaps 5mm and 6mm socket and associated ratchet.
Perhaps 5 or 6mm wrenches.
Allen wrenches.
Flat blade screw driver.
Good work light. Not a flashlight.
Cleaning supplies? If hoses are clogged, can of brake cleaner.
If hoses are clogged or you know you can see mayonnaise in separator, car or floor jack.
A magnetic tipped pickup tool is handle as I always drop something.
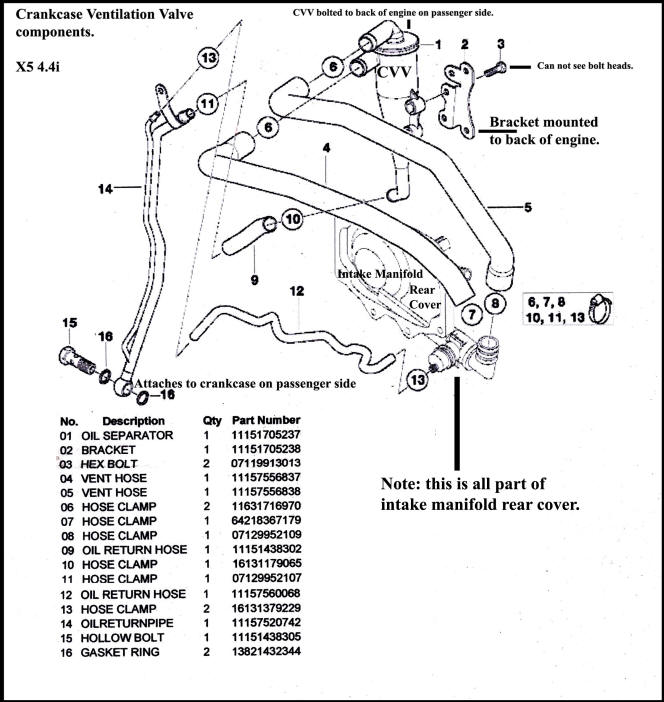
Oil separator and related components:
The oil separator is item 1 on the diagram.
There is a short hose, item 9, that goes from the bottom of the oil separator to item 14, the oil return tube.
There are no hose clamps on either end of item 9 hose.
To remove oil separator:
Park on level.
Pull emergency brake.
Remove acoustic cover from top of engine. This is removed with an Star or Torx wrench.
Oil separator is on left side of engine (USA), at back, facing engine from bumper.
.jpg)
Remove the cabin air filter.
Remove the rubber gasket that goes down over the front (bumper side) of the cabin air shroud. This is simply pressed into place and not glued down.
Look over how the cabin air shroud is attached to the firewall and notice that there are 2 outer sections and a long middle section.
Remove the cabin air filter holder by twisting the thumb locks downward until they pop up and remove holder.
Remove the plastic slides on either side of the cabin air shroud by pulling them upward and out.
Using a 17millimeter (mm) wrench, remove the 2 large nuts on the front of the center section of the cabin air shroud.
Now pull the cabin air shroud straight backwards until it comes off the 2 bolts and you can lift it out of the engine compartment.
With cabin air shroud center section removed, you now have room to work on the oil separator.

The image below is what the cabin air shroud looks like out of the engine compartment.

Remove the 2 hoses connected to the oil separator. With cabin air shroud removed, you should be able to use a flat blade screw driver to get hose clamps off.
Instead of a screw head, your clamps might be 5 or 6mm bolt head type and have to use a socket or wrench to remove clamps.
Move hoses out of way and look over for holes or damage.
.jpg)
Now using a 10mm socket, hoist yourself up on top of engine and feeling around oil separator back, locate and remove the top 10mm bolts holding the oil separator to the bracket mounted to the engine. Do not confuse the bolt holding the oil separator to the bracket it is mounted to, to bolts holding the intake manifold back cover in place.
"Seeing the bolt head in your mind", you want to move your wrench or socket clockwise to remove the first, top, bolt.
Once loosened, you might be able to turn the bolt with your fingers and remove.
Remember and be careful, do not drop bolt when it is loose and ready to come out.
Now locate the second bolt holding the oil separator to the bracket. You will not be able to see this bolt and do not confuse 10mm bolts holding the back of the intake manifold cover in place. The second bolt is just below the hole you now have where the first bolt was attached.
Again, once loosened, you should be able to turn with your fingers and not drop.
With oil separator loose from the back of the engine, you should easily be able to move it around with your hand.
Now look at diagram above of oil separator components.
You will note that there is a short piece of hose connecting the bottom of the oil separator to the metal tube that runs down the side of the engine and attaches to the oil pan.
Note that there are no hose clamps on this short piece of tubing!!
Now with your work light, move yourself and light so you can look down beside oil separator and actually see the end of the oil separator and hose.
Now pull the oil separator upwards and away from the oil return tube and the oil separator will come out either with the hose at the bottom still connected or the separator will come out with the hose at the bottom disconnected. If the separator has never been replaced. the hose can be pretty stuck at both ends and you might have to try to turn the hose by hand, one way or the other until the oil separator comes out completely.
With oil separator removed, look inside ports.
If ports are clean and not full of "mayonnaise" and hoses you disconnected appear clean, then all you need do is install a new separator and reconnect hoses.
If oil separator clogged and/or hoses clogged:
If when you remove oil separator, it is full of "mayonnaise", then there is probably the same gunk in: one or both of the hoses; the short connecting hose at the bottom of the separator and the metal oil drain tube that extends down the side of the engine to the oil sump.
Your choice to either remove and clean the 2 large hoses or simply replace them. In either case they have hose clamps on them that you will have to remove.
In the case of the top hose or the hose that connects to the back of the intake manifold back cover, you will not be able to see this clamp and must feel around for clamp head and remove with 5 or 6mm wrench or socket.
In the case of the hose that connects to valve cover the right side of engine (facing engine), this hose is very tight down in a nest of hoses, but you should be able to see hose clamp head and loosen and then pull hose up and out.
If the inside of the hoses are really clogged, replace.
The main problem with "mayonnaise" in the oil separator is that the metal oil drain tube is probably clogged and will have to be removed and the inside of the tube cleaned.
In the diagram below, the metal oil drain tube is item 14.
As can be seen, the metal tube is connected to the oil sump via a 17mm hollow bolt and washers.
Also, the metal oil return tube is connected to the back of the engine right where the oil separator hose, item 9 and item 13 hose connect. See the metal strap with hole in it?
The bolt through the metal strap is a 10mm. Note that this 10mm bolt is longer than the 2 bolts you removed to get the oil separator out.
To remove the metal drain tube, you going to have to dump oil out of your X5. If you dump into a clean container, you can reuse oil.
Use car jack to jack up X5 on left side (as you face engine from bumper). Jack up enough so you can get under to remove oil drain tube.
Use a 17 mm wrench or socket and ratchet to remove the bolt holding the bottom of the oil drain tube to the oil sump. Again, you remove hollow bolt by turning the bolt counter clockwise.
Note that some additional oil may drip from either the tube or from the hole in the oil sump.
Do not save and reuse metal rings on either side of the hollow bolt.
Now with a 10mm wrench in hand, hoist yourself up on top of the engine and reach down and feel around to find where the oil separator hose and small hose from intake manifold connect to the oil return metal tube.
You will eventually feel a 10mm bolt head.
Use wrench to loosen bolt and then use your fingers to remove.
Now you must remove the small rubber hose that connects to the back of the intake manifold back cover. This might be tight. Do not pull on the hose anywhere except right at the connection. You do not want to break the hose connection on the back of the intake manifold back cover!!!
If the rubber hose refuses to come off or you break it near the tube, do not panic. You can buy another piece of hose and a brass hose connector to connect the existing hose with your new piece of hose.
If the large hose going to the removed oil separator is still in place, you are going to have to try to remove it.
With your work light and you hoisted up on top of the engine, you should be able to look down right where the oil separator was and see the end of the rubber hose.
Then use your hand either on the separator end or the other end to either pull or push the hose off the fitting. Again, there should not be a clamp on this hose.
With both hoses off the metal oil return tube, move it away from the engine back towards the fire wall and then begin to lift upward.
Moving the tube around, you should be able to get it to lift up and out of the engine compartment.
Do not force the metal oil drain tube up and out. Be patient and it will come out eventually without a lot of effort.
With metal oil drain tube removed, take it to a trash can or outside and use brake cleaner to flush out the inside of both the large metal tube and the smaller metal tube. Continue to use cleaner until both tubes run clear cleaner out the bottom.
If you have one, use an air compressor to blow out each tube until you absolutely know it is clean.
Install new oil separator:
Probably just me, but I found the rubber hose going from the bottom of the oil separator to the metal oil return tube to be about 1/2 - 3/4inch too short to ensure both ends of the hose were completely over the end of the metal tube and the end of the oil separator. SO, I bought a foot of hose similar to inside diameter of BMW hose and cut a piece that was 3/4inch longer than original.
Because I did have to remove and clean the oil return tube, I got on top of engine and began to fish it down to the oil sump. It takes a little maneuvering around but I managed to get the tube to line up with where the hollow bolt holds the tube to the oil sump and also where it attaches via the bracket to the back of the engine.
With metal oil return tube in place, and up top of the engine, I move the rubber hose into where I knew it had to connect to the oil separator and then guided it until I found a hole it would fit through and connect to the metal oil return tube.
With an open, loose, hose clamp already on the metal oil return tube, I pushed the rubber hose onto the end of he metal tube and pushed it down until it was almost flush with the bolt bracket. I then slipped the hose clamp in place and tightened it down.
Of course all above sounds easier than it actually is but you will get it if you take enough breaks and whistle while you work.
Now position the new oil separator onto its support bracket on the back of the intake manifold.
Note that there are 3 holes in this bracket and you want to use the 2 lower holes.
Place one of the 10mm bolts through the hole in the oil separator and into the support bracket. Tighten bolt by hand.
Place second 10mm bolt through the hole in the oil separator and into the support bracket and tighten by hand.
Now use 10mm socket and ratchet or wrench to tighten both 10mm bolts.
The (2) 10mm bolts do not have to be torque down super tight. The bolts just keep it in place.
Now reconnect the hose that comes from the intake manifold to the top port on the oil separator and tighten hose clamp.
Connect the lower hose that comes from the valve cover gasket to the lower port and tighten hose clamp.
Look everything over:
Ok, separator is on, all hoses connected. Done.
Not quite.
Time to check everything over.
Remove all tools stuck here and there.
No loose anything anywhere??
Hoses tight on both ends??
If you removed metal oil drain tube, back on right and hoses connected from separator and back of intake manifold??
If you removed oil to remove metal oil drain tube, put oil into engine!!
Once more look everything over. Take a break, go away and then look it all over again.
Start car!
If all seems right with the world, install cabin air shroud and acoustic cover and bask in your victory!!