Shared Knowledge
“Toilet - How to Replace A Toilet Flush Valve”
12 May 2008
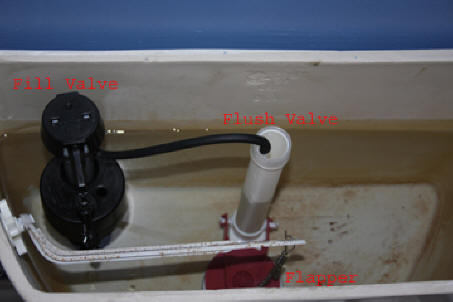
How you know you have to replace the flush valve washer? You can hear or otherwise know the fill valve is periodically topping off the tank and (1) you have already replaced the rubber flapper and (2) you see water on the floor around the toilet or between the tank and the bowl. There are 2 good ways to check to see if there is a leak around the flush valve. (1) Take the tank lid off and flush the toilet and wait for it to completely fill and the fill valve shuts off. Now take a pencil and make the water line on the flush valve. Now turn off the water supply to the fill valve and let the toilet sit for several hours. If when you check the water level in the tank, it is not at the mark you made on the flush valve, then the washer on the bottom of the flush valve is leaking and must be replaced. Or method (2) is to take some food coloring and put several drops into the tank. Now wait for an hour or so and if the bowl water is the color of the food coloring you used, you have a flush valve washer leak.
How you know you have to replace the tank to bowl washer? You see water between the tank and bowl or water running down the side of the bowl every time you flush the toilet.
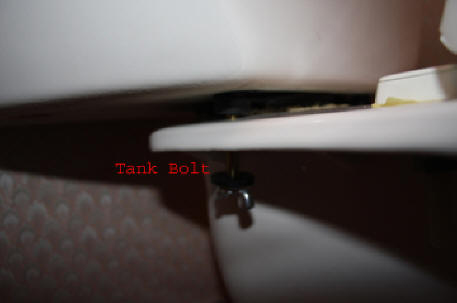
How you know you need to replace the tank to bowl bolt washers? You see water around the toilet in the vicinity of the tank bolts or you can see water actually dripping from where the tank bolts come through the bottom of the tank. Note here, that sometimes a simple tightening of the tank bolts will halt leaks but most likely this will only last for a short time before the washer must be replaced.
Do it yourself or pay a plumber? If you do not have hand tools like screwdrivers, pliers, pipe wrench and do not have easy access to a hardware store and have only one toilet to be repaired then perhaps a plumber is the way to go. Suspect cost will start at $100 and go up to maybe $300 depending on how much repair is done. New toilet, installed by a plumber, is going to run $450 - $600, so unless there is a crack somewhere in the bowl or tank, best to repair.
Do it yourself. To replace bolts, flush washer or tank to bowl washer, you are going to need: a good size flat blade screw drive, an adjustable wrench and\or pipe wrench, plumber's putty, plumber's pipe thread compound, plumber's Teflon pipe tape, a flush valve replacement kit, and a toilet tank washer.
Replacing flush valve, tank bolts and tank washer.
Turn Off Water Supply to Toilet.

Note that sometimes, since
the water supply valve may not have been closed in years, it might start leaking out the
stem end (near handle) as you close it. Be prepared with towels. If this happens, you
might be able to tighten the stem nut on the end using an adjustable wrench. If
the valve leaks even when fully closed, you will have to such the water off to
the house and remove the valve and replace the rubber washer on the end of the
valve stem.
Flush toilet and hold handle down to get as much water out of tank as possible.
Remove tank lid.
Look inside tank and be sure it is empty of water or as empty as it can be. If possible, let the toilet sit overnight to let all remaining water evaporate out of the tank or in the worse case, use rags or paper towels to get the remaining water out of the tank.
Unhook the fill valve from the supply valve.

Reaching up under the toilet
on the water supply line side of the tank, find and unscrew the nut over the
end of the tank fill valve. Most times, this nut will only be hand tight
but then again, you might have to just a pipe wrench to at least loosen it. As with all
bolts and nuts, if the nut does not want to turn, rather than muscle it, back
off and be sure you are turning the correct way. A rule of thumb for must nuts
is: righty tighty, lefty loosey.
Remove the bolts holding the tank to the bowl.
The toilet shown is a Kolher and it uses 3 bolts to hold the tank to the bowl. To remove a bolt, place your flat blade screw driver into the slot in the bolt inside the tank and while holding the screwdriver blade in place, turn the nut\wing nut on the underside of the tank off the bolt. It is possible that the nut or wing nut will not want to come off just with finger pressure and thus a pair of pliers or adjustable wrench might be required. Also note that because of typical toilet locations, it might be a little hard to actually reach one of the 3 bolts. Be prepared to use your less dominate hand or shift your body position as required.


Remove the tank.
With the toilet seat down, place a towel on top of it. Now standing over the tank, lift straight up on it and then lay it on its side on the seat towel. Lay it such that the bottom of the tank is facing you. The tank may weigh 10 pounds or so and certainly can be lifted by one person.
In this picture, you can see the old tank to bowl washer and the 3 old tank bolts sticking through it. I am not 100% sure but believe that only Kohler uses this one single washer for the tank to bowl and tank bolts. Meaning, you might see a smaller washer just around the large hole in the tank and then 2 or 3 bolts sticking through rubber washers independent of the large center hole washer.

Remove the tank bolts

Remove the tank bolts by pushing them from the outside into the tank. If each bolt has its own rubber washer, remove the washer first. In my case, all bolts were tight in the Kohler one piece washer and I gently taped each out using the end of a pipe wrench.
Removing the old flush Valve.
Even if you are taking apart to repair a
defective tank to bowel washer, replace the flush valve. You have the tank off
and it would be a shame to reassemble to find out almost immediately or 2 days
or 2 months later that the flush valve was leaking. Your time is more valuable
than the cost of a flush valve kit.
To remove the flush valve from the tank, the large nut on the flush valve must be removed. In some cases, I found this nut was only hand tight and could easily be removed from the underside of the tank. In other cases, I had to turn the flush valve inside the tank, while holding the nut outside the tank or in an extreme situation, actually cut the rubber washer off the bottom of the tank to gain full access to the flush valve nut.


Remove the tank to bowl washer.
With the flush valve removed, remove the tank to bowl washer. Please note that your washer may not actually be attached to the tank, as shown.


With the tank washer removed
from the bottom of the tank, clean the tank bottom as well as where the tank
sits on the bowl. Any cleaning agent will work but around where the tank and
bowl meet, you might have to scrap any sort of plumber’s putty that was
installed and has now dried.

Installing a
new tank to bowl washer.
In my case, the Kohler tank
washer has the rubber for the tank bolts as a part of a single tnak washer and installation is as easy as inserting the
rubber for the tank bolts into each tank bolt hole. Of course the tank washer
will only go on one way with the flat side of the washer against the tank and
the tank bolt hole pattern aligning with the washer


Above shows the new flush
valve washer installed on the flush valve. Also note that the threads on the
flush valve have been cleaned.

With new flush valve in
place, insert flush value into tank body hole such
that flush valve extends through tank and through tank washer. Then take flush
valve washer and thread onto flush valve. Comment: when putting any nut onto any bolt, always, hand
thread initially. It is very easy to cross-thread a nut onto a bolt if you use
some sort of tool other than your hand. If when you go to thread a nut onto a
bolt, if you meet a lot of resistance or the nut is very difficult to turn,
back it off and try threading again.

With flush valve mounted, now
insert tank bolts. On the Kohler model, the tank bolts just go into the rubber
that is part of the one-piece tank washer. As the rubber is tight around the
bolt, I had to actually use a screw driver to thread the bolt through the
rubber of the tank washer. You do not want to push or drive the bolt through the washer
as that will strip away rubber you want in there as a washer, gasket. On non-Kohler models, you might have 3
separate rubber washers that go under each bolt inside the tank.

With tank bolts in place, now
use plumbers putty and place it around the hole in the bowl where the tank
washer sits. You can use your fingers but after a while, you fingers will get
sticky and you will have to clean them before continuing. The plumbers putty
helps seal the tank to bowl washer. As this putty is going to be back under the
tank, you do not have to be all that cosmetic about applying it. The putty just
needs to be completely around the whole where the washer is going to fit.

With putty in place, lift the
tank and aligning the tank bolts with their corresponding holes in the bowl,
place the tank back onto the bowl.

With the tank sitting on the
bowl, time to tighten the tank bolts. In my case, I used a rubber washer and
then a metal flat washer and finally what I call a thumb-nut as it can be
easily turned by hand. Now since the Kohler has 3 tank bolts, I installed
rubber washer, flat washer and thumb nut on all three bolts and drew them up to
where they beginning to get tight. Now when you begin to crank down on the
nuts, you want to get equal tightness on all or your tank is not going to sit
right, so begin with the 2 bolts opposite from each other and tighten both at
the same time, the same number of turns. Then do the bolt on the rear until it
begins to be about as tight as the other 2 bolts. Then go back to the 2 bolts
opposite each other and tighten some more. Continue moving among bolt nuts
until all are as about tight as you can get them by hand. Do not use a wrench or other tool on these
nuts. Hand tighten only. If all nuts are tight,
you should not be able to wiggle the tank at all and it should be level across
the front of the tank with the bowl.
Installing New Fill Valve.
With tank installed on bowl,
get your new fill valve and adjust the length of valve so it is just about
touching the tank lid. Check this with the new fill valve rubber washer already
in place.


With fill valve seated in
tank, thread the nut that holds the valve to the tank onto the fill valve threaded
shaft. Hand tighten only. Strong hand
tighten.
Now using Teflon pipe thread
tape, wrap the end of the fill valve threads to prepare for attachment of the
water supply line. Comment: you should use Teflon tape on any pipe joint that is
under water pressure. What is not under water pressure? Shower
heads never have any real pressure on them as water is constantly coming out.
Now cut a length of Teflon
tape and wrap the water supply line connection in preparation of connecting the
line between the water supply and the tank fill valve.


Mount flapper valve. The ones
I use are generic and thus have to be cut at the back. Examine your flapper
valve before installing and cut if needed.

Connect the tube from the
fill valve to the flush valve. Tubing comes in a standard length and will have
to be cut to fit your situation.

Check everything twice to
make sure it is tight and then slowly turn on water supply. Run your hands all
around toilet, underneath tank and down bowl sides to feel for any moisture at
all. Should not be any.
If all looks ok, let tank fill and adjust fill valve for desired amount of water in tank.
You may visit
plumberkillara.com.au