
Shared Knowledge
"Samsung NP-N145+ - How to Replace BIOS Battery"
Summary: the NP-N145+ has a removable, replaceable, BIOS battery but motherboard has to be removed from NP-N145 plastic case to replace.
Background:
All personal computers (PC) have what is called a basic input output system or (BIOS).
The BIOS of a PC is the first software to be executed and contains basic information about the PC such as the current time and other system configuration data.
The settings in the BIOS are kept alive when there is no power or battery supplied to the PC by a BIOS battery.
On some PC's the BIOS battery is hard soldered to the motherboard making replacement difficult. Manufactures often consider the life of a PC to be the life of the BIOS battery or from 3 to 5 years.
The life of a BIOS battery is a function of how long the PS is not connected to either a power adapter or charged battery.
Eventually, the BIOS battery will fail and when this does, you may start seeing weird messages at system power up.
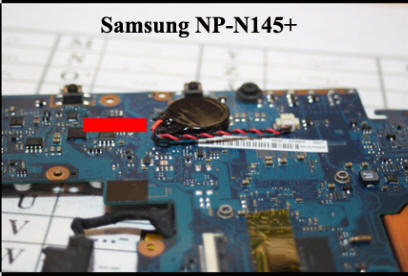
Luckily, the NP-N145+ has a replicable BIOS battery although a wrapped/insulated battery is glued down to the motherboard.
Tools needed:
Very small Phillips screwdriver.
Very small flat blade screwdriver.
You may or may not need a soldering iron, solder and some form of heat shrink tubing or liquid electrical tape.
Source of BIOS battery replacement (eBay, Radio Shack, other).
How to replace the BIOS battery:
Unhook the BIOS battery from the motherboard mounted connector.
Gently pull the BIOS battery away from the motherboard.
Cut the plastic insulation on the BIOS battery so you can determine what voltage it is. Most likely 3.3 volts direct current (VDC) but make sure.
Find replacement battery with attached wires and connector on eBay, Radio Shack or other.
Note here that the connector on the new battery may not match exactly the connector mounted on the motherboard. If this is the case, you going to have to clip the wires on the old battery and on the new one and solder the old connector onto the wires of the new battery.
If you do have to solder the old connector onto the wires of the new battery, make sure you get the polarity correct and that you cover the solder joint either with heat shrink tubing or liquid electrical tape.
Connect new battery to motherboard and spot glue it down to the motherboard.
Reinstall motherboard back into top portion of NP-N145 case.
Reinstall bottom case of NP-N145+.
At next start up:
Because the BIOS battery was removed, the BIOS will come alive in an unknown state and you probably will have to press repeatedly the Function Key 2 keyboard key to get the Samsung NP-N145+ to go into BIOS settings.
Once in the BIOS you will have to set system time and date and perhaps a few other settings but not many, exit saving changes and the NP-N145+ should start normally.
For More Samsung NP-N145+ Click Here