![]()
![]()
![]()
![]()
![]()
![]()
![]()
Ron Stultz
![]()
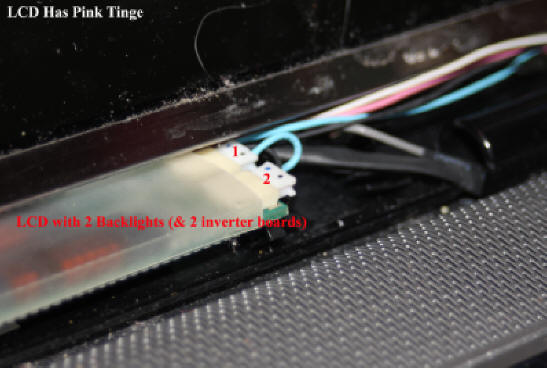
“LCD has a Pink Tinge”
Summary: the lamp at the bottom or the lamp at the top that lights up the LCD screen is going bad. Not an easy do-it-yourself (DIY) repair but can be done.
Background:
Every liquid crystal display (LCD), be it a part of a TV, computer monitor or laptop screen, has at the bottom and sometimes also at the top, running its length, a cold compact fluorescent lamp (CCFL). This lamp looks just like any fluorescent bulb-tube you have ever seen except that the one in a LCD is very, very, small in diameter.
The CCFL "backlights" the screen such that you can actually see what is electronically displayed on the screen.
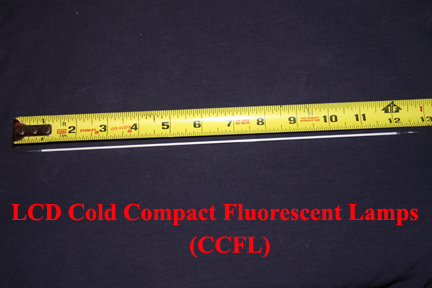
When a CCFL begins to go bad, the LCD gets a pink tinge.
Sometimes the CCFL will only turn the LCD pink at startup and will slowly go away.
After a CCFL begins to have a pink tinge, it can last months, if not years, if used sparingly. BUT, it will eventually fail and your LCD will be dark.
So you have a "device" with a pink tinge LCD, what do you do?
1. If the device is still under warranty, return it to where you bought it. Unfortunately, CCFL replacement is beyond the technical capabilities of most retail store service departments and they will have to send your unit to a manufacturer's authorized repair center. The point here is, if the unit with the pink tinge is a laptop, make sure you make a backup copy of all critical data before surrendering your laptop. Count on being without for 2 weeks, at least.
2. If the device is not under warranty and there is no way you can do any work yourself on the unit, you can: (a) have a manufacturer's authorized repair center replace the CCFL; (b) have a repair center replace the entire LCD or (c) just junk the entire device. CCFL replacement will be cheaper than LCD replacement. Expect to spend $150 - $300 for CCFL replacement. Expect to spend $600 - $1000 for the replacement of the entire LCD. Note that besides manufacturer authorized repair centers, there are repair centers advertised on the Internet that charge less for CCFL replacement but still expect to spend $100 - $250.
Do It Yourself (DIY)
I have replaced the CCFL in several laptop LCD's and the entire LCD on several other laptop units. As defined above, entire LCD replacement is more expensive than CCFL replacement. As I was working on older laptops, CCFL's cost about $40 each (cheaper in quantity), while the entire LCD (usually bought as part of a "non working" laptop) ranged from $60 - $100. CCFL are available from various Internet sources to include eBay. Entire LCD's are available from various sources to include the manufacturer (sometimes if the unit is not too old) or various laptop part websites or eBay. Be aware that sometimes the manufacturer wants more money for a new LCD than you will have to spend on eBay for a complete used system!
Whether you are going to replace the CCFL or the entire LCD, remove the power adapter plug and the laptop battery.
Replacing the entire LCD is a lot easier than replacing a CCFL.
To replace the entire LCD or CCFL:
Tools needed (remove complete LCD from laptop):
- Small Phillips head screwdriver.
- Med size flat blade headed screwdriver.
- Exacto knife or other sharp "knife-like."
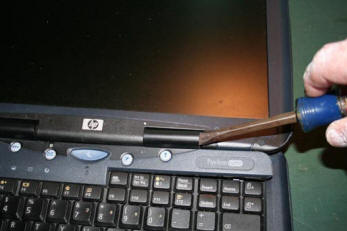
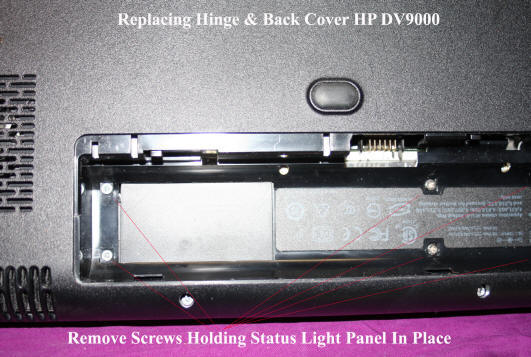
1. You usually have to remove the laptop switch board or lights status panel to get access to LCD hinges and LCD cables. This panel or board sits between the LCD and the keyboard. The switch board or lights status panel can be held in place by screws in the bottom of the laptop or along the back or simply "snapped" into place.
Below are samples of how you remove a switch board or lights status panel.

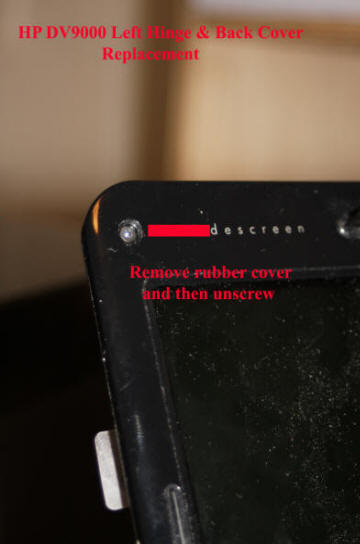
2. Looking at the front of the LCD, you should notice that at the 4 corners and perhaps in the center at the top, there are small round rubber/plastic bumpers or hole covers. Underneath each cover is a screw, which holds the bezel to the LCD. Using an Exacto knife or other sharp pointed instrument, pry up each sticky back bumper, stick it to a slick surface for safe keeping and then remove the small Phillips screw that is behind the cover.
3. Once you are sure you have removed all screws holding the bezel to the back cover of the LCD, starting on one side, use your hands to pry up the bezel such that it unsnaps from the back cover. Besides the screws you removed, the bezel is snapped to the back cover. Once you have the bezel lifted up and unsnapped from one area, move your hand gradually around the bezel and back cover unsnapping as you go. Once you have completely unsnapped the bezel, remove it from the LCD back cover and set aside.
.jpg)
.jpg)
4. You now unhook the data cable from the laptop that goes to the LCD and also the cable that goes to the LCD inverter board.
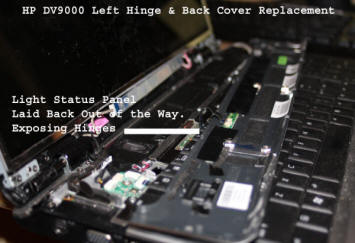
5. On some laptops, the hinge covers are part of the switch board or status light panel and on other laptops, the hinge covers are separate. If your hinge covers are still in place once you have the switch board or lights status panel out of the way, remove the hinge covers. In most cases the hinge covers will be held to the laptop frame by a single screw but after this screw removal, you may still have to use a flat blade screwdriver inserted between the hinge and the hinge cover to pry the hinge cover off the hinge. Of course, do very slowly here as you do not want to break either the hinge or the hinge cover.

6. With the hinge covers off the hinges, remove the screws (2 or 3) at each hinge that holds the hinge to the laptop frame. Once these screws are removed, you should be able to lift the entire LCD unit off the laptop.
7. Replacement LCD. You want to procure a LCD for your specific model of laptop. Also note that manufacturers do sometimes change LCD suppliers during a production run and a replacement may work in your system but require changing motherboard jumpers. (Check this out!) If you bought a replacement LCD that is complete to include back cover and bezel, you should be able to simply attach it at the hinges, reconnect all cables, replace the bezel and switch board or lights status panel and you are done.
8 If you bought just a replace LCD, you are going to have to remove the LCD back cover from your old LCD. To do this, at each hinge, remove the screws that go through the hinge into the back cover. Once the back cover is loose, remove anything that is a part of the back cover such as a webcam, microphones, wireless antenna's, etc.
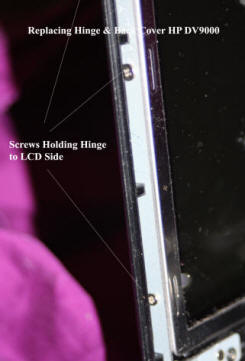
9. Now remove the hinges from your old LCD. To do this you remove the small screws on each side of the LCD that hold the hinge to the frame of the LCD.
10. Now you need to reinstall all items that mount to the back cover, attach the hinges to the side of the LCD frame and reinstall the new LCD to your laptop.
To replace a CCFL:
Ok, at this point you have the LCD off the laptop and the back cover and hinges removed.
From experience, there are 2 important keys to a successful CCFL replacement: (1) measure your current CCFL carefully and if you can not find an identical length match (will be specified in millimeters), buy a CCFL that is slightly shorter in length and (2) the real problem with CCFL replacement is making sure the soldered ends of the lamp do not short to the metal frame around the LCD.
Tools & Supplies Needed:
- Wire cutters.
- Needle nose Pliers.
- Spool of "wire wrap type", very small diameter, wire. (Radio Shack is one source for this.)
- Small heat shrink tubing. (Radio Shack or computer store are sources for this.)
- Medium power soldering iron. (A very low watts soldering iron may work but medium wattage will be better.)
- High quality, resin core, solder. (The smaller the diameter, the better. Available many places.)
- Small can of liquid electrical tape. (Home Depot or any good size hardware store.)
- Volt meter with a continuity setting or other device to test for electrical short.
1. Holding LCD in your hands and rotating it slowly around, examine how the metal frame is held in place around the LCD. What you are going to have to do, is somehow get into the bottom of the LCD where the CCFL is located. On some LCD's, once the metal frame at the bottom of the LCD was loosened I was able to slowly withdraw the CCFL out one end. Now understand that the CCFL is a long, small diameter glass tube that is easily broken, so go very, very slowly.
2. Once you have the CCFL out of the LCD, you will need to unsolder the wires at both ends. Now if the CCFL has never been replaced, there will most likely be a rubber cover over the very ends of the CCFL that you will have to remove before you can unsolder wires. Also note that on some LCD's I have found that both wires to the CCFL are routed to the left end of the lamp and a very small, insulated strip of metal is used to carry voltage to the left end of the lamp. I have never been successful in reusing this small insulated metal strip as a wire.
3. Once you have the CCFL out of the LCD, you need to measure it and procure a replacement lamp that is equal to the lamp you have or perhaps a little smaller. Now CCFL's are measured in millimeters. For reference, 1 inch = 2.54 millimeters and so for example, a 15 inch laptop screen may use a 35 millimeter CCFL.
4. Now I have found that the wires soldered to each end of the CCFL are actually so short that they limited my ability to properly solder them back on the lamp and then route down to the inverter board. So, what I do is use very thin, "wire wrap" wire to extend the length of the CCFL wires. What exactly I do is use an Exacto knife to scrape the insulation off the end of the wire wrap wire and then loop it around the long lead on one end of the CCFL and then carefully solder it in place. Note that in all soldering, you want as minimal solder as possible as there is very little space between the ends of the CCFL and the metal frame around the LCD. When soldering to the CCFL, you want the wire wrap wire to be close to the actual glass part of the lamp but not so close that you could not unsolder the wire and solder again if needed. Once wires are soldered to each end of the CCFL, wire cutters are used to careful clip the long leads of the lamp.
5. With new "wire wrap" type wire soldered to each end of the CCFL (solder on at least 6 inches of wire wrap wire), I use liquid electrical tape to cover the solder connection. Again, the space between the end of the CCFL and the metal frame around the LCD is so small that an electrical short is possible if you are not careful.
5. Once the liquid electrical tape has dried, I carefully reinstall the CCFL back into the LCD frame such that the left wire wrap wire runs along the length of the lamp and comes out on the right end of the lamp with the other soldered wire wrap wire.
6. I snap the LCD frame back together.
7. I now use the Exacto knife to scrap off insulation from both CCFL wire wrap wires. Using my voltmeter, I set it for continuity check and test that the leads to the CCFL are not being shorted together by the metal frame surrounding the LCD. If there is a short, I remove the CCFL from the LCD frame and examine each soldered end. Perhaps it needs more liquid electrical tape.
8 Once I am sure that the CCFL wires are not being shorted by the LCD metal frame, I take the CCFL's inverter connector wires and strip the ends of them just a little beyond what they had when attached directly to the CCFL. I then slide a piece of shrink wrap tubing over the end of the wire and slide it down far enough so soldering iron heat will not impact it.
9. I layout the wires coming from the CCFL and the inverter connector wires and determine what actual length I want the wire wrap wires to be and then click them with my wire cutters. I then strip insulation of the wire wrap wires and twist them onto the 2 inverter connector wires. Here you do not want a lump but rather a more or less straight connection as after soldering, you are going to slide the heat shrink tubing over the junction and heat the tubing to shrink around the soldered connection. If the soldered joint is too large, the heat shrink tubing is not going to slide over top.
10 With the wire wrap extension wires soldered to the wires going to the inverter connector, I slide the heat shrink tubing up and over the soldered connection. I then use a cigarette light or match and slowly move the lighter under the tubing to get it to shrink down tight on the junction. If you do not have a match or lighter, you can use your soldering iron, slowly moving it back and forth underneath and on top of the tubing.
11. With the new CCFL back in place in the LCD and the wires connected to it not shorted and the LCD inverter connected attached to the CCFL, you can test your new lamp at this time, if you are careful. To do so, connect the LCD data cable to the laptop and then connect the inverter board to the laptop and finally connect the CCFL to the inverter. Now plug your power adapter to your laptop and power "on" the laptop. You LCD should not show system startup and there should be no pink tinge.
12. If all is well, you will need to install the hinges to the sides of the LCD frame, all items to the back cover, the back cover to the LCD, etc. etc.
Finally, I can not emphasize enough that a CCFL is very, very fragile and that because of limited space, it is easy to wind up shorting the lamp ends against the metal frame of the LCD. If your CCFL is shorted to them metal frame, the inverter board will likely be ruined and you will have to track down and procure one of these ($30 - $100 depending on laptop model.)
If you are attempting a CCFL replacement for the first time, I recommend you buy 2 lamps. It will take several days for you to receive your lamp once ordered and then if you break it, you will have to wait another so many days for the second lamp.
From beginning to end, expect to spend, 2 - 3 hours doing a CCFL replacement.
And when you turn your laptop on and that LCD lights up all bright with no pink tinge, think of what you have accomplished. Not 1 out of 100,000 people could do what you have just done. :)