.jpg)
Shared Knowledge
"Jenn-air Electric Oven, Natural Gas Burners - Gas Burners, Igniter (Spark Unit) Replacement"
27 January 2019
Summary: Have to pull unit completely out of counter but spark module easy replacement.
Background:
Jenn-air Model JDS9860AAP, electric oven, natural gas stovetop, burners (4).
Natural gas spark igniters at burners intermittent (not just one out but rather no spark from any of them).
From wiring diagram, only gas controls switches and spark module could account for problem.
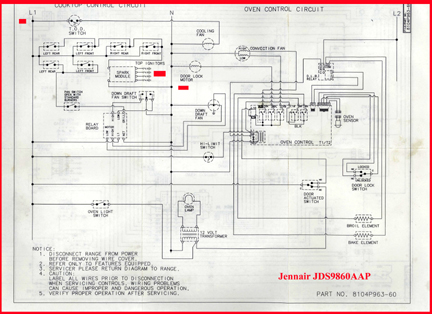
Note: upper left corner shows 120volts alternating current (AC) going through gas control knobs to spark module.
Pan switch and auxiliary relay board are not involved in getting spark unit to ignite burner gas.
Overview:
"Spark creation" module is mounted to back of Jenn-air so have to remove unit completely from counter.
Have to shutoff power to Jenn-air and circuit breaker box.
Have to turn off natural gas and disconnect flex hose from natural gas line at gas line connection.
Have to disconnect down draft flex hose from Jenn-air to floor mounted blower housing.
Have to disconnect cable from Jenn-air to floor mounted blower.
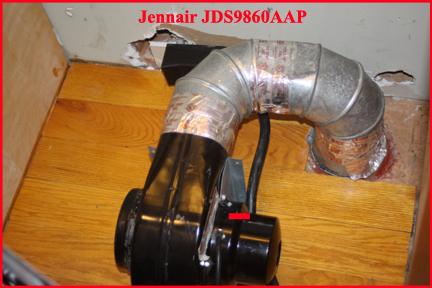
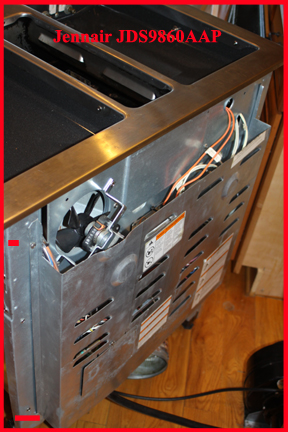
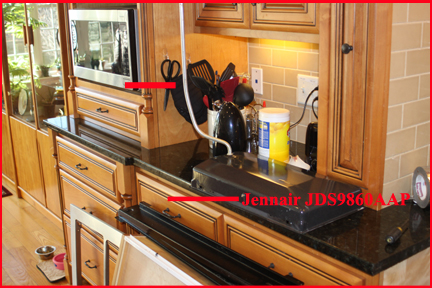
Image below shows what is under Jenn-air. Black box behind duct work is 240VAC connection. Although not shown, natural gas line come from right side of image through cabinet wall.
Note: your configuration could be different as to location of power outlet, gas line and ductwork.
Note: you are going to need some sort of duct tape to reattach down draft flex hose to blower. Suggest strongest stick version you can find.
Replace Spark Module:
At breaker box, turn off breakers that control power to Jenn-air.
Remove lower panel by pulling top outwards and then lifting pan at bottom.
Open door to first stop and then lift it off door latch.

Disconnect down draft flex hose from floor mounted blower unit. Might be held in place with lots of tape but have to get it off and pushed to left so it will clear floor mounted blower.
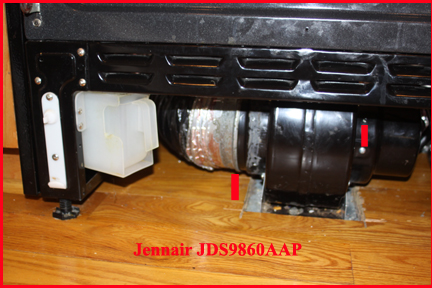
On blower unit, squeeze cable connector from front to back and lift it gently off blower connector. Cable should be placed under Jennair so that it will not be caught when you pull unit out.
Gas line flex hose. In my case gas line flex hose comes through right side of cabinet and connects to gas pressure regulator on frame of Jenn-air.
To pull Jenn-air out, I had to begin to pull and work gas line flex house slowly out of the cabinet wall so it was outside the cabinet and would not interfere with pulling unit out.
In my case, the Jenn-air was not attached in any way to back wall. You might have some sort of anti-tipping mount to deal with, don't know.

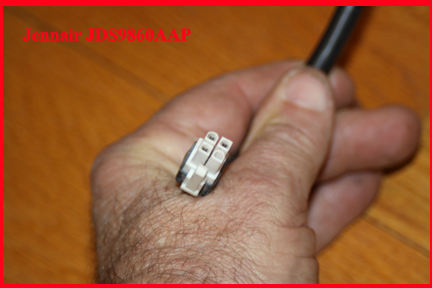
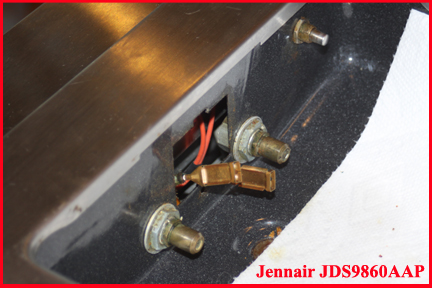
Note: you might think that the chrome bezel around the top of the Jenn-air should be removed before moving and at first inspection, appears to be only held in place by screws like one shown above but unfortunately, there are screws in the sides of the Jenn-air frame that keep one from removed the chrome bezel with Jenn-air in counter.
With down draft hose disconnected, natural gas flex line disconnected from gas line and cable from Jenn-air to blower motor disconnected, from the front begin to pull the unit straight towards you. It is not overly heavy and should begin to move.
Note: in my case 240VAC power cord fits over duct work and is very tight and in initial pulling met a lot of resistant of power chord moving across top of duct work. Keep pulling.
If you hit heavy resistance in pulling unit out, stop and using a flashlight, look underneath for anything that could be causing the Jenn-air to not move.
Once you have gotten the Jenn-air out far enough, unplug the power cable from the wall outlet. This is a heavy 240VAC chord and might take some wiggling to get plug removed.
With power chord loose from wall, pull Jenn-air out of counter so you can get to back easily.
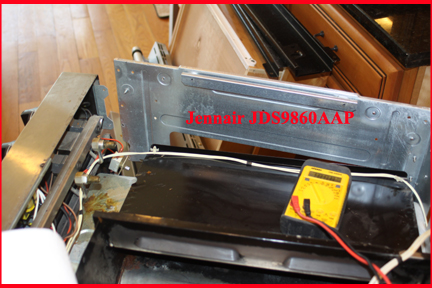
Below shows back of Jenn-air with metal cover in place over back mounted components.
Note: in my case, installer cut off top portion of back cover as it must have been interfering with counter top when first installed.
Remove back sheet metal cover. Cover is corner tabbed at bottom and then sheet metal screws. Remove screws and then pull up on cover and remove.
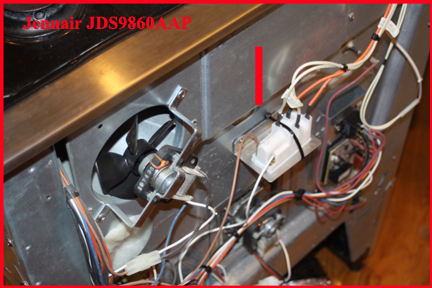
The spark module is the module with 6 wires to it. The 120VAC line and then one wire to each of the stovetop burner igniters.
Note: with back cover off, do examination of all wires, connectors, boards, etc. Looking for "trauma" of any kind such as burnt wires, blackened components, etc, etc. If you find anything, consider calling a service technician.
The original spark module is held to the support bracket by it being tabbed into slots on either end. To remove, need to pull on one end and upward and once that end above support bracket, pull slightly and lift other end.
Note: your spark module may look different and mount differently (if might have been replaced once already).
Note: in my case, new spark module had one of the 2 tabs broken so I had to secure new module with a cable tie.
Take your new module and hold along side old module. Now one at a time, move wires from old to new. Makes no difference location of orange and white wires but brown and white (120VAC) must go on end terminals.
With all wires from old moved to new, check that each wire is securely pushed on on spark unit terminal.
Take a break, move away from Jenn-air.
Now before replacing back cover, double check your work on spark module and again look for any signs of "trauma".
With spark unit mounted and wired, reattach back sheet metal cover.
Jenn-air back into counter:
With back cover in place, move Jenn-air close enough to counter to get 240VAC power chord into outlet.
Before pushing Jenn-air completely into counter, going to check spark unit operation.
With no natural gas connection, Jenn-air plugged into wall, restore power to Jenn-air.
Now rotate one of the gas valve knobs all the way to "ignite" and check that you have spark at each of the 4 burners.
If all is good, at breaker, turn off power to Jenn-air.
Now move Jenn-air to align with countertop and align natural gas flex hose so it will eventually line up with gas valve or hole in wall or however it connects to gas line.
Note: In my case, back edge of chrome bazel has to be slightly lifted up to fit on top edge of marble countertop.
Ensure down draft hose off Jenn-air is in front of blower collar and will not interfere with moving the Jenn-air back into counter.
Slowly push Jenn-air into counter. As down draft hose approaches blower unit, make sure it clears unit.
Note: in my case, 240VAC chord had to ride up over duct work and so as I pushed near the end of the Jenn-air unit install, I met strong resistance but had to continue to push for Jennair to mount completely into counter.
With Jenn-air completely in counter, need to reattach blower cable to blower by aligning connectors and pushing cable down.
With Jenn-air completely in counter, need to fit down draft flexible hose back over blower collar and secure hose. Here I used a flexible, strong, form of duct tape.
Reinstall lower panel on front and oven door and turn on power to unit via breaker.
Igniter Problem
So when I tested new spark module, one igniter was not sparking? Problem with spark unit, wire from spark unit, spark wire connection on stovetop? Other?
When my Jennair did work, sort of, (before spark module replacement), all igniters sparked or so I thought, so new problem related to module or wires or connector?
So what follows is a thumbnail of what I did to get my bad igniter to work....not extremely detailed but gives you idea if you have to go here.
To remove burner assembly, must lift gently from the back then slightly up at the back and then pull it away from front slowly so as not to damage to 2 prongs sticking out of the end of the assembly.
With burner assembly out, the spark and natural gas connections look like below.
The spark connector is ceramic and can be easily broken so be careful with it.
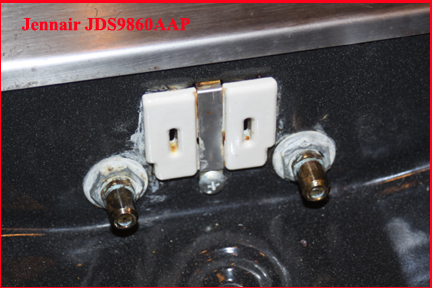
Removed screw below ceramic connector, lifted off metal clip and ceramic connected tilled forward and I lifted it gently out of stove.
Wires are held into ceramic by compression. A slight depression of one side tab and wires can be pulled out.
With wires out, checked wires and appeared fine but still cleaned them with electrical contact cleaner (comes in a spray can).
After cleaning wires, reinsertion into ceramic connector, I again applied power and spark still not working like it should, so..removed "pan" to get access to spark wires from spark module to ceramic connector.
Had to pull unit out of counter again and remove chrome bazel. Screws on the inside are obvious but also has several screws going through the frame at the sides and back of the frame.
To remove "pan" remove nuts holding gas pipes in place, removed ceramic connector and screws holding pan to Jennair frame.
Pan needed to be moved towards the back to clear gas pipes but met resistance and discovered pipe attached at bottom of pan that goes all the way down to grease cup. I was able to lift pan out with this pipe attached.
Below shows "pan removed" allowing access to wires coming from stove back mounted spark unit.
Below shows "pan" removed with grease pipe still attached.
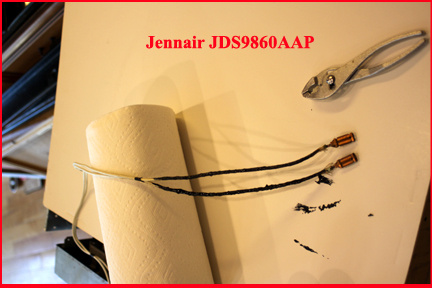
From spark unit on back, wires from unit (white in my case) come directly to ceramic connector on front and upon examination, found 12 inches or so were totally covered in grease.
The spark wires are not ordinary wire as voltage of spark is high so with grease on them soaked into insulation concerned that spark actually not making it to ceramic connector but rather jumping to frame instead.
The try to "fix" this problem with out searching for replacement wire, I cleaned wires and then coated with liquid electrical tape (can from hardware store).
With electrical tape dried on wires, put wires back into ceramic connectors, put pan back in place, secured gas lines and tried spark unit again. This time, spark at all igniters.
Now, hours later, still a problem with one igniter. Have ordered replacement igniter as possible after cleaning of entire unit, igniter could have been damaged. If new igniter does not cure problem, will replace wires from spark unit to ceramic connector as must be shorting to ground somewhere.
A day later: all igniters working 100%. Did take electrical contact cleaner to the spark prongs sticking out of the burner assembly but suspect liquid electrical tape just needed time to properly dry to insulate wire from spark unit to burner assembly.
Oven Door Latches:
If you are having squeaking nose when you open or close the oven door, this is a good time to replace latches. Easy replace.