Shared Knowledge
"Hydronic Heating System - How to Install a Whole House Air Scoop"
10 November 2010
Summary: Every hydronic heating system needs a whole house air scoop. This device will end all your air-in-system problems. It is not difficult to install but if you have no copper pipe soldering experience, pay to have installed.
Background:
Bought a home with a hydronic heating system.
Knew nothing about hydronic and technicians I called in to "ready" system for winter also knew nothing.
Struggled with air in system for years, slowly learning system and how it worked.
Finally realized, never going to get air out of system without installation of a whole house air scoop.
Having soldered cooper pipes before, I did the job myself, but if you paying a plumber expect maybe a $600-$1000 bill for the entire job.
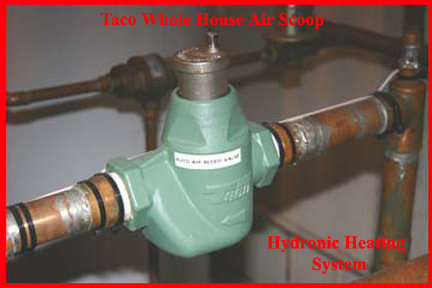
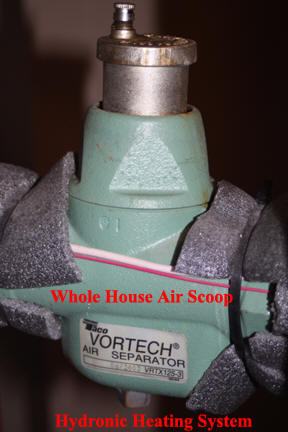
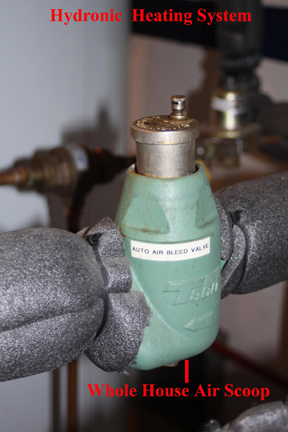
The one I installed is a Taco Vortech Microbubble Air Eliminator, $219. This air eliminator is inserted in the line coming directly out of the furnace before any of the zone valves or expansion tank. (In my case since I have a 1.25" line coming out of my furnace, I ordered the model VRTX 125 directly from Taco. Note that Taco makes these valves in sizes from 3\4" all the way up to 2".
Do-it-yourself (DIY) tools required:
Pipe cutter. A pipe cutter large enough to accommodate the size of the pipe coming out of your furnace.
(Note: never hacksaw copper pipe. You will not get a straight cut and you will leave burrs on the end of the pipe.)
A copper pipe soldering kit (flux paste, emery cloth, solder).
Note: solder does not have to be "lead free" but should be fairly large in diameter.
A propane torch. The torch should have a hose between the propane cylinder and the torch head. A normal torch where the torch head is screwed directly into the cylinder will tend to flame-out as you turn the cylinder upside down to use the torch head soldering your air scoop in place.
Adjustable pipe wrench large enough to fit around the air bleed valve top of the air scoop.
Work gloves of some type to protect from accidental propane torch touch and dripping solder.
A light coat or long sleeve shirt to protect from dripping solder.
A bucket to catch water.
Installing whole house air scoop:
The whole house air scoop is installed in the large pipe coming out of the furnace carrying heated water and before any zone control valves.
Drain the water from the section of your system where the scoop is to be mounted. In the worse case, this will mean draining your entire system. In my case, I was able to isolate the section of pipe via valves such that when I cut the pipe, only water in several feet of pipe drained out.
As you will be using an open flame around your furnace, if you know how, shut off the natural gas or oil to the furnace.
The whole house air scoop will come with information about the size of the scoop body between the inlet and outlet connections.
You will need to mark the furnace cooper pipe for the size of the air scoop body and cut out this piece of pipe.
Note: you want the ends of the copper pipe to insert fully into the inlet and outlet ports of the air scoop so only cut a section out of your system pipe large enough to accommodate the air scoop body.
As when cutting anything, double and triple check your measurements, marks, before cutting.
Before cutting, make sure the pipe you are going to cut has enough "play" in it to allow you to insert the air scoop. What I mean by this is, in my case, the inlet side pipe goes directly to the furnace and the pipe can not be moved slightly out out of the way to allow insertion of the air scoop. However, on the outlet side of the air scoop, the cooper pipe goes to Taco zone control valves and can be moved slightly without breaking any existing solder junctions/joints.
Position your bucket under the pipe to be cut and make the first cut slowly. Any water in the pipe should begin to drain down into your bucket.
Make the second cut, again with your bucket under it.
Cooper pipe will never solder correctly if there is any water in the pipe, so you must swab out any water you can see in the ends of the pipe and then let the pipes sit for a couple of hours to make sure an residual water is gone.
The cooper pipe to be soldered must be absolutely clear, clean of any water on the inside of the pipe.
Take emery cloth of solder kit and buff cooper pipe ends. You want to buff off any burrs left from pipe cutting.
Emery cloth brighten the ends of the cooper pipe out to and beyond the amount of pipe that is going to be inserted into the inlet and outlet ports of the air scoop.
Use a paper towel or cloth to clean any emery cloth residual from the ends of the cooper pipe.
Now take the air scoop and try inserting it into the cooper pipe.
Looking at the arrow on the air scoop, make sure you insert the scoop in the direction of heat flow (furnace, through scoop, to zone control valves)
Insert the air scoop into the cooper pipe side that has the least amount of "give" first and then the other side.
The air scoop is going to be tight so you may have to push and gently twist at the same time.
If you must pull pipe backwards to get the pipe to insert into the air scoop do it very slowly and carefully.
Once the air scoop is inserted between the pipe ends, does it look right?
Are the pipe ends butted up again the inlet and outlet port flanges of the air scoop?
The pipe ends need to butt up flush with the inside flange of the air scoop on both sides.
Is the cooper pipe bright and shiny well beyond where it is inserted into the inlet and outlet ports on the air scoop??
Double and triple check.
If required, cut off a little more of the furnace copper pipe on the side with the most amount of "give" or "play".
Again, you do not want the pipe to be too short in that both ends go all the way into the air scoop body.
If you are comfortable that the air scoop appears to be ready to solder, slowly and clearly remove it from your system pipe.
Once again, cloth or paper town wipe the ends of the pipe.
Once again, make sure there is no water inside the pipe ends and swab out if required. As noted above, solder pipes just will not solder correctly if there is any moisture, water inside the pipe ends.
Now using your solder flux paste, apply flux paste completely around both ends of the cooper pipe all the way out to and slightly beyond where the pipe is shiny from emery cloth cleaning.
Make sure the flux is covering the pipe ends completely and evenly.
Now insert the air scoop back into the system pipe.
The air scoop should go into the pipe ends more easily this time because of the flux paste.
When you are sure the pipe ends are inserted fully into the air scoop and that the air scoop is inserted correctly into the system pipe and the air scoop is more or less vertical to the pipe, time to solder.
Put on coat or long sleeve shirt.
Clean area under where you are going to solder of any tools or anything that solder could drip on.
Take the coil of solder and unwind about 2 to 3 feet of it and cut it off coil. Straighten solder.
Put on work gloves.
Now place propane cylinder in a bucket so as to keep it upright during soldering, place bucket such that you have enough hose length to move the torch head completely around both ends of cooper pipe to be soldered.
Open valve on propane cylinder and then ignite torch.
Adjust torch to where you have a nice steady, not too long or high, flame.
Now with solder in one hand and torch head in other, place torch flame blue tip end on one side of the air scoop cooper pipe.
Place the flame on the cooper pipe just beyond where the pipe enters the air scoop body.
Move the flame around and over the cooper pipe for several seconds getting the pipe hot.
Move the flame completely around the pipe to include the underside and the backside you may not be able to see very well.
Now with the torch flame a little ways out of the junction of the air scoop and the cooper pipe, take the end of the solder and place it right at the junction of the air scoop and pipe.
Moving the torch flame slowly around the cooper pipe, if the cooper pipe is hot enough, solder will begin to melt and as the flux paste melts, pull solder back into the junction.
Slowly push solder as it melts and runs completely around the junction.
Do not place torch flame on solder. Always heat the junction metal, never the solder.
Continue to push solder and let it melt and run into the junction.
Some solder may drip off the junction.
Continue to push and melt solder, slowly moving the torch flame, until you are sure there is solder all the way around the junction.
Remove torch flame from pipe and shut down torch.
Take a short break while the one side of the air scoop cools.
The soldered junction does not have to look pretty but it should be obvious that the solder has been pulled back into the air scoop body junction and properly melted to the pipe, meaning you can not see any gaps between the solder and the pipe.
Check your solder. You know how much you cut off to begin with. Do you have enough left of the initial piece to solder the other junction? If not, cut off another long piece from the solder coil.
When ready, with gloves on, ignite your propane torch and solder the other air scoop junction.
When complete, turn off torch and close valve on propane cylinder.
Let the second junction cool.
Once again, look over both junctions to make sure the solder has melted properly to the pipe and lip of the air scoop.
If it appears that one junction is not 100% correct, you can try applying more solder via the torch.
Once again, heat the pipe and not the solder. When the pipe is hot enough, the solder will melt and flow.
If you are 100% comfortable your junctions are good, clean up the area.
Now check to see that the top of the Taco air vent is nice and tight on the brass cylinder sticking up out of the Taco scoop body.
The air bleed valve on the very top is like any other air bleed valve and must be slightly open for air to be released.
When both soldered junctions are completely cool to a finger touch, allow water back into the section containing the air scoop. If water leaks or even "weeps" at a junction, you will have to do some or all of the above again. (Note: do not confuse flux paste and water. There may be some flux paste on the pipe you can easily wipe off.)
With water back in the section that now has the air scoop installed, get system cold water pressure close to normal. If you do not know how to do this, consult another of my sections related to hydronic heating.
Now place your bucket under the air scoop and using a pipe wrench, unscrew (counter clockwise to loosen/remove) the top of the air bleed valve that is on top of the air scoop and pulling straight up, remove the top. Some water will come out but it should stop after a short while.
Now use a cloth or paper towel to wipe out the inside of the air bleed valve body. It is possible that some flux melted and was caught on the inside of the valve.
Now place the top back on the air bleed valve and pipe wrench it into place.
Make sure the small cap on the very top of the air bleed valve is open enough to let air escape.
Once cold water pressure is close to normal, get the air out of the system. Again, consult another of my sections to do this.
Now take a pipe wrench
Once you system is full of water, turn back on the natural gas or oil and fire up the system.
Now watch your system pressure and also for leaks around the air scoop.
If all fine, you are done and great job.
Click here for more home hydronic heating system.