
Shared Knowledge
"Hydronic Heating System - Automatic Pilot Light Not Lighting"
17 February 2013
Summary: problem could be any one of multiple components but easy enough to narrow down and do-it-yourself (DIY) replacement. As both 120 volts alternating current (VAC) and explosive gas involved, be very careful and take your time.
Background:
Normal autopilot light lighting is as follows:
(1) The 24VAC transformer mounted on the furnace control box supplies "control line" power to all thermostats.
(2) The control unit on the furnace senses when a thermostat demands heat and applies 24VAC power to the automatic pilot assembly and pilot light igniter.
(3) The automatic pilot opens the pilot light gas valve, allowing natural gas to flow to the ignition assembly.
(4) The pilot light igniter begins to spark from the end of its metal rod to the metal of the pilot light tube.
(5) Once the pilot light ignites, the pilot light igniter stops sparking.
(6) After maybe 15 - 30 seconds of the pilot light burning, the autopilot heat sensor opens the natural gas valve to the burners.


Tools needed:
Voltmeter than can read 24volts alternating current.
Flat blade and Phillips screwdrivers.
Flashlight.
So what is wrong?
At furnace, turn off power switch to furnace or turn off circuit box breaker for furnace.
Go to a room thermostat and set it to heat 5 degrees above current room temperature.
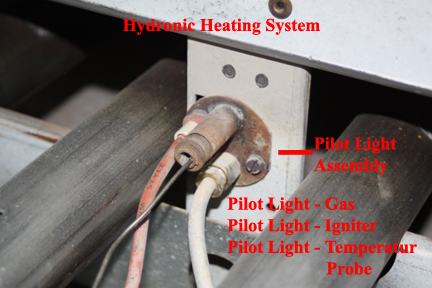
At furnace, remove the panel that should be in place over the bottom part of the furnace so you can see the pilot light assembly.


Using a flashlight, look behind the pilot light assembly and see the pilot light natural gas tube, the pilot light ignition wire (red insulated outside the furnace) and the automatic pilot probe.
Now turn back on power to the furnace.
Using voltmeter confirm there is 24VAC on the output terminals of the transformer mounted on the furnace control box. The output terminals should be on the top of the transformer or under wire caps, which you will have to remove to measure voltage.
No 24VAC:
If you have 24VAC on the transformer output terminals, skip down.
If there is no voltage on the transformer terminals, either power is not being supplied to the furnace (circuit breaker or furnace switch) or the transformer is bad and will have to be replaced.
Note here that as odd as it may sound, I had the power switch, mounted near the furnace go bad once!!
Note that 24VAC transformer is tied directly to furnace power so the control box can be ruled out as the cause of no 24VAC.
![]()
If you must replace the transformer, you must get a transformer that can supply as many amperes of current as your current transformer and will be defined on the transformer itself. Some heating supply companies have transformers but as there are so many different ones, you might have to acquire via the Internet.
My transformer went bad a couple of years ago and I replaced it with a new one that could supply significantly more amps of 24 volts than my old transformer. Over the years, aging of zone control valves, modifications to heating systems, such as addition of new thermostats can easily up the amps requirement.
Replacing the transformer is certainly do-it-yourself but you must cut all power to the furnace before doing so and if necessary, make a drawing of how the old transformer was connected to wiring. Oh, and do not assume a circuit breaker panel actually kills power to the furnace or the furnace power switch. Using a voltmeter, confirm there is no 120VAC present on the power terminals inside the control box!! Assume nothing when it comes to 120VAC or wiring.
You have 24VAC on transfomer:
Turn off power to furnace.
Wait several minutes.
Now turn back on power to furnace.
Get down on floor and get close enough to pilot light assembly to use flashlight and look in behind.
You should smell pilot light natural gas. Not much gas but enough to smell it.
You should see sparks from the end of the pilot light igniter metal rod and the metal of the pilot light gas assembly.
If you smell pilot light natural gas skip down.
No gas smell:
If you can not smell natural gas, check that your natural gas valves are open. There is at least one main natural gas valve and perhaps a secondary on the line feeding the furnace as well as one right on the natural gas controller mounted at the bottom of the furnace.


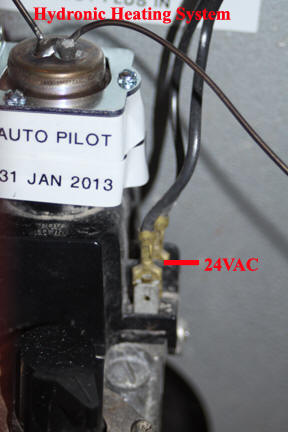
If all valves are open, take your volt meter and confirm that you have 24VAC on the terminals of the pilot light igniter, which should also connect to the automatic pilot light assembly. If you have 24VAC at the transformer but not at the terminals on the pilot light igniter or auto pilot light assembly, you have bad wiring between the control box OR there is something wrong with your controller box.
With power off to furnace, check connectors on all 24VAC wiring to the igniter and auto pilot unit. Perhaps a wire is crimped in place at the connector but no electrical connection??
Note that 24VAC applied to the igniter and auto pilot come from the controller box and not directly from the 24VAC transformer.
Before you decide you have bad wiring or a bad controller box, repeat all steps above to this point.
If you are sure your wiring from controller box to igniter and auto pilot is good, call a service man for your controller box.

If you have 24VAC on the terminals going to the auto pilot assembly but you can not smell any gas, the auto pilot is bad and will have to be replaced.
Note there that it is possible the gas control valve has gone bad. Never have had this happen but anything possible.
If you do not trust your sense of smell, turn off power to furnace, wait and then apply power to furnace and with a long, wooden match, stick the burning match near the end of the pilot light gas tube that is in behind the pilot light assembly mounted on the bottom of the furnace. If the pilot light natural gas lights, the autopilot is good and does not need to be replaced.
If you still can not get the pilot light to light and you have 24VAC on the auto pilot terminals, you must replace the autopilot. Once again, a local heating supply company may have the part or you can get over the Internet. You want the same model number or the updated version there of. Note here that it is possible that the natural gas controller unit has gone bad. I have never had this happen but guess it possible. If you do replace the autopilot and still can not get pilot light gas, suggest you hire a company to replace the natural gas controller.
Note, the auto pilot assembly pulls straight up off the gas controller and then you will have to remove the temperature sensor mounted in the bottom of the furnace. The sensor is held in place by a thumb type bolt head on the very end. The wire of the auto pilot sensor goes through this thumb screw. Once loose, you can pull the sensor out of the furnace.


Natural gas at pilot but no ignition:
Ok, the furnace controller is forcing the auto pilot assembly to open the pilot light natural gas valve and natural gas is flowing into the furnace but you have no ignition of the pilot.
At this point, the problem is related to the pilot igniter. The pilot igniter is not simply a coil that takes 24VAC and jumps it up to a voltage that will create a spark but an electronic unit that creates a spark and also senses when the pilot light has actually lit.
Once again, check that you have 24VAC on the terminals of the pilot igniter.
If 24VAC is not present, bad wiring.
If 24VAC is present on the pilot igniter unit, turn off power to the furnace.
Is red insulated wire pushed all the way on the igniter terminal?? The red insulated wire could be either pushed over a spark plug type terminal or could be soldered to a lug on the main igniter terminal. Is red insulated wire frayed or cut or damaged in any way? If so, replacement is in order and again local store or Internet.
If red insulated wire looks fine, remove from pilot igniter by pulling straight back if spark plug type connection.
Using either a flat blade or Phillips screw driver remove the 2 screws or bolts and nuts holding the pilot igniter to the furnace.
If you look on the unit, you will see the symbol for "ground" meaning this screw must make good contact with furnace metal.
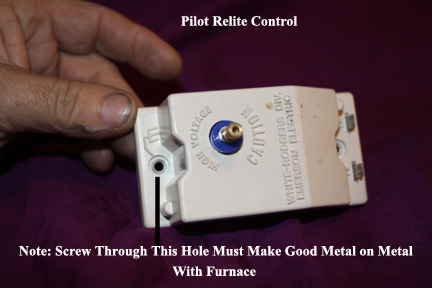

In my case, no effort was made by the initial installers to scrap off the paint that is directly under the metal posts of the pilot igniter and over time, a good connection can be lost.
So before replacing the pilot igniter, scrap and sand the paint off where the 2 screws hold the igniter to the furnace. On the outside of the furnace and on the inside. Get to bare metal.
Now remount the igniter and make sure both screws or bolts that hold the igniter to the furnace are tight.
Reconnect the red insulated wire.
Apply power to furnace again and see if pilot light ignites.
If it does not immediately ignite, with a flashlight look in behind pilot light assembly and see if you can see any sparks at all.
If no sparking is occurring, the pilot igniter is bad and will have to be replaced. In this case, replace only the igniter and not the red wire and igniter. Get the unit identical to the unit you have or one that is noted as an upgrade to the unit you have.
Install new igniter making sure metal screws, bolts are tight.
Pilot light but no burner ignition:
Ok, your pilot light is lighting as it should be you still do not have furnace burners going.
In this case, the auto pilot unit is bad or the main furnace natural gas control valve.
In normal operation, once the pilot light ignites, the auto pilot temperature probe heats up to the point that it commands the natural gas valve to open the main natural gas line to the burners. Once again, have never had a natural gas controller valve unit go bad so suspect your auto pilot assembly is bad.
Read above about how to replace the auto pilot.
Click here for more home hydronic heating system.