![]()
![]()
![]()
![]()
![]()
![]()
Ron Stultz
![]()
How To - "Install a Wi-Fi Grid Antenna"
Summary: this is about installing a grid antenna to the side of a house and is about mechanical. If you going to install, make sure you go out of your way to make installation strong. Do not want antenna falling during storm and perhaps injuring property for people.
Updated: 2023-Aug-26
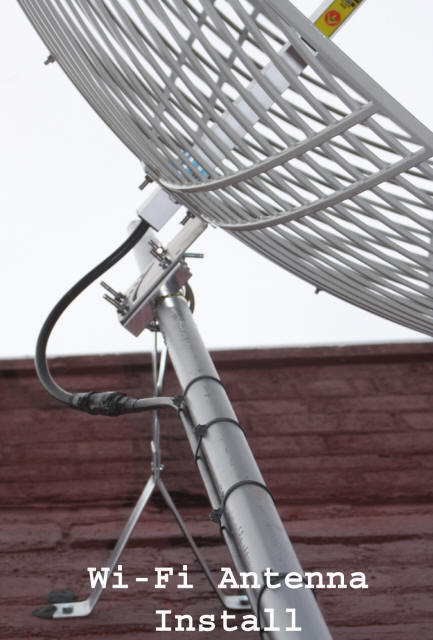
Update: The antenna should be mounted horizontally or the wide part level with ground. Feed horn should be aligned with horizontal axis of antenna.
Overview. Doubt you would be reading this if you were not contemplating buying and either installing yourself or paying someone to install an outside Wi-Fi antenna. Do it yourself (DIY)? If you have the tools required and have done tasks requiring you to be high up on a ladder, then perhaps, otherwise, pay someone. Although mounting a Wi-Fi antenna is not difficult, it does require multiple skills, tools and lots of patience. DIY or pay to have installed: what follows should help you either do it or understand why it costs so much to have done for you.
Background. Daughter lives in Richmond, Virginia and does not have either dish or cable Internet. For years, she could scan local networks and usually find at least one unencrypted network to tie onto for the very little bit of Internet email she does. But in the last year, all local networks have become encrypted with only some fairly distant networks being open for her use.
Even with a 500milliwatt amplifier and a fairly decent directional indoor Wi-Fi antenna, she was still having problem getting and keep any sort of reliable Internet connection. Thus, the need to install a fairly high gain directional antenna on the side of her house to hopefully get a reliable connection to a well known, unencrypted hot spot.
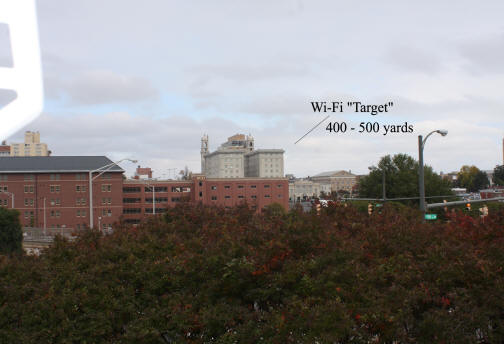
"Target" hotspot as seen from ladder, high enough up ladder for clear line-of-sight.
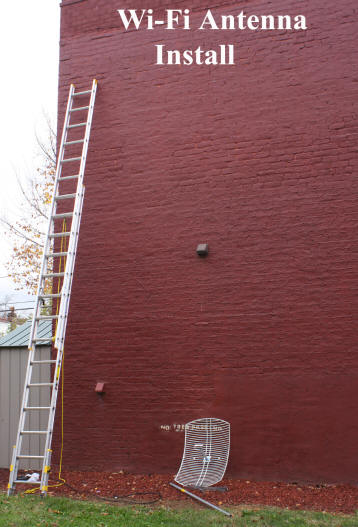
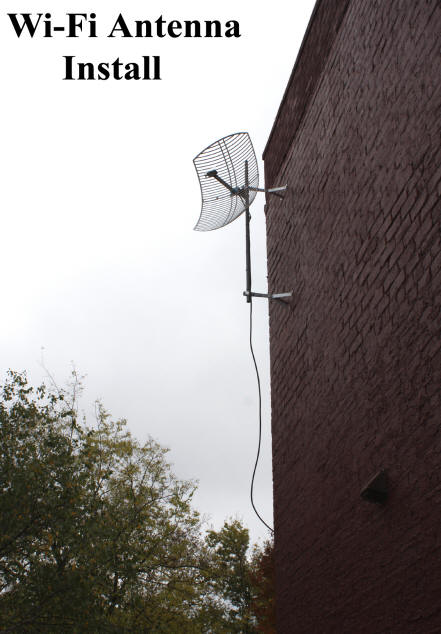
House outside brick wall where antenna had to be mounted.
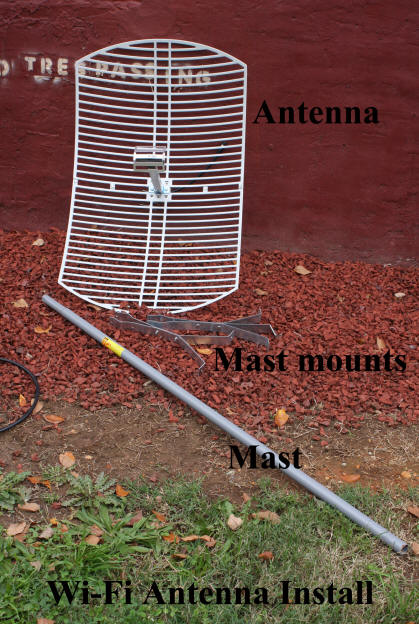
Antenna. With the closest unencrypted "hot spot" some 1500 or more feet away, knew I would need a fairly high gain antenna and thus went with a 24db square grid antenna (WLG-2450-24). I assembled this antenna before going to Richmond and was already familiar with how it would have to be mounted.
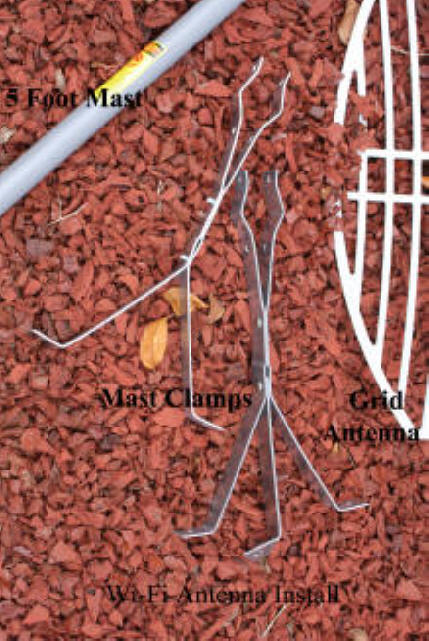
Mounting hardware. In my case the square grid antenna could host a 1.5 inch diameter mast pipe, so I went to Radio Shack and procured a TV mast mount kit and 5 feet of their 1.5 inch mast pipe.
Tools and Supplies.
- Ladder. I used a 28 foot, adjustable legs, that I own
- Portable drill with multiple charged batteries.
- Masonry drill bits. (For brick wall mount.)
- 10 mm wrench (used by antenna hardware)
- 11 mm socket and ratchet (used by TV mast pipe supports)
- Electrical tape.
- Small level.
- 11 inch long cable straps.
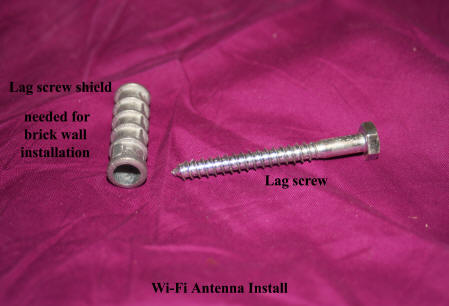
- 1/4 inch lead lag shields (long). (For brick wall mount.)
- 1/4 inch X 2 inch lag bolts (11mm heads.) (For brick wall mount.)
- Tool belt to hold drill, bolts, screws, etc.
- 1/4 inch lock washers for Radio Shack TV mast pipe support bracket bolts (did not come with any).
- Pipe cutter. (To cut copper pipe used as ground rod.)
- Wire cutters.
- Pliers.
- 6 feet of 1/4inch outside diameter (OD) copper pipe. (Used as ground rod.)
- Ground wire pipe clamp.
- Flat blade screwdriver.
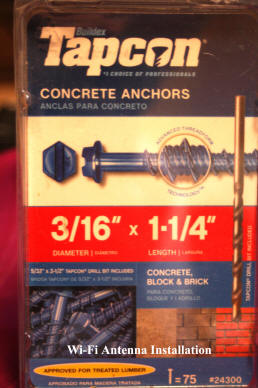
- Box of Tapcon concrete anchors. (Brick wall installation.)
- Box of cable mounting clips.
Safety.
- Ladder. Ladders are inherently dangerous: they can be heavy and difficult to move around; extremely dangerous when overhead power lines are present; if not properly leveled, can shift and dump your ass and everything else on the ground and once you are up a long ladder, balance can easily be lost and once again, you are on the ground and the results may not be pretty. I own a nice ladder but you can rent a ladder from several companies. If you have no experience with a ladder, which extends beyond 20 feet or so, hire someone to install your antenna.
- Do whatever you can do, on the ground. For example, mount as many bolts, clamps, etc as you can before going up the ladder.
- Use a tool belt. Do not try to climb a ladder with one hand or both hands full of bolts, clamps, antenna parts. And do not try to use your pockets. No idea how many people have been hurt when they lost their balance on a ladder when they were fumbling around in one pocket or another for a screw or other part.
- Cable any portable drill you have to your tool belt such that the drill slips out of your hands while you are up the ladder, it will not hit someone helping you below or smash that expensive window or break the drill into pieces when it hits the ground.
- Plan your work such that you never have to raise your arms above your shoulders.
- When up a ladder, remember where you are. Sounds stupid to say that, but in the midst of getting a nut to go onto a bolt or some other task, a loss of orientation and you could easily lean too far off one side or the other of the ladder.
Mounting Mast Pipe Support Brackets.
Overview: The Radio Shack TV mast pipe support I bought consisted of 2 brackets: an upper bracket requiring 2 screws and a lower bracket requiring 3 screws. My plan on installing the mast pipe support brackets was to: install the upper bracket first; mount the mast pipe to the upper bracket; slide the mast pipe into the lower support bracket and with a level on the mast pipe, align the lower bracket and then mark where mounting holes had to go in the brick wall; mount the lower bracket and finally lock the mast pipe in place to the lower bracket.
Now the Radio Shack TV mast pipe support kit I bought included (5) 1/4 inch, 1 inch long, lag screws. Knowing 1 inch lag screws would never hold in a brick wall, I bought 1/4 inch "lead" lag shields (long) and (5) 2 inch and (5) 2 1/2 inch long 1/4 inch lag screws.
.jpg)
Mounting the upper mast pipe support bracket. Up the ladder with my tool belt on, holding the upper mast pipe support bracket in one hand. When I got high enough on the ladder to have a clear line of sight to the Wi-Fi hotspot target, I positioned the upper bracket on the brick wall such that the both mounting holes in the bracket were over brick and not brick mortar. I then placed a small level across the "arms" of the upper bracket and leveled the bracket. I then used a black marker through the support bracket mounting holes to mark where I needed to drill holes and install lag shields., I placed the upper support bracket on the top of the ladder and using a 12/32 inch masonry drill bit drilled my marked holes. Note here that although I bought and intended to use 1/4 inch lag shields in the holes, if I had drilled 1/4 inch diameter holes, the lag shields would have been too loose in the hole for a lag screw to ever tighten up on.
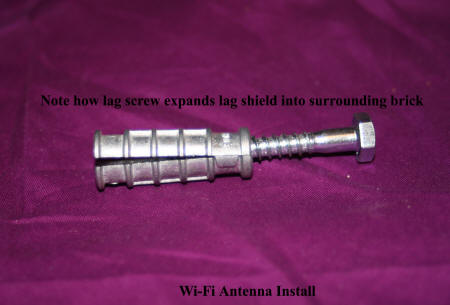
With both mounting holes drilled to a depth that would allow me to fully insert my 2 inch long, 1/4 lag screws, I took a lag shield and using a hammer, gently tapped 1 into each hole until it was flush with the brick wall.
Drill placed in tool belt and 1/4 inch socket on ratchet removed from belt along with 1 lag screw. Position mast pipe support bracket and insert lag screw in left lag shield hole. Slowly ratchet lag screw into lag shield. When sure screw in place hold bracket but not tighten down completely, insert lag screw in other mast pipe support bracket and screw it into the lag shield. Now with both lag screws inserted into their lag shields, I slowly tighten one screw and then the other until both screws were snug to the mast pipe support bracket. Here, you want screws tight but if you turn too far, you will strip the screw out of the "lead" shield.
With the upper bracket in place, I took up the ladder the 1/5" OD mast pipe. I positioned it into the upper mast support bracket. Now since I had also bought an outside high definition (HD) TV antenna, it was my intention to mount this antenna on the top of the mast and so I positioned the mast pipe into the bracket such that I had enough pipe above the bracket to mount my HD antenna. I then tightened the bolts in the mast support bracket that compressed the bracket around the mast pipe. When I initially open the support bracket box and saw that the mast pipe was going to be held in place by the mast bracket compressing against the side of the pipe instead of having a bolt through the pipe, I was concerned and thought perhaps I would have to drill a hole through the bracket and pipe and mount my own mast pipe support bolt. Well once I got the mast support bracket bolts pulled down tight on the mast pipe, I was pretty confident an additional bolt was not needed and thus did not install one.
I now took the lower mast support bracket up the ladder and placed the lower end of the mast pipe into the bracket. I now place the bracket against the brick wall and with a level, moved the bracket around slightly until the mast pipe was level right and left. I then used a marker to mark the location of the 3 screw holes required and removed the bracket from the mast pipe and brought down the ladder, the level.
Now using my drill, I drilled 3 holes and then mounted lead lag shields in each hole. I placed the mast pipe back into the mast support bracket and used my ratchet with 1/4" socket to actually mount all 3 screws. Once all screws were in lag shields I slowly tightened each one.
With lower support bracket now firmly attached to brick wall, I tightened the bolts of the support bracket that keep the mast pipe in place.
With all bolts tight, I grabbed the mast pipe and give it a good tug. Was not loose at all.
.jpg)
.jpg)
Antenna Mounting.
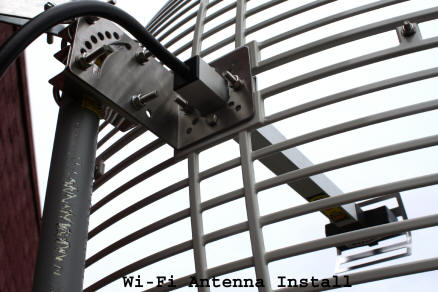
With mast pipe firmly in place in the mast support bracket, I took the antenna up the ladder. Because of the weight and size of the grid antenna used, it was a bit awkward but I managed to hold the antenna more or less in place and inserted the upper U-bolt around the mast pipe and into the antenna mount. I installed the associated flat washer, lock washer and nut and tighten the upper U-bolt nuts. I think installed the lower U-Bolt.
With antenna on mast, I got my head and thus eyes in behind the antenna and aimed, more or less, the antenna at my target hot spot. Now if I had had a very, very small computer, would have been nice to actually aim the antenna based on computer signal strength display but did not have small laptop and thus eyeballed it. As it turns out, I had to move the entire antenna up the mast to almost the upper mast support to get a perfectly clear line of sight. And here I make a point for you or your installer. Install the mast support brackets as high up on the side of the building as possible. The antenna I have allows for tilt and thus if mast too high, can tilt it down some, but if too low and do not have a clear line of sight, signal strength received or transmitted not going to be what you hoped for with new outside antenna. And as it turns out, while I had planned to mount a HD antenna on the top of the mast pipe, all HD TV stations are located on the other side of the house, so did not need to leave so much mast pipe above the upper support bracket.
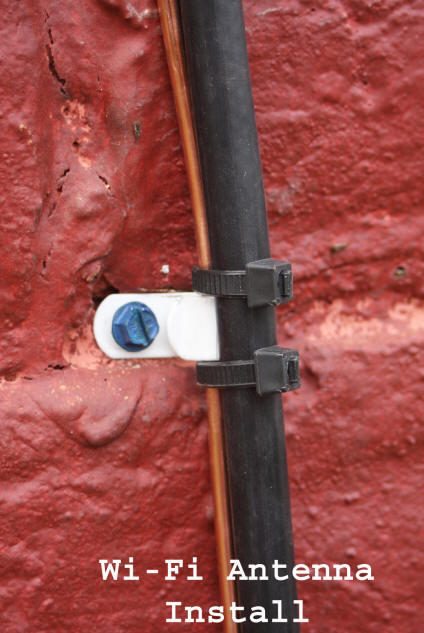
Antenna Cable Mounting.
W
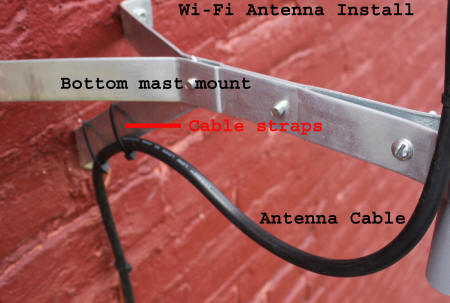
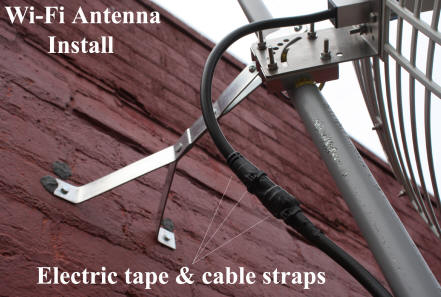
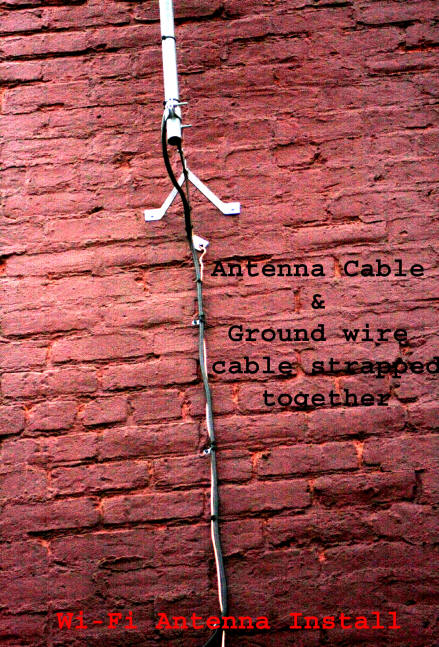
With grid antenna in place, took up the ladder the antenna cable. First I connected the cable to the grid antenna and then wrapped the connection with electrical tape and finally secured the ends of the tape with small cable ties. Then I used cable ties to secure the antenna cable down the mast pipe to the lower support bracket and then to the bottom of the "foot" of the lower support bracket.
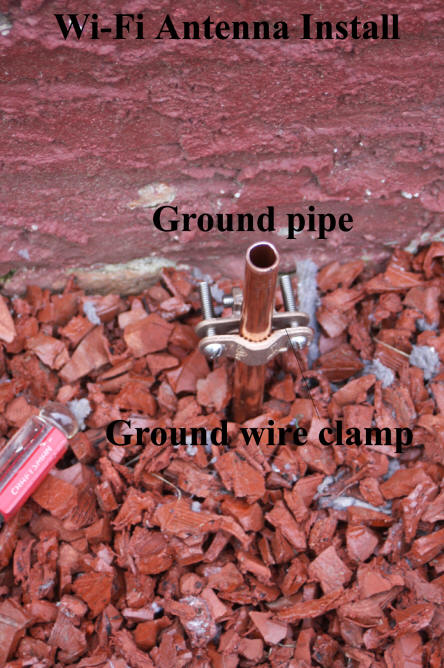
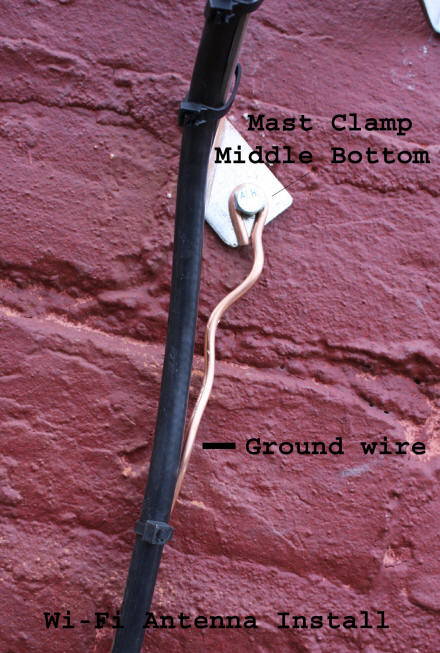
Grounding. With antenna up 28 or so feet off the ground and very few higher spots in the area, I had to ground the antenna in case of a lighting strike. To do this:
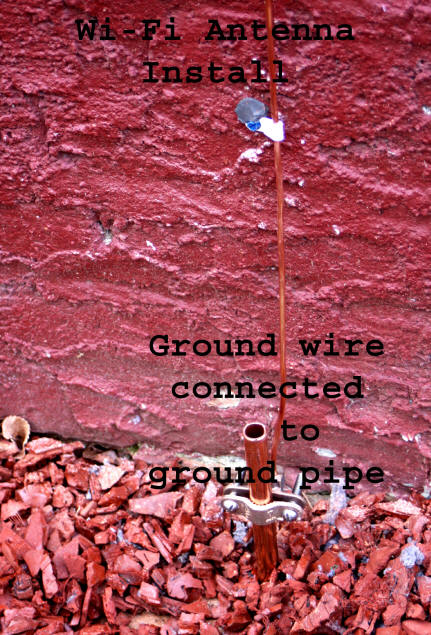
- I bought a 6 foot piece of 1/4 inch outside diameter (OD) copper pipe and used a pipe cutter to reduce the pipe to a about 4 feet in length. I could have bought a ground rod but these are 8 feet long and not easily cut and I did not want nor need to pound 8 feet of rod into the ground.
- I bought a ground wire pipe clamp. I got the type that can be easily mounted to the pipe once it is in the ground.
- I now positioned my 4 foot pipe of copper pipe directly below the mast of my Wi-Fi antenna and used a sledge hammer to pound the pipe into the ground leaving only about 6 inches sticking above ground.
- I attached the ground wire clamp to my "ground rod."
- I bought 30 feet of 6 gauge solid copper wire. This is sold as "ground wire."
- I uncoiled the 6 gauge wire and took one end of it up the ladder to the base of mast and backed the bottom support lag screw out enough to allow me to slip a loop of the ground wire under the lag screw head. I then tightened back down the lag screw.
- Now with ground wire connected to antenna mast, I went down the ladder and pulled slightly on the ground wire to get some of the slight bends out of it and measured where I needed to cut it so I could insert the end of the wire into my ground rod wire clamp.
- I insert the ground wire into the set screw channel in the ground wire clamp and tightened the set screw down tight.
- Finally, I move upward from the ground rod and anchored the ground wire to the brick wall of the side of the house with small metal wire clips and concrete screws.
Attach cables to side of house. Now I did not want the antenna cable or the ground wire cable flapping in the breeze, so I bought and used Tapcon anchors as I thought they would save me from having to drill holes and used lead lag shields. Well, even though used smaller drill bit than included with Tapcon anchors, Tapcon screws still did not hold associated cable clip very well. Probably weakest part of completed job for me but cables will not move around, so I am going to leave it. In retrospect, should have used hollow wall plastic shields and long screws. Think this would have held better in crumbly brick mortar.

Outside installation complete.
.JPG)
.jpg)
%20(100).jpg)
And How Did It Work? Routed the antenna cable around the side of the house and mounted to wall with cable clips and screws and finally in through a window to the personal computer (PC) desktop. I connected antenna cable to wireless adapter card installed in PC and did a scan of networks available to me. Sure enough, the target Wi-Fi hot spot appeared in the list and was unsecured. Attempted to make a connection and no problem. Turns out the signal strength was not as good as I had hoped but the connection quality was 50% or so, whatever that means, and the link was stable. Was a boo however, to learn that the hot spot was 802.b only or 11Mbps! Know it exceeds Federal Communications Commission (FCC) rules on Wi-Fi signal strengths allowed but connected a 500milliwatts amplifier between the PC and the antenna and immediately got a significant signal boost on both send and receive. Of course did not leave the amplifier in the circuit but was curious. You have to remember that not only do you have to be able to receive a decent signal from the hot spot, but you have to send them one as well. No idea power out of my PC wireless adapter card but suspect no more than 50milliwatts at most.