![]()
![]()
![]()
![]()
![]()
![]()
Ron Stultz
![]()
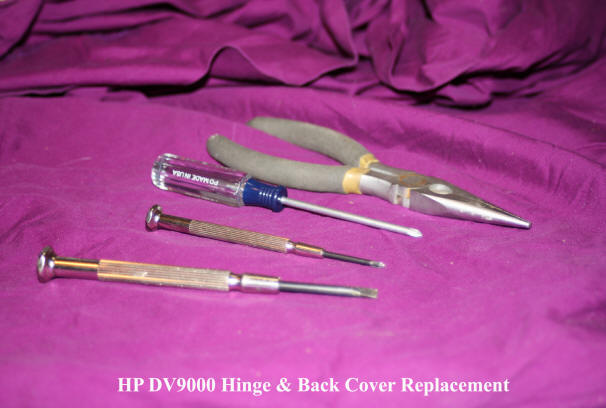
"How to: Replace Left Hinge and LCD Back Cover on HP DV9000 Laptop"
Summary: hinges on many large screen laptops are not strong enough to not break under constant use. Replacement of hinge is not an easy do-it-yourself but can be done.
Background:
The Hewlett Packard (HP) DV9000 series laptops have a problem with the left Liquid Crystal Display (LCD) hinge. When the LCD is opened off the keyboard and raised, most people being right handed, raise the LCD from the right front. Unfortunately this puts a torque on the left hinge such that it eventually breaks and once it goes, the screws through the hinge into the back cover can not support the lifting motion and the screw holes molded into the plastic in the back cover break out as well. It is amazing how many broken LCD back covers and new back covers are for sale on eBay. HP really ought to fix this problem.
Should not have to but best to always raise the LCD away from the keyboard by lifting in the center and not either edge.


To replace the left hinge and LCD back cover:
1. You are going to need a very small Phillips screwdriver and a larger Phillips for hard to extract screws. You are also going to need a small flat blade screw driver, an Exacto knife or other small knife point and perhaps a pair of needle nose pliers. If you do not have a very small Phillips screwdriver, any computer store or Radio Shack sells a small kit of screw drivers.
2. Remove the power adapter plug from the laptop and remove the battery.
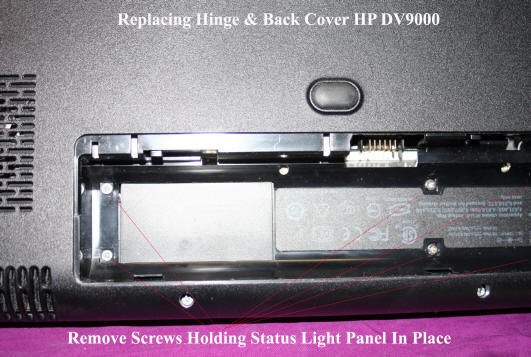
3. Close the LCD (at the center, slowly) and turn the laptop over. Remove all screws in the battery compartment (6.) These screws hold the status lights panel just in front of the keyboard in place and you must remove this panel to get access to the hinges.
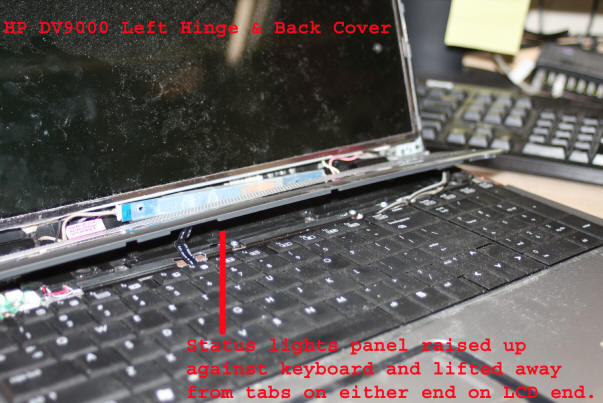
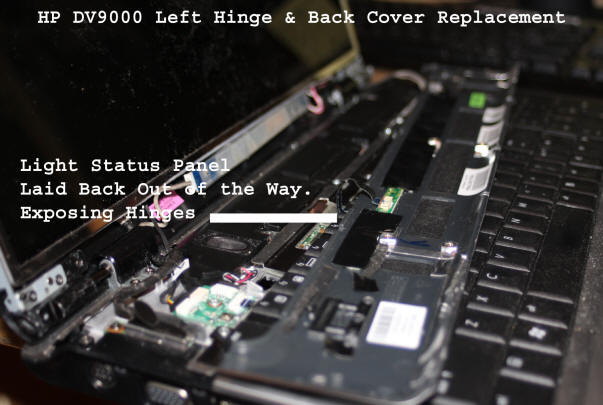
4 Turn the laptop so you can open the LCD (at the center, slowly). Once the LCD is clear of the keyboard, looking on the left side of the keyboard, you will see where the status light panel mates against the keyboard. At this point, you should only have to insert a small flat blade screw drive into the seem between the panel and the laptop base and lift, to get the status light panel to pop up. Raise the panel until it unlatches from the left side of the laptop. This panel is has a metal tab on either end that fits into the laptop frame and thus you lift the panel from the rear and up out of the tab holes in the front and then lay it back carefully on the keyboard. Be careful lifting the panel as it has a small flat ribbon cable attached to it that runs to the motherboard and you do not want to accidentally remove this cable.
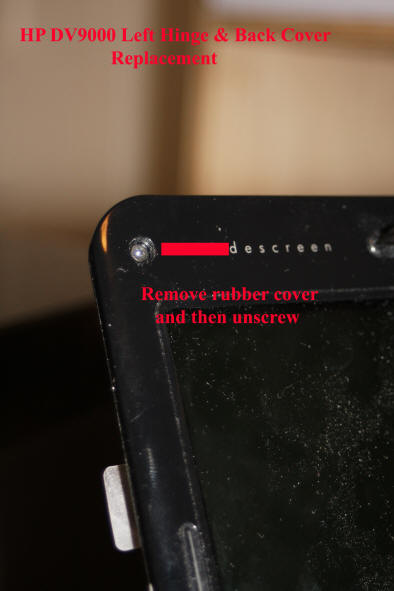
5. Now using an Exacto knife or other sharp point, remove the rubber covers you see at the 4 corners of the LCD bezel (the bezel is the front LCD surround piece) and the one in the center at the top. These "rubber bumpers" cover a screw, which holds the LCD bezel to the LCD and its back cover. Remove all 5 screws.
6. If all screws removed from the LCD bezel, start on the left side and using your fingers pry the bezel up off the back cover. The bezel is simply "snapped" to the back cover.
.jpg)
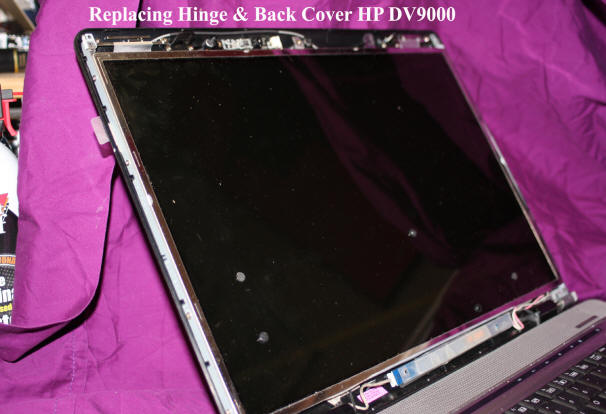
7. Using your hands, move around the bezel unsnapping it from the back cover until you can completely remove it. Go slowly as you do not want to break the bezel. It will pop up.
.jpg)
8. Looking at the left hinge, you will notice that it has a "hinge cover" over the body of the hinge. You must remove this cover. Upon examination, you will notice that the cover is held in place by a screw into the frame of the laptop. Remove this one screw. Now place a flat blade screw driver up under the hinge cover between the hinge cover and the top of the hinge and slowly raise the cover up and off the hinge. Note here that the screw points on my hinge covers where broken. Since this laptop was used, have to assume previous owner or a repair technician broke the covers trying to remove them before noticing they had a screw hold down. In my case, because the covers fit so snugly over the hinge, really does not seem to make any difference that not held in place by a screw.
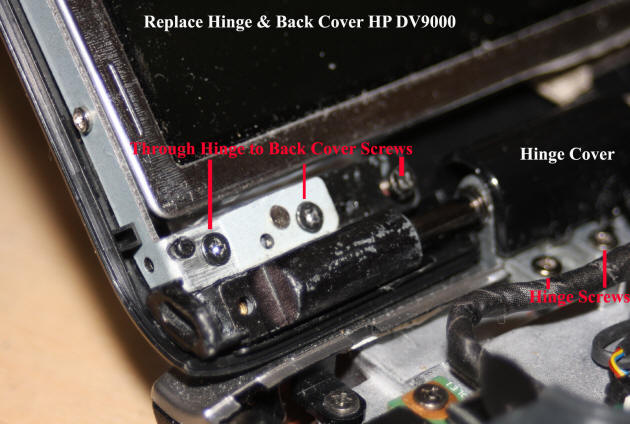
9. Now go to the right hinge and remove the screws holding the back cover to the hinge. You do not have to remove the hinge cover to do this. If all screw points on the back cover are broken out on the left side, the back cover should be loose and you want to lay it down flat in behind the LCD.
10. Go to the left hinge and remove the (3) screws going through the hinge into the back cover. If the back cover was not loose enough to lay flat when you removed the screws on the right hinge, when you remove the last of the (3) screws in the left hinge, make sure you are supporting the back cover as you do not want it to fall and possibly pull wires loose.

11. Removing the left hinge. During the steps involved in removing the left hinge, you want to be sure to support the LCD on the left side. You do not want to either break the LCD or the right LCD hinge.
12. At the left hinge, remove the 2 screws holding the hinge to the laptop frame.
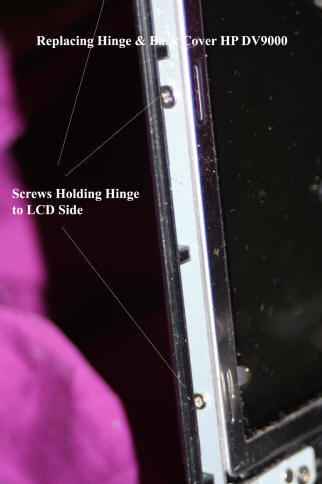
13. With back cover laying in behind the laptop, along the left edge of the LCD, remove the screws that hold the left hinge to the LCD. Please note that these screws are very short and be careful not to drop any when removing as they can be hard to find on the floor or embedded in your clothes and you will need all when you install the new hinge.
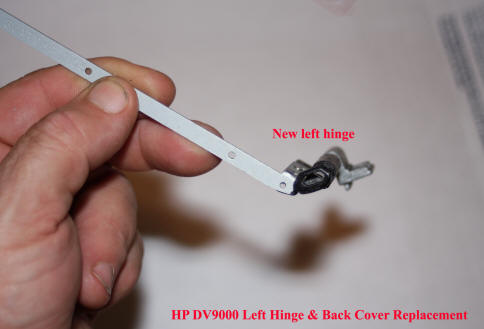
14. The broken hinge should now be completely loose from the LCD and the laptop frame and pitch it into the nearest, "Bad HP ergonomics design" waste can. Now take new hinge and align side of hinge with screw holes in LCD and reinstall all screws. Do not forget a screw and if you dropped one, find it. You do not want to have to replace the hinge again because it pulled away from the LCD along the side.
15. With the new left hinge attached to the side of the LCD, move the base of the hinge back over the laptop frame. Now here, in all likelihood, the guide post on the underside of the hinge and the holes in the hinge through which you must insert the hold down screws is not going to be perfectly aligned with the laptop frame. SO, at the hinge, you must slowly rotate the hinge until it will align and drop into the laptop frame. Now laptop hinges are incredibly hard to turn. You would not think so but they more or less have to be to allow the LCD to hold any particular user viewing angle. And my point here is that you might have to use a pair of needle nose pliers to help you rotate the hinge. Just go slow, perhaps a little at a time as you do not want to break the hinge at the weakest spot. Eventually, the hinge will be aligned and drop into place. Now insert and tighten 2 screws down through the hinge into the laptop frame. At this point, you can move the LCD if you wish but only at the center top and very slowly.
16. Time to now remove the broken back cover. Here, basically you are going to remove the webcam if your system has it, the center latch and (2) latch points with wires on them (Wi-Fi antenna?). Details: the webcam consists of a small circuit board with a hole at either end. On the right end of the board, the board sits over a plastic tab sticking up out of the back cover. On the left side, the board is held to the back cover with a piece of foam that is sticky on both sides. To remove the webcam, simply pull it up from the left side. Once lifted off the broken back cover, remove the foam as the new back cover will have new for you to use. Once you have everything loose from the broken cover, you need to pull up on the sticky foil holding all wires to the back cover such that all wires are free of the back cover.
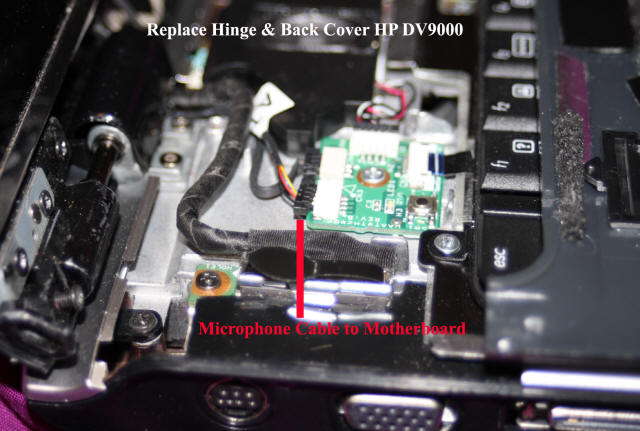
17. Now you must unhook the back cover microphone from the laptop motherboard. To do this, you trace the microphone cable into the laptop and see that it has a connector you simply pull out. Do not pull the microphone cable by the wires, pull at the connector. The cable connector should easily pull out of the motherboard connector and is keyed so no worry about remembering how you removed it at reinstall time.
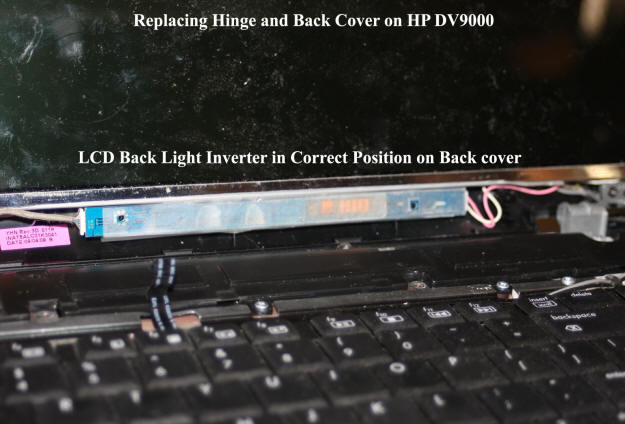
18. The LCD inverter. At the bottom and sometimes also the top as well, there is what is known as a cold compact fluorescent lamp (CCFL) or back light. It is this lamp that actually illuminates the LCD screen. To power this lamp, a high voltage of limited current is required and thus what is known as a back light inverter is used. This inverter is usually mounted in the front bottom of the LCD and so it is with the DV9000. Now when you loosened the broken back cover from the LCD and hinges, the inverter probably fell out. Not to worry, reinstalling in new back cover is easy.
19. As your new back cover should have come with microphones attached, time once again to pitch the broken back cover. Wonder if HP has a plastic recycle address? Wonder how many broken hinges and back covers are replaced by some repair facility or even HP just because of a poor hinge design. Happens with lots of products all the time. Sad really.
20. Slide the new back cover in behind your laptop and reinstall the webcam, latch, latch points (Wi-Fi antenna?).
21. Now route cables along the series of foil tabs and lifting a tab up, peel the white tape off of it revealing a sticky side to the foil. Place a wire or wires under the foil tab and then press the sticky side down. Repeat until all wires are secured to the back cover. Obviously, plan your wire route so there is not too much wire to be dealt with inside the laptop and too little that wires bind when the LCD is opened or closed.
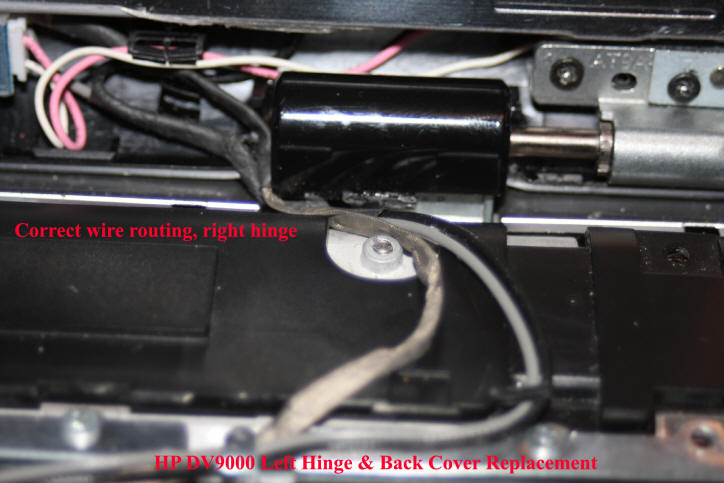
22. Tricky. Now position the new back cover up against the LCD. Tricky? Only that you must make sure the wires to the webcam are properly routed near the right hinge. You do not want the webcam wire sticking out from under the bezel or back of the laptop. Also be careful of the pink and white wire going to the LCD from the back light inverter. They are so close to the right hinge, you might get them snagged on it. I did and nicked the pink wire. Had to tape it to get the back light to work properly!
23. Reconnect the back cover microphones to the motherboard.
24. Hold the back cover up to the LCD and insert the screws that go through the left hinge into the back cover. Repeat for the right hinge.
25. When you are sure the back cover is on correctly, position the LCD inverter where it belongs. It has 2 holes in the circuit board at either end and these just fit over tabs in the back cover.
26. Take the LCD bezel and place it on the LCD and once you are sure it is aligned correctly begin to snap it down all the way around the LCD. Make sure you snap the bottom as well and that no wires are sticking out of it.
27. Install the 5 screws holding the bezel to the LCD and back cover. Once all screws are in place, replace the rubber bumpers/covers on all holes.
28. Lift up the status lights panel and with the front edge of the panel tilted down, get the metal tabs on either end into the slots in the laptop frame. Once you are sure the status lights panel is secure in the front, holding it in place, turn the laptop over and replace the 6 screws in the battery compartment that hold the panel to the laptop bottom.
29. Look everything over. Bezel snapped down all around? No wires showing any where? If there is a problem fix it now.
30. Reinstall battery and plug in power adapter. Power up the laptop and all should be well. If you get no screen display but you know the laptop powered up, this means there is a problem with the LCD inverter and you should immediately power down, remove the battery and power adapter, remove the LCD bezel and check inverter connectors and the wires running from the inverter to the LCD.
31. FYI. The right hinge is held into place by 2 screws through the bottom edge of the laptop frame and one screw through the hinge on the top side. I really did not have to loosen the right hinge but did before I knew what I was doing. What is of interest to me is that the one hole in the hinge through which a screw goes down to hold the hinge in place on the top side, is the same hole another screw goes into from the under side.
