![]()
![]()
![]()
![]()
![]()
![]()
Ron Stultz
![]()
“How to - Floor an Attic”
Summary: my method uses precut panels of plywood
that are then spaced and screwed to ceiling joist in attic. Certainly
do-it-yourself (DIY) if you have a power handsaw and portable electric
screwdriver.
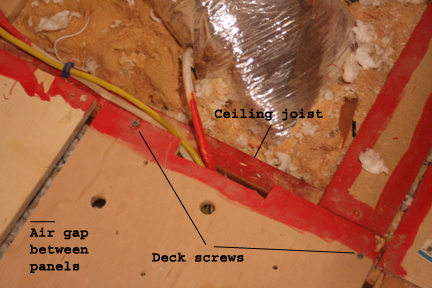
I bought 4x8 3\4inch plywood sheets and had the hardware store rip the sheets length wise so each sheet was 16 inches wide or the exact center-to-center distance between ceiling joists. I then cut each 8-foot long ,16-inch wide strip into 8, 1 foot wide hunks, so in the end, I had this pile of 16 X 12 inch panels. I then drilled 4 1-inch holes in each panel to allow for airflow underneath the panel and then began hauling the panels to the attic.

Since
the panels are small, they are easy to haul around and easy to get up into the
attic space and are then simply put down like you would floor tiles. In my case I used a cordless screwdriver and
deck screws to fasten each end of the panel to the ceiling joist. Each end of a
panel rest halfway on a ceiling joist allowing for the additional of the next
panel in a row. Between rows of panels I left a 1-inch space, again for air
movement and to save on flooring materials.
Using the panel method, it was easy to floor my attic and the job looks very professional and because I used panels, I could put down 10 or 15, stop for a day or 2 and then put down more panels and expand my work zone in any direction I wanted.
.jpg)
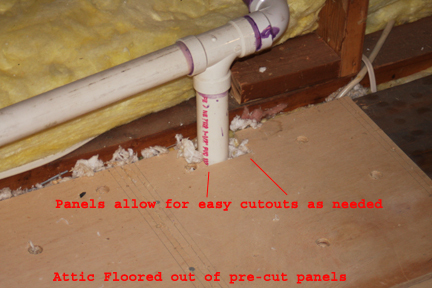
Where
there were obstructions to the placement of a panel, like were a PVC pipe came
up out of the bathroom below, I simply used a saber saw to cut a notch or
whatever as required in the panel so it would fit around the obstruction. In the case of electrical wires, I simply
raised the wire and placed panels under them and then when I was all done, I
used electric wire staples to staples the wires to the flooring so I would not
trip the wire.
After I thought of the panel idea, I think I actually saw something similar for sale somewhere but the price was ridiculous like $10 a panel or something like that, whereas via my method, I got maybe 30 panels for $30’s.