Shared Knowledge
"How to: Clone a Laptop Hard Drive (SATA)"
1 December 2009
A clone operation of a laptop hard drive is applicable if the hard drive is operating properly but is simply no longer has enough room for all your programs and data. A clone operation saves you from having to reload the operating system, all programs and your data.
Before cloning a laptop hard drive, check the entire disk via Windows Scandisk and also check it for virus's and spyware. If a scan disk operation displays bad sectors, your drive is failing and you might better consider a replacement instead of a clone operation.
"How to: Replace a Laptop Hard Drive"
First determine the type of hard drive installed in your laptop. The clone instructions below are for a SATA hard drive.
"How to: Locate and Determine What Type of a Hard Drive is Installed in a Laptop"
"How to: Clone a Laptop Hard Drive (PATA)"
Tools and Skills needed:
- Desktop PC with CD-ROM drive. The clone methodology defined below requires the use of a desktop computer with a built-in CD-DVD reader. If you do not have a desktop personal computer (PC), look into procuring one of the USB-based cloning tools.
- Desktop PC with (2) free SATA ports. The clone methodology defined below requires a desktop with (2) free SATA ports. If your desktop only supports PATA (IDE), consider: (A) procuring an IDE channel converter like shown below. This tool plugs into an IDE channel on your motherboard and provides (2) SATA ports (about $20) or (b) if you have an open PCI card slot, procure a PCI card that provides (2) SATA ports (about $30). You must have (2) free SATA ports. If your CD-ROM uses one of the only (2) ports your motherboard supplies, you are going to have to add SATA ports to your system.
.jpg)
- A small Phillips screwdriver. You will need one that is not worn out but rather has nice sharp edges at the point.
- Needle nose pliers.
- Cloning software. There are many Internet-based sources for this software. I have tried free versions and have found them lacking in one or more features I needed. Expect to pay $30 - $50 for cloning software and this is for a download you will eventually have to burn to a CD. And "NO" you can not simply do a Windows copy of one drive to another. You must have cloning software.
Use the following as guidance in cloning a SATA laptop hard drive:
1. Drive out of laptop. At this point, you should have read "How to: Locate and Determine What Type of Hard Drive is Installed in a Laptop" and have the hard drive out of your laptop. You should also have procured a new hard drive to which you are going to clone the old drive.
2. Open desktop and unhook current hard drive (s). With desktop powered "off" and power cord unhooked from back of desktop, remove the SATA cables from the rear of your desktop hard drive(s). If you only have 2 cables: 1 for the desktop hard drive and 1 for the CD-Rom, you are going to have to procure another SATA data cable. (about $10). If your desktop only supports PATA off the motherboard, install either the IDE adapter the PCI-based SATA board now.
3. Change CD-ROM "master\slave" jumper setting, if required. If your desktop uses a PATA CD-ROM and is sharing an IDE cable with a desktop hard drive, you are going to have to change the PATA CD-ROM device jumper on the back from "slave" to "master." To do this, you need to move the small jumper set on 2 pins on the rear of the drive. Usually, the first set of vertical line pins is for "master" so you will need to move the jumper from the second set of vertical pins to the first. With a flashlight, and Exacto knife and needle nose pliers, you should not have to remove the drive from your desktop. Unfortunately, the master\slave\cable select map on most CD-ROMs is located on the top cover of the drive. Finally, you are going to have to move the IDE cable such that the drive connector closest to the mother board is connected to the CD-ROM.
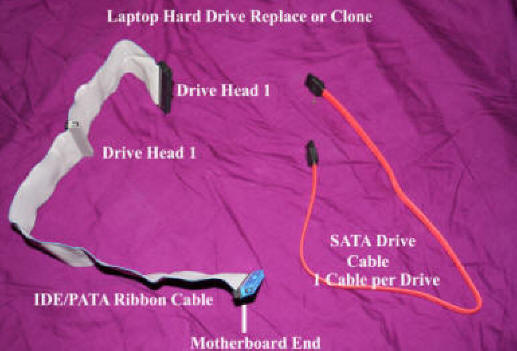
4. Attach laptop drives to SATA ports. The interface connector for SATA is the same electrically and mechanically as for a full size desktop drive, so all you need to is attach an existing SATA cable to your laptop drives. Again, you must have a working CD-ROM in addition to the 2 laptop drives connected to SATA ports. And if you did not know, you can not connect 2 SATA drives to a single port. It is not necessary to mount the laptop drives into the desktop. Laptop drives weigh so little that can simply dangle from the SATA cables or you can lay the laptop drives flat on the floor beside your open desktop.
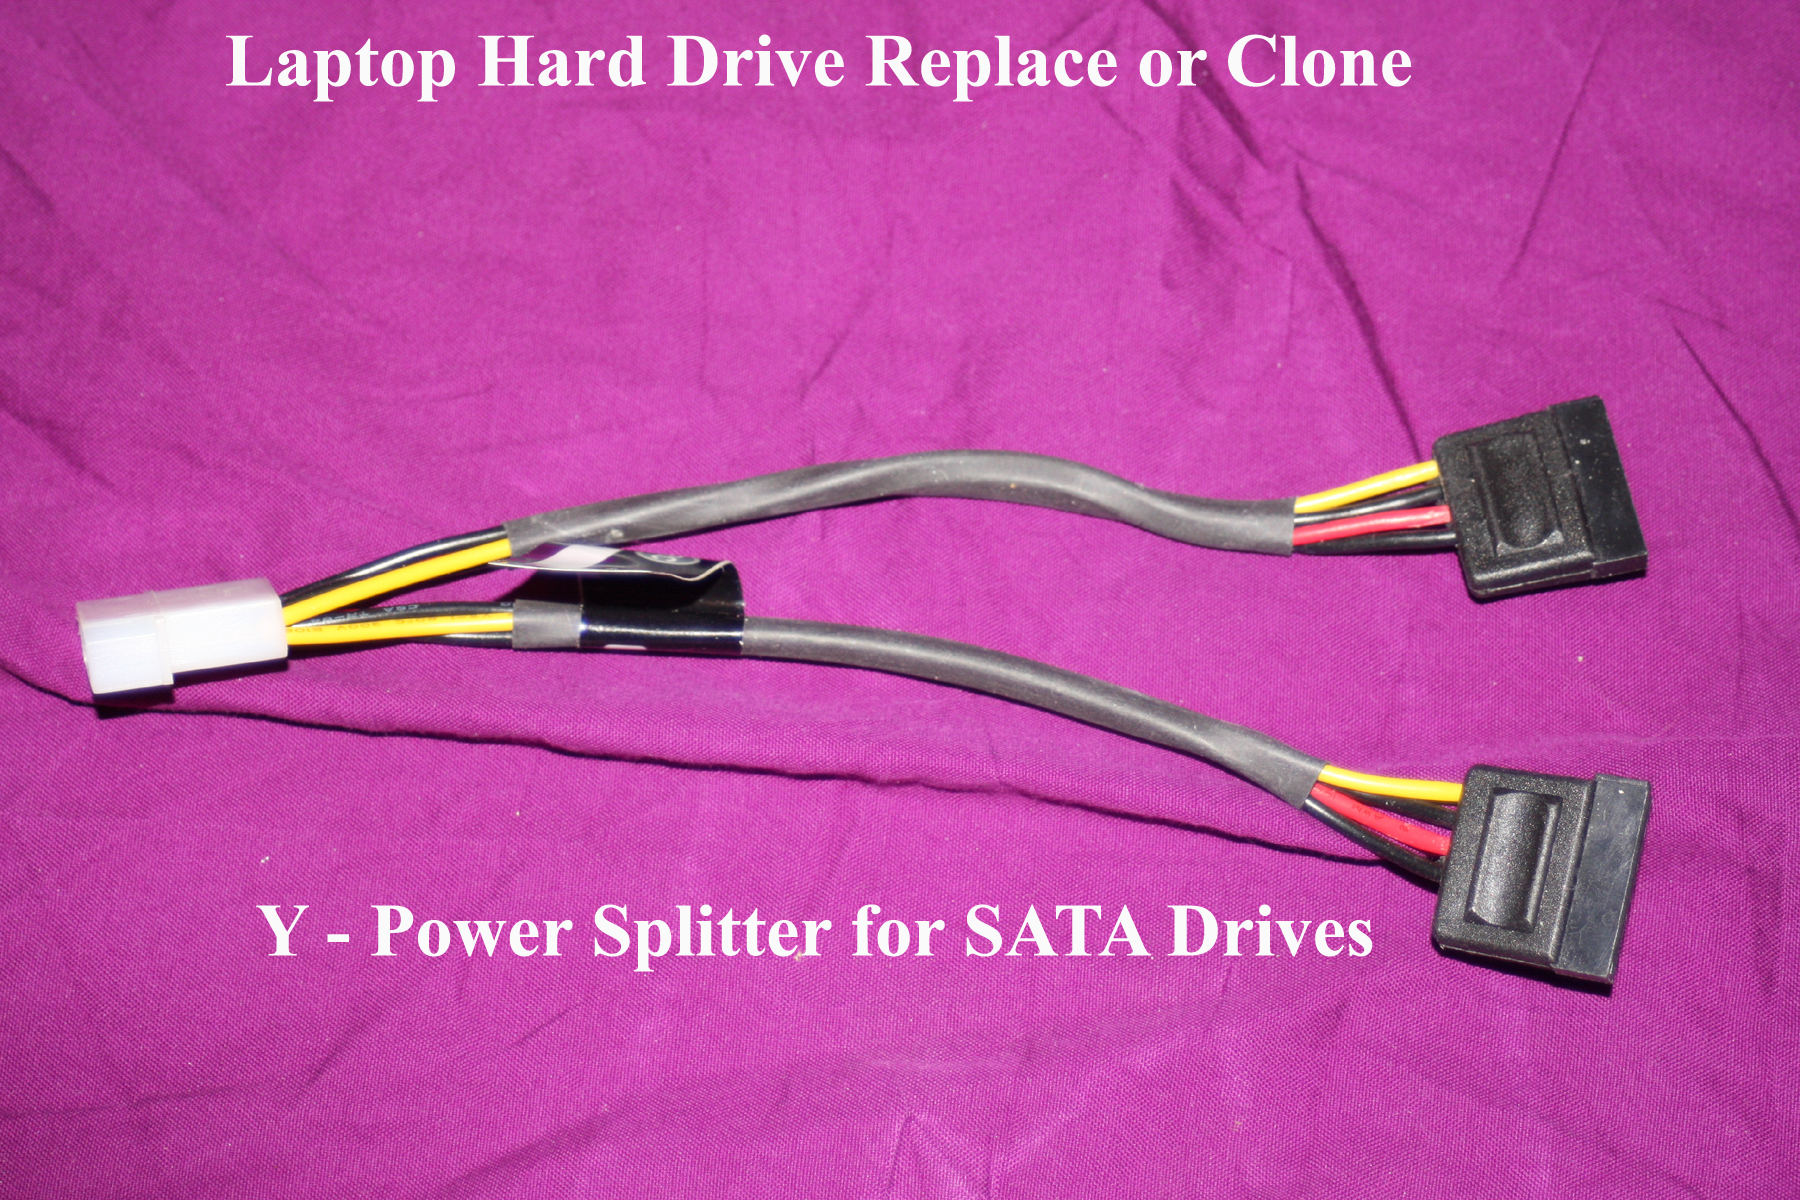
5. Connect power cable(s) to the laptop drives. On some desktop SATA drives, there is both, the traditional power connector as well as a SATA-type power connector. This is not true for laptop drives. You must connect power supply power to a laptop drive via a SATA-type power connector. If you do not have (2) free SATA power connectors to use, you will have to procure an adapter\splitter like shown below. (about $8.)
6. Write down the model number of the original laptop drive. When you clone, you need to know which is the original drive and cloning software is only going to tell you a model number.
7. Check over all electrical, mechanical connections\connectors. Best at this point to take a break and go outside or do something else for 10 - 15 minutes. Then when you come back, check the entire insides of your desktop. No wires going to be caught in a fan? All connectors on tight?
8. Plug the power cord into the power supply of the desktop. The desktop may come alive for a second or 2 but then power down.
9. Use the "on" button to power up the desktop.
10. Now begin pushing the function key or keys required to get your desktop into the BIOS.
11. Insert cloning software CD into desktop CD-ROM reader. When the BIOS main menu screen is on your desktop display, insert cloning software into your CD-ROM and close the tray. The cloning software will not start at this time.
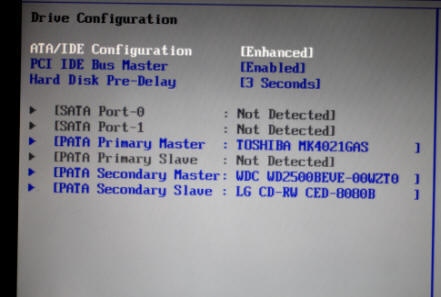
12. Verify that the laptop drives and CD-ROM are being seen by the BIOS. It will depend on your specific desktop's BIOS, but you should be able to tab along the main menu at the top of the BIOS until you see a submenu for "drive configuration." Select this option and verify the the desktop BIOS is seeing both laptop drives and your CD-ROM. If one or more drives is not present, shut down the system and check all SATA data and power cables. Once you are done verifying that both drives and the CD-ROM are being seen by the desktop BIOS, escape key back to the main menu.
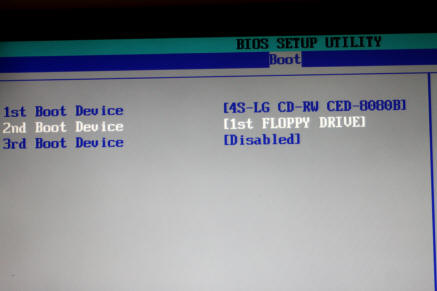
13. In the BIOS, change the device boot order. You now have 2 laptop drives and a CD-ROM active on your desktop and you are almost ready to run the cloning software but first you must change to desktop boot order to the CD-ROM as the first device. On the main BIOS menu, you should be able to tab over to "Boot" and then on the submenu change the first boot device to your CD-ROM. Change the second device to the floppy drive. Once you have changed the boot order, escape key back to the main menu.
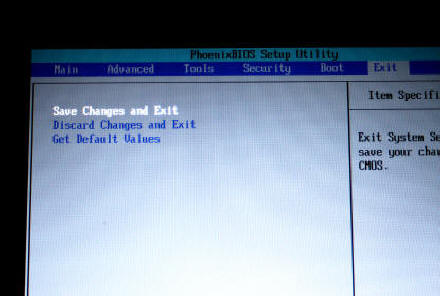
14. Save the current BIOS settings. Tab over along the main BIOS menu to the "Save & Exit" menu bar. Then select "Save and Exit."
15. The cloning software should now start. Once you do a "Save and Exit", our desktop will restart and begin executing the cloning software on the CD inserted into your CD-ROM. If the clone software does not start or you receive any sort of error, shut down the system and verify that the CD of cloning software is valid.
16. Follow cloning software instructions. Here you will be asked to define the source disk and the target disk. And you will be given an opportunity to have the original OS expand into all the space on the target drive. If you wish to divide the target drive into 2 or more smaller drives, you should have the ability to do so in your cloning software options.
.jpg)
.jpg)
17. Shut down desktop. When the cloning software has completed (may take a few minutes or hours depending on the size of the original laptop drive) shut down your system. You can use the switch on the power supply if you have on to do this.
18. Remove the new laptop hard drive from the desktop. Remove the new laptop drive from the desktop and if a caddy is used, install new laptop drive in caddy and install any special connectors.
19. Install new drive in your laptop.
20. Power on the laptop. The laptop should now come alive with the OS you cloned from the old drive.
21. Run a scandisk. If all appears well, run a Windows scandisk operation. Select the option to completely scan the entire drive included unused space.
22. Remove the original laptop drive from the desktop. Remove the original drive from the desktop and place it a safe place. Do not format or sell or give it away, just yet.
23. Reconnect desktop hard drives.
24. Check all desktop connections.
25. Power up your desktop.
26. All complete. Hold on to your original drive for a couple of weeks in case your new drive decides to go bad on you.
27. Make a data backup. If you have not done so in a while, make a CD or DVD backup of data on your laptop drive.