.jpg)
Shared Knowledge
"Home Elevator"
28 Dec 2010
Summary: Adding an elevator to your home is not cheap: elevator ($25,000); architect plans ($10,000) and contractor to build required elevator shaft ($15,000 - $30,000).
Background:
Current home is 3 stories and we use all three floors.
I am 65 and wife 64.
Like our home and its location and because so few single floor homes in real estate market that to ensure we do not have to move from our home because of future physical handicap problem, decided to install home elevator.
Looked as home elevator as investment in home because would make future sale possible to the elderly. So few homes have elevators although some newer, very expensive, homes include them.
Looking at our home, could see where an elevator hoist way could be added to outside of the house with elevator stops (an access door) on each floor to be serviced, more or less in a ok location. No interest to putting elevator in center of home or replacing stairs between floors.
Home elevator selection:
Did research and found there are several nation-wide companies that sell elevators. Some elevators use a hydraulic piston to raise the elevator cab while others have a motor and cable installed at the top of the hoist way. Of course each elevator company claimed their mechanics where superior to their competitors.
Contacted 3 different companies to have them visit my home and provide a quote.
To get a quote, you must define:
- Number of stops or floors you wanted serviced. As my home has 3 floors, I wanted a 3 "stop" elevator.
- Size of cab. You can get a elevator cab that really can only hold 1 standing person but I opted for the largest cab available for home installation. The cab I ordered accepts a wheel chair.
- Height of cab interior. I opted for the highest cab ceiling available. Do not like enclosed spaces so higher ceiling "helps" me when I use the elevator.
- Finish of interior walls. All cab interiors are finished off with some sort of plywood veneer but you can opt for fancy wood and various trim. Note that the floor of the elevator is not finished and it is up to you to arrange for some sort of flooring to be installed over the rough plywood floor of the cab.
- 950 pounds seems to be the maximum cargo weight any home elevator can lift. I opted for the 950 pound option.
- Other options such as automatic elevator return to floor desired, lighting in cab, hand rails in cab, finish of elevator control panel in cab, etc. etc.
- Because I do not like the enclosed. small space, feel of any elevator opted for a floor-to-ceiling window in one wall of elevator cab with intent to include windows in elevator hoist way. Windows allow for natural lighting of elevator cab and open it up to the outside and make elevator cab less a box. Of course this added to elevator cost as well as cost of hoist way.
- Learned that home elevator supplier will not build hoist way. Elevator manufacturer will install elevator in hoist way built to their specifications.
- Learned that elevator manufacturer will not even recommend building contractors because of fear of liability.
- Learned that motor control room required. This in addition to elevator hoist way or shaft that must be built.
- Learned that home elevator supplier will not do home electrical wiring. Required 220 volt subpanel in elevator control room must be done by licensed electrician.
- Learned that special building permit required for home elevator but elevator supplier "pulls" this permit.
Quotes:
Knowing what I needed and wanted, my 3 quotes, just for the elevator hardware and elevator hardware installation, came in from $25,000 to $35,000. Most expensive was one using motor, drum and cable installed at top of hoist way. Upon review of all quotes, could not see value difference between low and high and so went with lowest cost supplier, Residential Elevators, Inc located in Florida.
To contract for elevator, needed to provide a deposit and then when elevator hoist way complete and inspected by elevator company, they would then build, ship and then install elevator hardware.
With signed contract and deposit, elevator manufacturer provided a CD-Rom of computer aided design (CAD) hoist way and motor control room drawings and specifications as well as paper drawings.
Architect:
Perhaps an experienced building contractor could use the CD-Rom provided by the elevator manufacturer to make plans that would be accepted by city or country building inspectors but because adding an elevator to my home was only part of a larger home renovation, I contracted with an architect. With the CD-Rom from the elevator manufacturer, the architect prepared all plans to be used for building permits and for the building contractor to use.
Preparing building contractor bid package:
Because elevator manufacturer would not build elevator hoist way, needed a building contractor but before I could contact a potential contractor, needed to firm up various elevator install details to include:
- Inside of elevator hoist way to have drywall or not and if so, be painted? Because my 3 stop elevator opens on 2 sides of the cab, I did not want a passenger to see open structural woodwork as he or she rode in the cab and opted to have the shaft dry walled and painted.
- As I opted to have a window installed in one wall of the elevator cab, needed to define size and manufacturer of windows to be installed in hoist way.
- Needed to define the width of floor doors that open into the elevator cab. Because wanted elevator to accommodate a wheel chair, opted for 36 inch wide doors. By elevator manufacturer definition, these doors had to be solid core doors.
- Needed to define location of elevator motor control room. An enclosed room with a metal locking door is required to house elevator control electronics and hydraulic pump.
- As hoist way to be added to outside of house, had to define hoist way siding materials. In keeping with my homes current outside appearance, opted for brick on the first floor and vinyl siding on the second and third floor of the hoist way.
- All definitions were supplied to architect for incorporation into building plans and specifications.
Building contractor:
Interviewed 3 building contractors. None had ever built an elevator hoist way before. Supplied hoist way drawings to each. Hard to split out cost of just building elevator hoist way from other renovation I contracted for but from elevator manufacturer and talking with building contractor, a 3 stop hoist way costs about $30,000 to build. Hoist way does not have a ton of expensive materials but has to be so precise that takes contractor at least a week or more to build it.
Upon review of quotes, building contractor provided references and my perceived ability to talk with and work with each contractor, I selected a building contractor. Put contractor in touch with architect so they could collaborate on plans and getting the required building permits. Contractor selected would do all work to include making elevator pit, building hoist way and all electrical wiring
Contractor selected was JR Renovations,
Inc.
8019
Iliff Drive, Dunn Loring, VA 22027-1211
Getting it done:
Contacted architect in March.
Selected elevator supplier in May.
Bid packages went to 3 building contractors in August
Building contractor selected in August.
Elevator hoist way complete and inspected by elevator manufacturer in November. Again, elevator only part of larger renovation but building hoist way only part of elevator related worked required. On each floor of house, door way had to be cut into elevator hoist way and a new door installed. Dry wall had to be removed, replaced, sanded and then painted. The exterior of the hoist way had to be finished with brick and vinyl siding, motor control room had to be built and wired, etc. etc. etc.
In November, money was supplied to elevator manufacturer to go ahead and build elevator.
Elevator arrived in pieces in late December.
Crew (3 technicians) from elevator company arrived in early January and it took 3 days to install elevator.
Once elevator installed, local elevator service technician came and using weights provided to local building inspector that elevator would lift 950 pounds. Elevator was certified by local building inspector.
In summary, took 9 months from elevator add idea until it was installed and operational. Again, because other work was done by building contractor, can assume elevator only could have been installed start to finish in 6 months or less but certainly not 1, 2 or 3 months.
Miscues:
Even with an experienced elevator manufacturer, architect, building contractor, and city building code inspectors there were several miscues in integrating an elevator into my home:
- Elevator cab is a rectangle and not a square. Because I insisted that a window be installed in the elevator cab and that windows be installed in the elevator hoist way, 2 of my 3 stop elevator are not deep enough to accommodate a wheel chair easily. When the architect lays out the hoist way of your elevator, make sure the the orientation of the elevator cab is such as to have the long side of the cab aligned with the floor stop.
- I insisted a window be placed in the elevator cab and this window line up with windows in one wall of the elevator hoist way. When the windows were installed in the hoist way, they were centered in the hoist way frame. But the cab is not centered in the hoist way, thus the window in the cab does not perfectly line up with the windows installed in the hoist way.
- Window installed in cab has no way to wash outside of window. Windows installed in hoist way do not open allowing access. Bottom window in hoist way should have been a crank out window allowing access to cab window.
Notes: patio concrete had to be removed to have elevator hoist way pit. Image shows 2nd floor elevator door opening.
.jpg)
Notes: shows elevator hoist way under construction.

Notes: shows some of wood hoist way structure. To keep hoist way from being too hot or cold, heat pump vent routed into hoist way. Allowed by building code. Only marginally helps as hoist way is colder than floors it services.

Note: from second floor elevator access, looking down hoist way. Ready for elevator hardware install. Hoist way dry wall and painted. During elevator installation, walls became very dirty from grease and hand prints. Walls had to be cleaned after elevator installation.

Note: from second floor elevator access, looking directly out. Ready for elevator hardware install. Windows on back of hoist way allowing natural light into hoist way and eventually elevator cab.

Notes: from second floor elevator access door looking up hoist way. Shows 3rd floor or stop door way and window in hoist way at top. Windows can be cleaned by getting moving elevator down or up, in between floors and forcing the floor access door open. Then slowly, carefully, crawling onto the top of the elevator cab.
.jpg)
Notes: shows elevator hardware being installed.
.jpg)
Notes: as seen from 1st floor. Brown door leads to garage. Brown door had to be moved 2 feet to right to allow for building of motor control room.

Notes: red blocks mark areas where windows had to be removed to accommodate elevator hoist way. Door shown here is same elevator access door as shown in image above it.
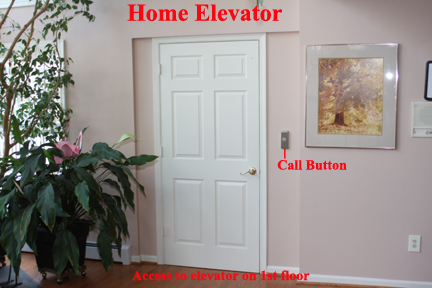
Notes: elevator access, finished, from 1st floor.

Notes: show elevator hardware being installed, looking up hoist way from 1st floor.
.jpg)
Notes: shows where motor control room was built inside garage. Could have been outside. Had to have steel door with deadbolt lock.
.jpg)
Notes: shows content of motor control room. Note electrical subpanel that had to be installed before elevator manufacturer could install large hydraulic pump in grey box on floor and electronics control unit on back wall.
.jpg)
Notes: home elevator electronics control unit. Includes battery backup to allow elevator to descend if power interrupted.
.jpg)
.jpg)
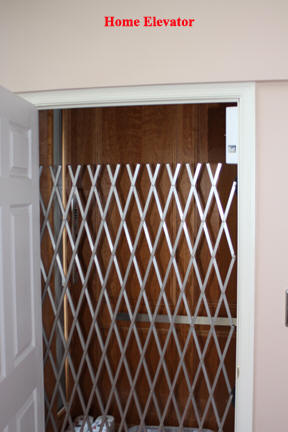
Notes: 1st floor elevator access. Shows scissors door.
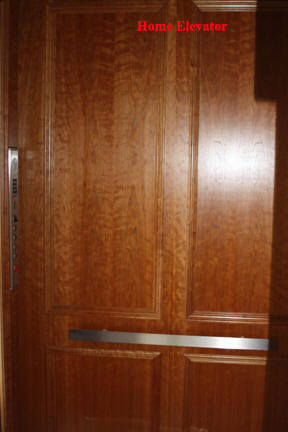
Notes: shows wood detail of cab as seen from 1st floor.
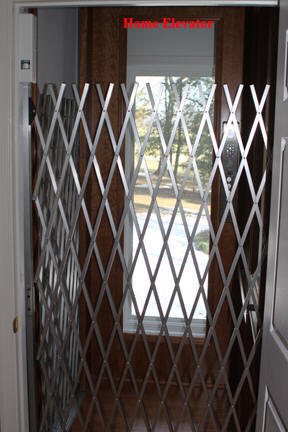
Notes: Looking into cab from second floor access door. Shows scissors doors installed on 2 sides of cab.
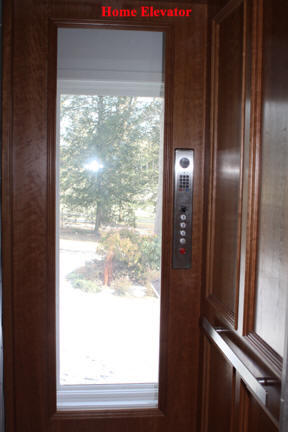
Notes: shows interior of cab and out window in cab, out window in hoist way to backyard. Also note finish of cab interior and metal hand rail installed. This image taken from second floor elevator access door. On second floor, elevator deep enough to accommodate a wheel chair straight in
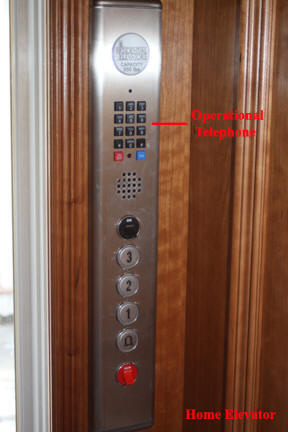
Notes: control unit inside the cab. Included operational hands-free telephone.
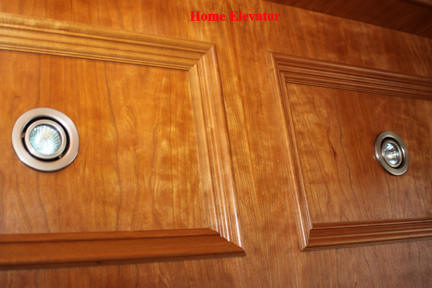
Notes: shows details of wood cab ceiling and optional lights installed.
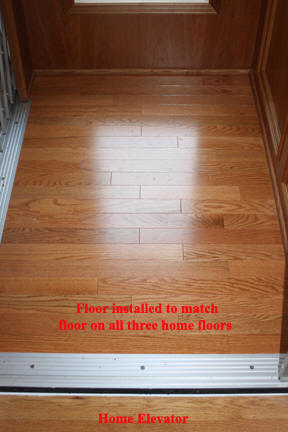
Notes: shows floor installed in elevator cab. This flooring identical to flooring on 1st, 2nd and third floors of home. Again, this floor not installed by elevator manufacturer but by building contractor.
And since install:
Elevator was really installed as an insurance policy. Should either me or my wife become disabled in some way such that we can not navigate stairs in the house, the elevator will provide us mobility freedom. Thus, currently, I do not use it very much.
It can function and does as a dumb waiter, hauling various objects between floors, such as dirty laundry from the 3rd floor bedrooms to the washer and dryer on the first floor. Or groceries from 1st floor to second floor.
So far:
- Elevator squeaked as it moved, the first winter, but solved by applying grease to cab wheels that run on metal track attached to hoist way back wall
- In very hard rain storm, water leaked around the outside of the hoist way into the pit. Water never filled pit and then spill into 1st floor but to prevent even the slightest chance of this every happening, used cinder block water sealer paint and after several applications, no more water in elevator hoist way pit.
I would need to check but believe initial certification by the city was only good for 2 years and then elevator must be loaded with its maximum weight again and tested in front of the city inspector. I, as the home owner, have to pay for this elevator manufacturer service call. It is unclear if I contact the city for inspection or they keep track and will notify me when another inspection/certification is due.