![]()
![]()
![]()
![]()
![]()
![]()
Ron Stultz
![]()
![]()
Many older homes have 2 prong outlets installed. The type that requires an plug-in adapter to use any modern 3 prong appliance.
The difference between a 2 and 3 prong outlet is that the 3 prong provides a ground prong that an appliance plug can use to shunt any electrical short to ground. It is a safety feature and now a requirement in new electrical wiring.
In some older homes, 2 prong outlets have been replaced with a 3 prong but the installation was not done correctly in that the 3rd prong is not actually tied to an electrical ground. When a house is sold or in Northern Virginia anyway, if a 3 prong outlet is installed, the 3rd prong must be tied to electrical ground and the outlet polarity (which side of the outlet is tied to the white wire and which to the black wire, must be correct) or a home inspection will fail. If a 2 prong outlet is installed, that is acceptable to the inspector.
In many older homes that have not had a wiring update, the wiring used only has 2 wires: a white and a black or no ground available at any outlet box. In this situation, replacing a 2 prong with a 3 prong outlet is easily done but this will never pass any sort of home electrical inspection. Again, I am sure it varies from location to location and perhaps from home inspector to home inspector, but if a home only has 2 wire cabling, it is legal to use 2 prong outlets but 3 prong outlets must not be used.
In other older homes, 3 wire cable was used: black, white and a ground. Because only 2 prong outlets were used, the ground wire was attached to the metal outlet box and the outlet made a contact with the ground through its metal-to-metal contact with the box. Where there is a ground present at an outlet box, it is possible to convert from a 2 prong outlet to a 3 prong that will pass a home electrical inspection.
Tools and supplies:
- Phillips screwdriver.
- Flat blade screwdriver.
- Cheap neon lamp 120 volts alternating current (VAC) tester or a voltmeter.
- A flashlight.
- After you have verified there is a ground present at each outlet box:
- 3 prong outlets.
- Metal box ground clips. These clips are pushed down over an edge of the metal box and have a hole for inserting a ground wire that is then crimped. Available at any home improvement store.
- Potentially, a length of 14-2, with ground, cable. Available at any home improvement store.
- Potentially, electric wire caps. Available at any home improvement store.
- Sharp knife.
- Wire cutters.
- Needle nose pliers.
- 3 prong outlet tester. Sold at any home improvement store.
Determining if a ground is present at an outlet box:
The easiest way to be 100% sure an electrical ground is present at an outlet box is to use either a cheap neon lamp 120 VAC) tester or a voltmeter.
1. Got to the home circuit breaker panel and turn off the breaker controlling the outlet you want to test for ground. If you are alone and the circuit breaker panel is a mess of labels and confusion like most panels are, take a radio and plug it into the outlet to be tested. Turn the radio volume up such that you can hear it when right at the circuit breaker panel and turn off circuits one-by-one until the radio suddenly is silent.
2. Go to the outlet box to be tested and confirm that it is electrically dead. Do this by plugging in a lamp or other appliance and confirming that both the top and bottom plug inserts are dead. When it comes to electricity, assume nothing and trust to nothing. The wiring in older homes easily could have been modified many, many times, and not all, correctly.
3. Remove the outlet faceplate.
4. Remove the 2 screws holding the outlet to the metal outlet box. Sometimes wall paper or drywall compound or other material has been spread over the outlet screws and you will have to remove this material before extracting the outlet.
5. Gently pull the outlet out of the outlet box. Some outlets will have long black and white wires on them, while others, very short but the outlet needs to clear of the outlet box and the side terminals of the outlet not touch the outlet box.
6. At the circuit breaker panel, energize the circuit with the outlet exposed.
7. Do not touch bare test leads. Take your neon 120VAC tester or voltmeter set on 120 or higher VAC scale and place one test lead on bare metal of the outlet box and then touch the other test lead to the black screw terminal of the exposed outlet.
8. If the neon lamp of the tester lights or the voltmeter shows 120VAC, then there is an electrical ground present at the outlet box and you can safely convert from the current 2 prong outlet to the newer 3 prong.
9. If the test for electrical ground fails, you can not convert from a 2 prong to a 3 prong outlet and meet safety and home inspection requirements. Go back to the circuit breaker panel: shut off power to the exposed outlet; confirm at the outlet, that it is electrically dead; push outlet back into outlet box; attach outlet to box via the 2 outlet screws; reattach wall plate; energize outlet via the circuit breaker panel and test that power is at outlet by use of a lamp or other plug-in device.
Because you can assume nothing when it comes to the electrical wiring of older homes, the fact that a electrical ground is or is not present at one outlet box does not mean it is present or not present at another outlet box. If you have multiple outlets you want to convert from 2 prong to 3 prong, you need to test each via the method defined above.
Overview: conversion from 2 prong to 3 prong where ground at outlet box:
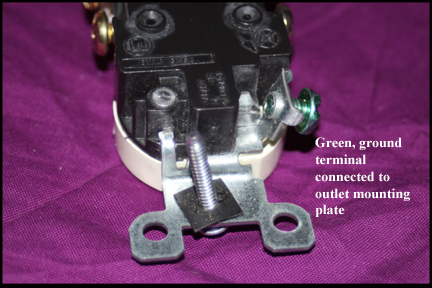
Looking at a new 3 prong outlet, the green or ground screw terminal connects to the metal of the outlet mounting plate. Great, you think, all I have to do is move the black and white wires from the old outlet over to the new 3 prong and let the mounting screws of the 3 prong connect the outlet to the ground of the box. While in some case, you may have no choice but to do this, I advise you to make every effort to get a solid cooper wire from the outlet box to the green screw terminal of the 3 prong outlet. A 3 prong outlet was designed to provide a ground to the mounting box via the green ground screw and not the other way around. Outlets do not always butt up tight and snug against an outlet box and even mounting screws can be used such that they do not make contact between the box and the mounting plate of the outlet. USE A GROUND WIRE.
Besides using a ground wire to get outlet box ground to the outlet, you must make sure that the black and white wires are mounted to the correct side of the outlet. This mounting is known as getting the outlet polarity correct. The 3 prong outlet should be marked on the back of the outlet as to which wire goes where. The black wire is often referred to as "HOT."
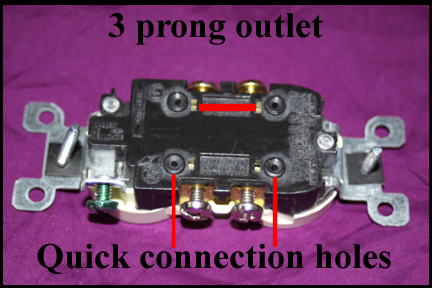
On modern, 3 prong outlets, there are quick connect holes in the back of the outlet. The idea of quick connect is that a wire, stripped of insulation, is pushed down into a hole and "teeth" in the hole make electrical contact and also keep the wire from being pulled out. I suggest you do not use this method of connecting black and white wires. It has been my experience that the "teeth" in some outlets just do not hold the stripped wire tight enough and the wire can come out when the outlet is pushed back into the outlet box for mounting. USE THE OUTLET BLACK AND WHITE SCREW TERMINALS.
Finally, in some outlet boxes, you are going to find that 2, 3 or even as many as 4 cables are present in the box and connected to the outlet. In these cases, you must ensure that all cables are reattached to the new 3 prong outlet. If black and white wires are short or in a jumble, it may be best to twist all black wires together, add a new piece of black wire, stripped, that will go to the outlet, to the bundle and use a plastic electric wire cap. Then bring the single new black wire to the outlet.
If you have multiple cables in an outlet box, try to confirm by looking into the box, that the grounds of all cables are twisted together and attached to the box. If a cable's ground is not connected to other grounds, you should make it so by whatever means fits the unique situation.
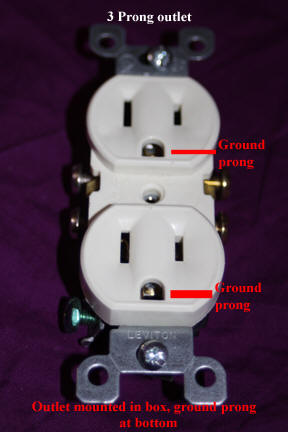
3 prong outlet mounting. It does not matter how a 3 prong outlet is mounted. I mount all 3 prong with the ground prong at the bottom but up to you.
Conversion from 2 prong to 3 prong where ground at outlet box:
Ok, you have tested an outlet and outlet box combination and found that there is an electrical ground present at the box so to replace the old 2 prong with a 3 prong:
1. At circuit breaker panel, shut off power to exposed outlet.
2. At exposed outlet, confirm outlet is electrically dead via your neon lamp tester, voltmeter or by plugging in an appliance and trying to turn it on. When it comes to electricity, double and triple check before you touch bare wires.
3. Unscrew all black and white wires from old 2 prong outlet. Looking at back of new 3 prong outlet, make note of which side gets the "Hot" or black wires.
4. From the 14-2 with ground, cable, strip out a piece of ground wire about 6 inches long. Use wire cutters to cut piece off cable.
5. Take a ground clip and insert ground wire into hole in ground clip and using needle nose pliers, crimp ground wire tight to clip.
6. On one side of the metal box or the other, push the ground clip over the edge of the outlet box. Obviously you want to attach the clip such that the ground wire is in the outlet box and not outside. Pick a spot on the metal box free of paint or drywall spackle or other "insulating" material.
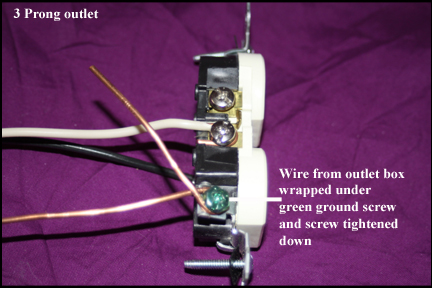
7. Unscrew the green ground terminal screen on the new 3 prong outlet.
8. Leaving plenty of bare ground wire inside the outlet box, wrap the ground wire under and around the green ground terminal screw on your new 3 prong outlet. Wrap the ground wire in a clockwise direction. Use needle nose pliers to tighten the ground wire loop under the green ground screw.
9. Tighten the green ground screw down on the ground wire loop
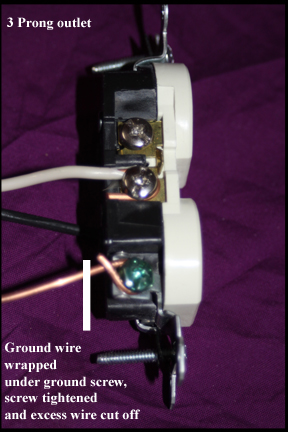
10. Using wire cutters, cut off excess ground wire wrapped around and under green ground screw.
11. Take black wire and wrap it under and around the 3 prong outlet screw that is supposed to get the "HOT" or black wire. Wrap wire clockwise under the screw. If there is not enough insulation stripped off the black wire to fully wrap it under the screw terminal, strip off more insulation.
12. Take needle nose pliers to tighten black wire loop under screw.
13. If there is another black wire, attach it to other screw terminal on same side of 3 prong outlet. If the outlet has only one black wire going to it, screw down tight the second black terminal. Do not leave a terminal screw sticking out that might one day contact the outlet electrical ground.
14. Take white wire and wrap it under and around a screw terminal on the other side of the 3 prong outlet. To be clear, all black wires go on one side and all white wires to terminals on the other side.
15. As with the black wire, wrap the white wire under and around the screw terminal and use needle nose pliers to tighten loop. Wrap white wire around the terminal in a clockwise fashion.
16. Tighten down the screw terminal on the white wire.
17. If there is another white wire, attach it to the other terminal screw on the same side of the 3 prong outlet. If the outlet has only one white wire, tighten down the other white wire terminal screw. Do not leave a terminal screw sticking out that might contact the outlet box one day.
18. With 3 prong outlet fully wired, check everything over. Ground clip tight to box? Ground wire attached to ground clip is tight to click? Ground wire tight on outlet green ground screw terminal? Black or hot wire on correct side of 3 prong outlet. Only black wires on one side of outlet and white on other?
19. Gently push outlet back into outlet box and attach via screws at top and bottom. Leave face plate off. If the wires on the outlet are long, you may need to fold them down to get the outlet to push back into the outlet box.
20. At circuit breaker panel, energize the outlet you have just worked on.
21. At outlet with no face plate, use your new 3 prong outlet tester and plug it into outlet. As outlet has not been used, plugging in the tester may require a little more effort than you are used to.
22. Once fully plugged into the new 3 prong outlet, the 3 prong outlet tester will show the status of the outlet via 3 lights. If all wiring is correct, it will show presence of a ground and the correct polarity of the black and white wires.
23. Success. Attach face plate on outlet.
24. Move to next outlet you want to change and repeat all steps above to include determining if an electrical ground is present at outlet box.
In summary then:
When it comes to electrical, assume nothing and trust nothing.
Check and recheck that any outlet you are about to work on is electrically dead.
Do not use outlet quick connect holes. Use screw terminals.
Wrap wires around under and around terminal screws in a clockwise fashion.
Use a ground wire on the green ground screw terminal of the 3 prong outlet.
Make sure the black or hot wire is attached to the correct side of the new 3 prong outlet.
Check the wired outlet with a 3 prong outlet tester.
If an electrical ground is not present at an outlet box, do not replace 2 prong with 3 prong.