![]()
![]()
![]()
![]()
![]()
![]()
![]()
Ron Stultz
![]()
![]()
"Home Electrical Wiring - Circuit Breaker Panel"
Summary: Most people are scared of their circuit breaker panel and rightly so as there is lethal voltage inside but if you have successfully done home wiring and are very careful, you can go into your circuit breaker panel to either add a new circuit or replace a defective breaker.
Background:
Every house has one, some like mine, have 2: circuit breaker or fuse panel.
For most people, simply knowing how to reset a circuit breaker is all they need to know about a circuit breaker panel. But if you have successfully done home electrical wiring and are careful, there is no reason you can not go into your circuit breaker panel to either add a new circuit or replace a defective breaker (never had a defective breaker).
To be sure, there is lethal 240 volts alternating current (VAC) inside the panel and 240 VAC can kill you, so any intrusion into the circuit breaker panel is to be taken very cautiously and seriously. This is no place for errors or loss of concentration. Go slow.
If you have never been into a circuit breaker panel, best to throw the large breaker at the top of the panel to disconnect 240 VAC from the circuit breaker busses below. There is no way to cut the 240VAC present at the top of the panel so never, ever, get near this section. If you throw the panel breaker, you probably are going to need a battery power light source. AND if you have 2 circuit breaker panels, do not assume that throwing the 240VAC breaker at the top means that the 120VAC buss bars in that panel are no longer "hot". In my home with 2 panels, when the second panel was installed, the electrician made an error and although the 240VAC breaker of my one panel could be "off", one of the busses in the panel was still being feed from my other circuit breaker panel. When it comes to electrical, best to never assume anything. Always check with a voltmeter, always.
Finally, what I provide here is in no way urging anyone to open their circuit breaker panel. I have been into mine and just show what it looks like on the inside and how circuits are attached through breakers.
Circuit breaker panel:
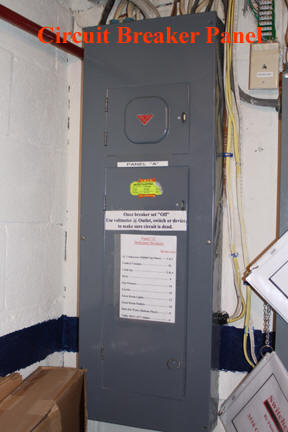
Electrical circuit breaker panels come in various amperage sizes (I have seen 100amp and 200 amp). What you see above is a 200 amp panel, meaning it is made to supply no more than 200 amps when the amperage of all attached circuits are summed. Most homes have a smaller (fewer circuit breaker slots) 100 amp panel.
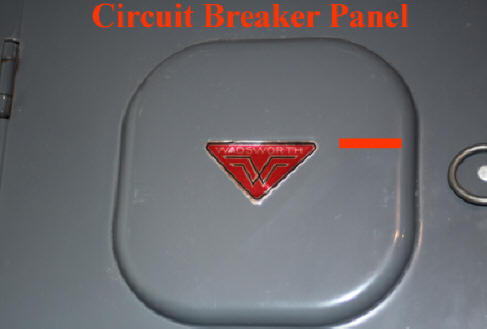
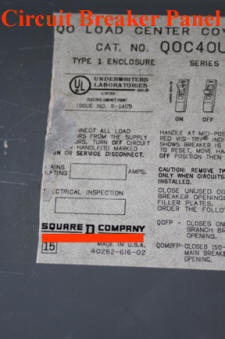
Over the years there have been many manufacturers of circuit breaker panels. If you are going to add a new circuit breaker to the panel or going to replace an installed defective break, you must first determine who made your panel. By-in-large the breakers made for one panel will not fit into another. Breakers for older panels will not be carried at the large home improvement stores whereas Home Depot carries a pretty extensive line of Square D breakers. If you have an older panel that is no longer manufactured, a search of the Internet or perhaps eBay may be a source of breakers.
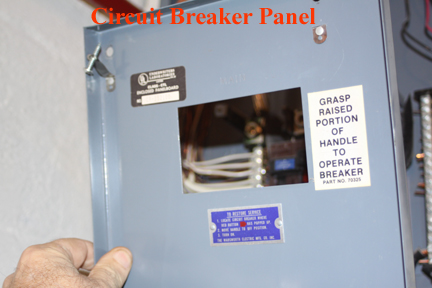
The first step to getting into the circuit beaker panel is to remove the front cover. The front cover can have as few screws as 2 or as many as 6 holding it to the base of the panel. Before you begin removing front cover screws, you need to inspect your panel and see if the front cover slides over metal tabs anyway. In my case, the front cover is only held on by screws and when I remove all, I simply pull the cover towards me at the top, lift off and then place on the floor out of the way. On both my circuit breaker panels, the front cover is quite heavy so caution when you begin to pull it off panel and lift away. You do not want to drop it.
Once the front cover has been removed, you can see some of the insides of the panel. In the image below, you can see where 240 VAC enters (large black wires, dead center the top) and how house circuit wiring is routed into the panel at the top.
To go deeper into the panel requires the removal of the circuit breaker cover. This cover is held at the top of the panel by 2 screws and tabs at the bottom that the panel must slip over upon removal or reinstall (how exactly your circuit breaker cover is installed may vary from how the covers on my 2 panels remove).
Caution: always keep you fingers in the open so you can see them. Never grasp anything with your hand closed on it such that your fingers are in behind. Once again, dangerous voltages are in the panel.
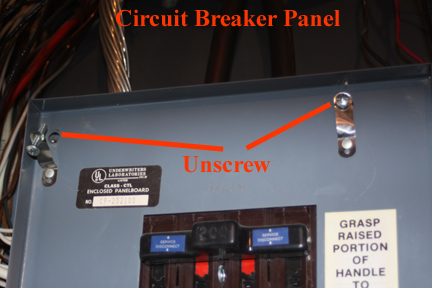
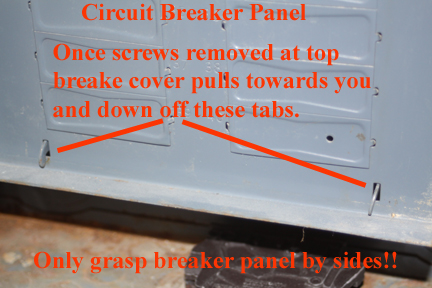
When the screws are loose at the top, place one hand on either side of the panel gently as you do not to touch anything "hot" under the cover and pull the cover towards you and then off the tabs at the bottom.
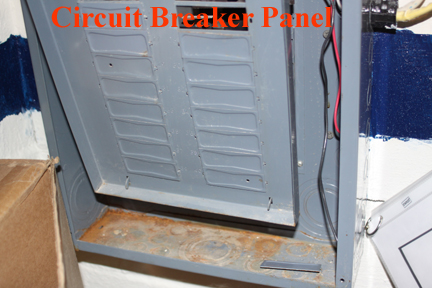
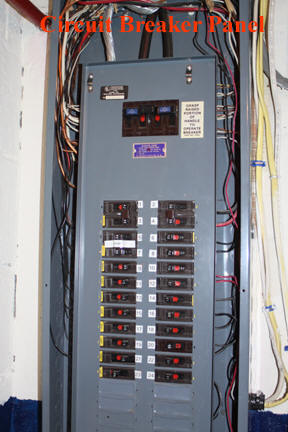
Now with front cover and breaker cover removed, you can see the organization, structure of the circuit breaker box.
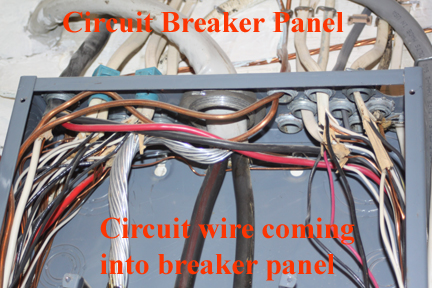
House 240 volts comes in the top center of the panel and is the larges 3 wires in the image above: 2 black wires and the heavy, non insulated, ground wire.
Although it might be tight, the cable of a new circuit can be routed down into the panel through an existing hole or another hole on the side of the panel used.
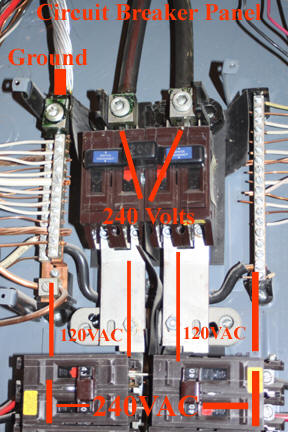
The image on the left shows the 240 VAC connection to the panel. Each side of the 240 VAC junction is hooked to a panel buss running down the length of the panel. (The voltage between one side of the 240VAC line and ground is 120 VAC). The 2 busses running the length of the panel have a tab or blade configuration such that breakers oscillate as to which buss they attach to. This means that breakers on the right of center are on one buss and then the other all the way down the panel and the same is true for breakers on the left side.
While 120VAC is dangerous and can certainly hurt you , 240VAC is lethal and so you must stay away from the 240VAC wires and their associated metal connector on the whole-house-breaker.
Some home devices require 240VAC and this is derived by having a larger breaker sit over (2) 120VAC buss blades. Most 240V breakers will be installed at the top of the panel.
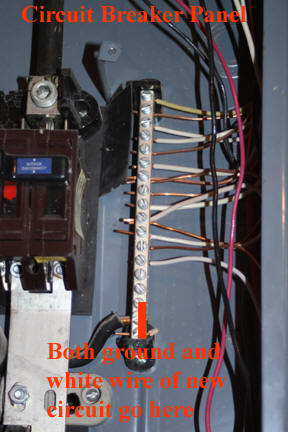
The image on the right above shows how the white wire and ground of any house circuit is terminated to the panel. When a new circuit is added, an empty terminal "slot" is located, the screw of the empty slot loosened, the white and ground wire inserted underneath the screw and then the screw tightened back down. If your panel does not have any empty ground terminal block "slots", you can loosen the screw of any "slot" that does not have more than 2 wires inserted into it and add your white and ground. Once the screw in the terminal block has been tightened, the white and ground wires underneath the screw should not be loose or be able to move in any way.
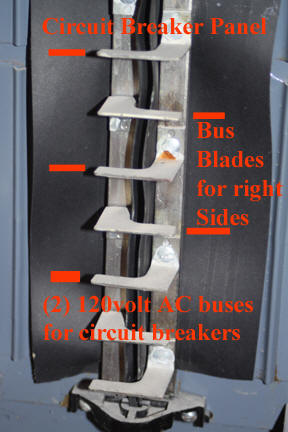
This image shows the construction of the 120VAC busses that come off the 240VAC feed. Note how each buss uses blades that stick in opposite directions to allow circuit breakers to be pushed down over the buss blades on the left and right of center. All exposed buss blades are hot with 120VAC so caution!
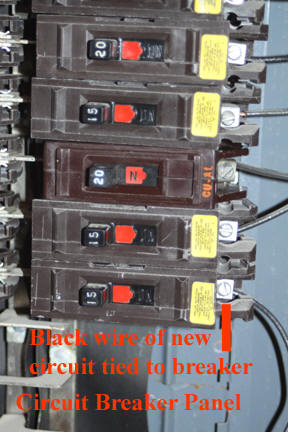
This image shows how the black wire of a home circuit is routed to a screw on each circuit breaker. Attachment of a house circuit black wire to the breaker is similar to the white and ground terminal block. The screw on the breaker is loosened, the black wire inserted in the hole underneath the screw and then the screw tightened down on the black wire. Again, the screw must be tight down on the black wire so the black wire is not loose or move at all. Also, make sure that there is no bare copper wire exposed at the breaker screw terminal that you or anyone else could come in contact with later.
Note: I have worked on panels that did not have any available breaker slots but I needed to add a circuit. Some panel, breaker manufacturers, sell thin breakers that allow 2 breakers to occupy a single breaker slot. If you have to go this way, make sure you do not exceed the amperage rating of your circuit breaker panel.
.jpg)
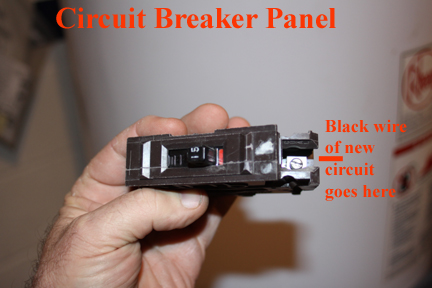
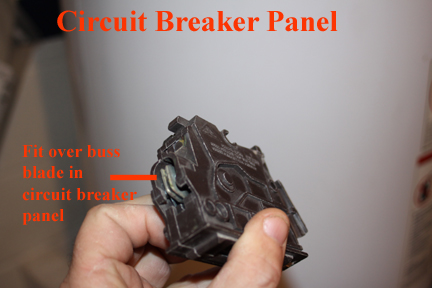
The 3 images above show what a single pole (120VAC), 15 amp, breaker for one of my 2 circuit breaker panels look like but as I have said, once upon a time there were many different circuit panel manufacturers with different breaker designs so the breakers in your panel may look differently.
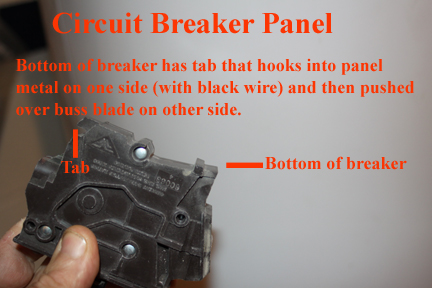
Of special note is the bottom of the breaker. In my 2 panels, a circuit breaker latches under a metal tab built into the panel and then the other end of the breaker is pushed hard and down over a buss tab. How a breaker in your panel is installed may be different.
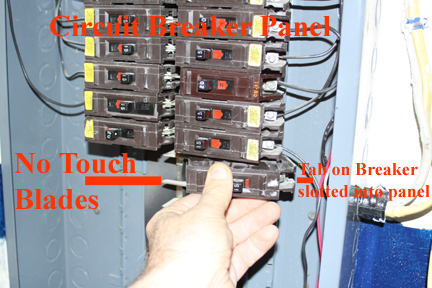
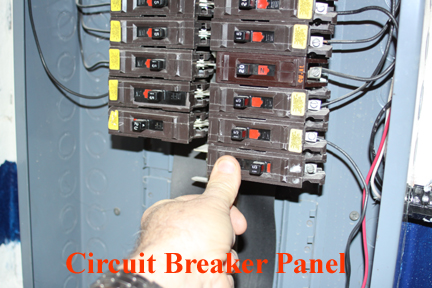
The 2 images above show a breaker being installed in a panel. In the first image the breaker in the "off" position, is latched back under the tab in the panel and then pushed down over a buss blade. Note how all fingers are visible. Once again, those metal tabs extending down the length of the panel are hot and avoid them.
With a defective breaker replaced or a new circuit added, the main panel breaker can be thrown at the time energizing the buss bars and you can then throw the breaker you installed or replaced to test. If all is correct, time to replace the breaker cover.
When replacing the breaker cover, be especially careful at the top. Again, 240VAC is present at the top and you do not want the metal breaker cover to come in contact with live 240VAC.
In summary then:
- Do not go into your circuit breaker panel if you have not worked with electrical.
- If you have some electrical experience but never been inside a panel, throw the large 240 VAC breaker at the top of the panel.
- If you have 2 circuit breaker panels, do not assume throwing the 240VAC breaker at the top of one panel means the buss bars in that panel are completely dead. Always check voltages with a voltmeter, always.
- Keep your fingers in full view. Never wrap your hand around anything.