![]()
![]()
![]()
![]()
![]()
![]()
Ron Stultz
![]()
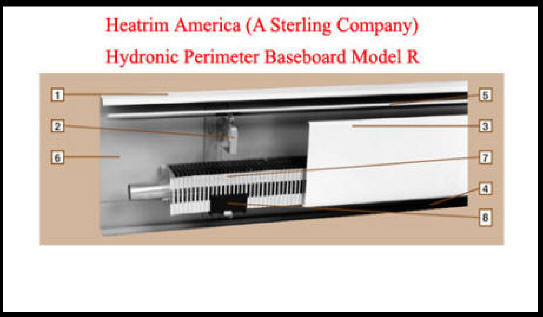
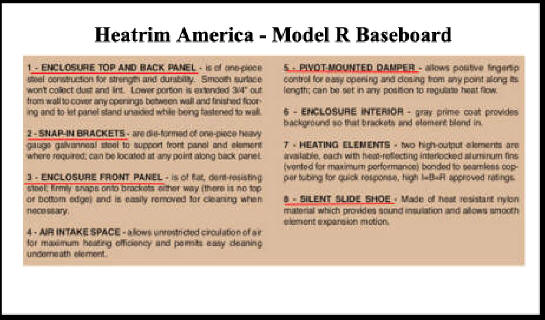
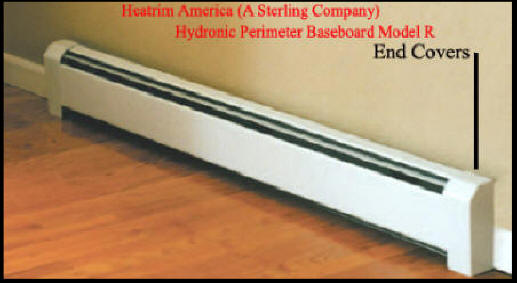
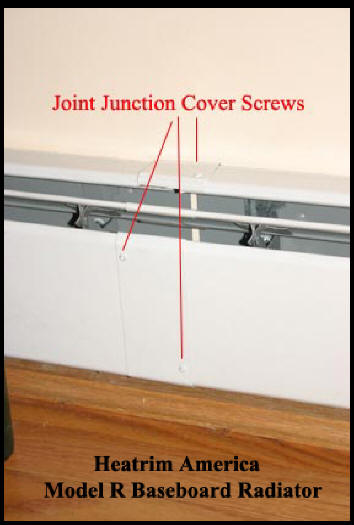
Heatrim American Hydronic Perimeter Baseboard Model R - "Owner Review and Repairing\Reinstalling”
In 1991 my wife and I bought an older house and set about doing a complete renovation of it. Although not called for in the specifications I drafted of the renovation, the general contractor removed all the hydronic baseboard units everywhere in the house, and when they were finally replaced, the heating and air conditioning contractor installed new Heatrim American Hydronic Perimeter Baseboards Model R.
Now I have not done any sort of survey of perimeter baseboard hardware but Heatrim American (Heatrim) or at least Model R has to be one of the cheapest units on the market. We had not lived in the house for more than a couple of weeks when I began to see various things wrong with the Heatrim units What is wrong with Heatrim? In my case, the first thing I noticed was that the end covers, which slip over the back and front face plates were always askew from vertical. As it just sits on the end over the back and front plates, there is nothing to keep it from moving and unless your house is never vacuumed or the floors washed, the end covers will always be out of alignment and in some cases, fall off. Other things? My installation uses 8-foot lengths of back plate; heat louver and a front faceplate except how many walls are exactly 8 feet in length? So every time there was a hydronic radiator run of more than 8 feet, the installers cut a piece of the back plate, louver and front plate to completely cover the radiator. And to Heatrim’s credit, they expected this and provided these small covers, which go over the junctions of 2 pieces of back plate, louver and faceplate. Problem is, just like the end covers, there is nothing to keep these junction covers in place. They are supposed to snap on and stay in place and they do for a while but eventually, these junction covers come off. Finally, the whole baseboard installation consists of a back plate which is supposed to be attached to the wall into which a hanger is fitted, onto which the louver is “clipped” over the tab at the top of the hanger and the faceplate fitted over a tab at the top and the bottom of the hanger. Everything is a “fit over”, which just does not stay in place. After only a week or 2, many of the faceplates had come loose from their hanger and sagged or gapped in the middle of a run or a louver was completely disconnected from the hanger and lay inside the baseboard on the actual hydronic radiator itself.
Finally, after living with this situation for some number of years, I decided it was time to take some action and not wanting to replace what I had, I went through the following repair, reinstallation procedures:
- First, I had to track down the make and model of the perimeter baseboard enclosures I had as the installer had left me no information about the enclosures.
- I went around and did a survey of all the baseboard enclosures I had to create an order of the parts I needed. In my case, having 4 children, some enclosure front panels were so dented or bent, they had to be replaced, and I was missing numerous enclosure top and bank panel, pivot-mounted damper and enclosure front panel junction covers. Also, upon examination I thought more snap-in brackets might help and more silent slide shoes, which actually hold the heating element, so I ordered many of these.
- At the first baseboard enclosure, I removed the end covers, the enclosure front panel, and the pivot-mounted damper and examined the snap-in brackets and the enclosure top and back panel. As I suspected, none of the snap-in brackets was actually screwed into the wall and in fact, the enclosure top and back panel was only screwed here and there with drywall screwed without any regard to trying to find a wall stud to screw into. Thus, the enclosure top and back panel was not attached to the wall and so that is the first thing I corrected. Using hollow wall anchors, I drilled a small hole through the sheet metal of the enclosure top and back panel all the way through the drywall behind it, then inserted a hollow wall plastic anchor, and finally used a cordless screwdriver to mount a screw in every plastic insert. With the plastic drywall insert in place, the screw then drew up tight and the enclosure top and back panel was mounted tightly against the back wall. I repeated the process of tightly mounting the enclosure top and back panel to the wall ever several feet for the entire length of the enclosure run.
- Now time to place snap-in brackets. As I thought, part of the problem of the pivot-mounted damper falling off and sagging enclosure front panels was too few snap-in brackets, I first slide enough brackets into the tracks of the enclosure top and back panel so that I had a snap-in bracket every 2 feet at a minimum. I then went to each end of the enclosure top and back panel and back one foot from where the heating element ended, I snapped the snap-in bracket into place but I went a step further and using the 3 holes in the snap-in bracket which were obviously meant to hold screws, I actually used 3 hollow wall screws, plastic anchors and screwed in each snap-in bracket. Again, with the hollow wall anchors, the snap-in brackets became well attached to the wall behind the enclosure top and back panel. I then repeated my process of snap-in bracket location determination and screwing them through the sheet metal of the enclosure top and back panel into the drywall behind the enclosure.
- With all snap-in brackets now in place and firmly attached to the enclosure and top and back panel as well as the drywall behind the enclosure, I inserted a silent slide shoe underneath the heating element at every snap-in bracket.
- Pivot-mounted dampers were tricky as they have a clip on the underside of the damper which supposedly snaps into a hole in the snap-in bracket, but the clip can and does slide freely in the damper and so it took a while to get a damper into place on all the installed snap-in brackets. Where there was a junction in the pivot-mounted damper, I used superglue to glue the provided junction cover into place.
- Next came the enclosure front panel. This panel is supposed to fit over a tab at the top of the snap-in bracket and over a finger of metal sticking out at the bottom of the snap-in bracket. As I mounted the enclosure front panel, what I found was that some of the snap-in bracket’s lower enclosure front panel fingers where bent upwards and were not actually holding the enclosure front panel into place tightly. Here a pair of pliers and a simple bend down corrected the problem and I was able to get on the enclosure front panel so that it was tightly held by the snap-in brackets.
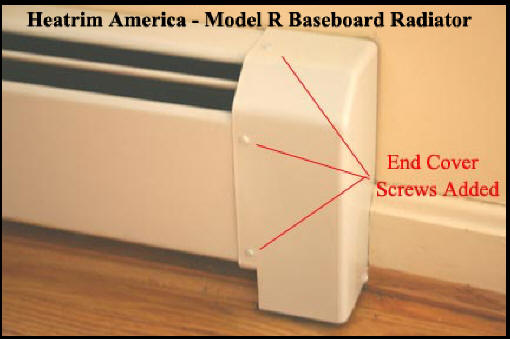
- With the pivot-mounted damper and the enclosure front panel in place, I moved to the end covers. Here I installed the covers over the end of the enclosure top and back panel and slide the end of the enclosure front panel into the slot provided for it on the end cover. Now taking a small drill bit, I drilled 2 small holes into the front of the cover, all the way through the enclosure front panel and also one hole on the top of the end cover all the way through the enclosure top and back panel and screwed in small sheet metal screws. With 3 screws in place, there is no way the end cover can move now.
- Next, I went to every enclosure front panel junction and placed a junction cover over it. I then drilled 2 small holes on each side of the junction metal, all the way through the associated enclosure front panel and installed 4 small sheet metal screws. Now the junction on the enclosure front panel could not ever come apart or fall off.
- I repeated the process defined above for all the enclosures I had and then took one end cover to Home Depot and had them make a quart of paint, which exactly matched the color of my end cover. With a small brush, I went around and painted all the heads of the screws I installed in the end covers and at enclosure front panel junctions and touched up whatever needed it due to slight scratches or whatever.
All the above took some time and I have not detailed what was required to completely replace an enclosure top and back panel which I did have to do in several cases but the point being is that my installation of the Heatrim product is 100% better than it originally was and no more will I see end covers askew or junction covers missing or off.