Shared Knowledge
"Zone Forced Air - Damper - Repair"
4 Feb 2020
Summary: When a zone no longer responds to a thermostat setting for either heat or cool, there could be many reasons, to include damper failure. A damper can fail either by not fully opening or closing when it should.
Background: If your air flow problem is limited to a single zone (air flowing when it shouldn't or not flowing when it should), meaning other zones respond correctly to thermostat settings for heat or cool, then mostly likely the problem is damper failure in the one zone you are having problems with. Depending on the type of failure (no air flows when it should or air flows all the time), before replacing or repairing the damper in the offending zone, you need to test the damper.
To do this, if air flows all the time when it shouldn't, turn completely "off" the thermostat in the offending zone and raise or lower the temperature setting of a thermostat in another zone. If air flows into the zone that is calling for air but is also flowing in the zone with the thermostat set to "off" then either the damper is not getting 24volts alternating current (VAC) from the zone control board (again, normally open, powered closed is the normal type damper installed) or the damper has potentially failed. At this point, you need to take a voltmeter to the offending damper and determine if it is getting 24VAC or the command to close. If no voltage is present at damper, either cabling from zone control board is bad, a loose connection at damper or on zone control board or the zone control board has a problem.
If 24VAC is present on the damper that is open all the time, the motor has failed and needs to be replaced.
If air does not flow when command to, check that 24VAC is not present on the offending damper. If 24VAC is present, there is a problem with either cabling or the zone control board or the thermostat.
If 24VAC is not present at the offending damper, the damper motor could be stuck or the spring inside the motor or inside the damper assembly is broken and not pulling the internal plate open.
If you call a technician to find and fix the problem with a damper, do not automatically agree to have all dampers assemblies replaced. Unless a spring inside an old style damper has failed, replacement of motor head is all that is required. Yes, foam-based, damper closed seals inside damper deteriorate over time but some leakage of air through a closed damper is built in heating and cooling calculations and zone requirements. Complete damper assembly replacement is labor intensive and expensive.
Damper Motor Replacement: If the damper motor is not closing when it should, the motor head needs to be replaced. This is certainly a DIY job if you are willing to procure the correct motor head and probably climb a ladder.
In my case, I have 3 zones with one damper per zone. 2 of the zones have newer Honeywell damper assemblies and one zone has an older Lennox damper motor and assembly.
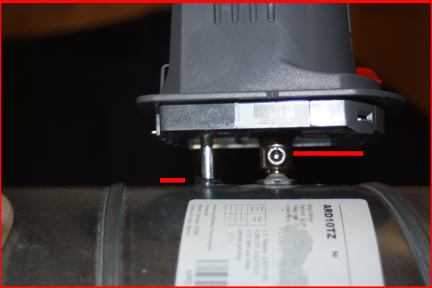
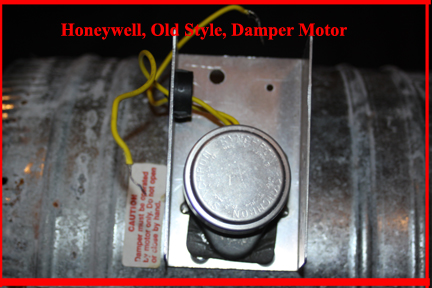
The newer Honeywell damper have a perfectly round damper plate shaft sticking out of it, on which the damper motor sits on top the shaft and also into a tab that sticks down into the damper assembly sheet metal to keep the motor from simply turning on the damper plate shaft.
This style damper motor is secured to the damper plate by a Torx set screw.
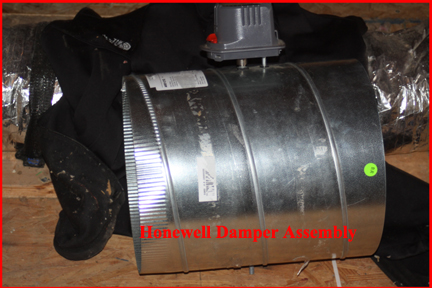
The image below shows how the Honeywell damper motor is set into the damper assembly and sits on top of the damper plate shaft.
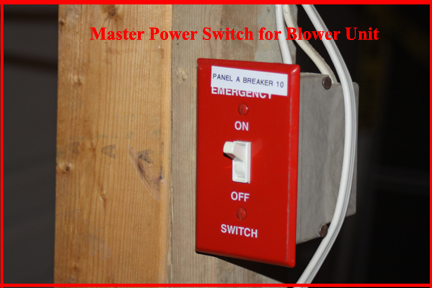
Removal of this type of damper is easy: turn off circuit breaker or switch supplying power to zone control board. In my case, this switch is near blower in attic.
Unhook 24VAC wires from damper connections. How wires are attached vary. Some are simply twisted together (from zone control board to damper wire leads) while the newer Honeywell uses a push-down connector, you push down and then pull wire out.
Now locate Torx set screw on underside of damper motor. I forget size of Torx. Using correct Torx, loosen motor from shaft and simple lift up and off.
Install a new style Honeywell damper is not quite as easy because the damper plate shaft is perfectly round and the spring that returns the internal damper plate to fully open is inside the motor and not the damper assembly. This means there is some alignment that has to be done between the shaft and the motor before the Torx screw is tightened.
To install new Honeywell motor head, first connect the 24VAC damper wires to the new motor, restore power to the system and via thermostat settings, make sure the damper motor is responding correctly to both open and close. No sense installing a factory-dead damper.
Turn off power to system but leave wires connected to new damper motor.
With your fingers, rotate the damper plate shaft and get a feel for when it hits the closed position foam in the damper assembly. The plate will rotate both clockwise or counter clockwise but in both cases, hit the foam at the closed position and stop rotating. Looking at how motor is going to be installed on damper assembly meaning tab that sticks down into sheet metal assembly, note direction motor moves to the fully closed position, again clockwise or counterclockwise . In most cases, the motor will move from counterclockwise, as seen looking down on top. This means, the damper plate is going to move counterclockwise to close. So to install motor, first move the damper plate with your fingers counterclockwise until it hits the foam inside the damper assembly and stops moving.
Now turn on your system and make the damper you are going to install, close.
With your fingers, ensure the damper plate is fully closed against the foam in the assembly and use needle nose pliers or other to keep shaft in closed position.
Now take "closed" damper motor and sit down on top of damper assembly such that motor goes over damper plate shaft and motor tab sticks down into hold in damper assembly. With damper plate held in closed position and damper motor in closed position, tighten Torx set screw. Really tighten it.
Now using thermostats, check for proper operation of newly installed damper motor. If incorrect, perhaps damper plate is set in incorrect position to open or Torx set screw was not tight enough or 24VAC is no longer at damper motor.
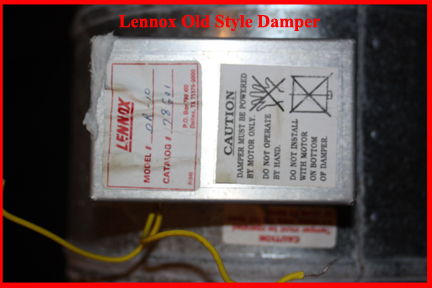
Old Style Damper Motor Replacement: Again, there are many different manufacturers of damper assemblies and motors over the years. Some still in business and some not.
In my case, the one older style damper assembly and motor was from Lennox although they did not make the actual motor.
If the offending damper is allowing air flow all the time perhaps the motor is bad (again most damper motors are normally open, powered closed).
Turn off power to your system, how ever you need to do this. Again, there is a switch near my attic-based air blower that kills control power.
Remove dust cover from old style damper motor. In most cases it is simply pushed on and pulled off, but might have one or more screws.
With access to wiring, turn back on power to system and set thermostats such there should not be any air passing through duct with offending motor.
Using a voltmeter, check that 24VAC is present at motor terminals, wires, connections. 24VAC commands motor to turn on and move the damper plate to the closed position.
If 24VAC is not present at damper, either loose wiring, bad wiring or perhaps problem with zone control board.
If 24VAC is present at damper motor and air is still flow that duct, zone, motor is bad.
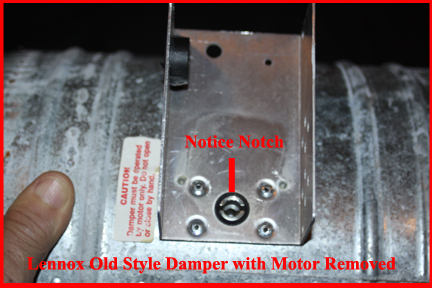
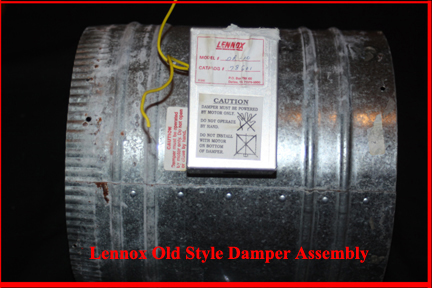
To remove old motor from housing, turn off power to system, disconnect damper control wires from zone control board and then remove 2 small screws holding the motor to the housing. By looking at the image above and the one below, you can see the 2 small screws holding the motor to the housing on either side of the round motor near the bottom but not at the bottom.
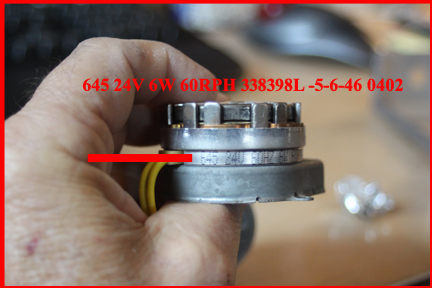
Again, Lennox did not make motor and in most cases damper manufacturers do not make the motors they use, so you must determine who did make motor and/or model number. This may or may not be on motor itself. In my case it, a very long number was present on the actual motor.
In image below, actual manufacturer's name was found on the top of the motor.
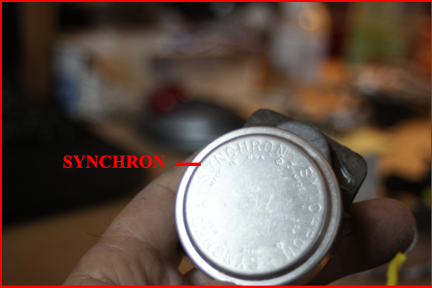
Now with manufacturer's name and complete model number, I was able to locate new motor on the Internet.
Once you have a new motor, turn off power, wire zone control board to motor, set thermostats such that new motor should close and test it. Uninstalled in housing, you should be able to see bottom of motor turn as you connect and disconnect 24VAC.
Now, unlike the newer style Honeywell damper motors, the older style is very easy to install.
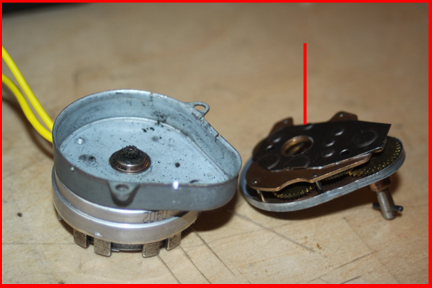
Looking at the image below, notice at the bottom that where the motor connects to the damper plate, it is keyed, or notched.
In the image below, notice on the geared portion of the motor assembly how a shaft sticks out with tabs on it that are going to fit into slots in the damper plate shaft.
So to install a new, old type motor , place motor into housing and make sure motor shaft tab sit properly in shaft slots and then reattach motor to housing with 2 screws.
Again attach zone control board wires and test damper by commanding it to "open" and "close".
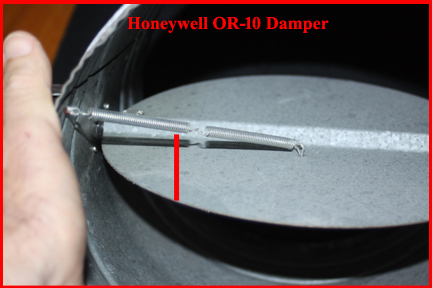
If damper is closed all the time, no matter the thermostat setting, could be the spring inside the damper assembly is broken. Again, in most dampers, power is applied to a motor to close the damper and when power removed from damper, a spring pulls internal damper plate open. If damper plate spring is broken, air flow might push the damper fully open, partially open or not open at all.
Replacing a spring in an old style damper is not an easy task and recommend that you contact a service technician and have entire damper assembly replaced with newer Honeywell type.
Replacing Entire Damper Assembly:
Damper assemblies, meaning a hunk of sheet metal duct with a damper plate on shaft inside sheet metal with motor attached is possible do-it-yourself (DIY) but depends greatly on location of damper assembly. Those that are difficult to reach or require a ladder or those as part of a full metal duct work are best left to a professional.
In my case, I replaced 2 old Lennox style, spring inside sheet metal assembly, with the newer Honeywell assembly.
Note there that although damper assemblies appear to be the same length, the diameter varies and you must procure the correct size damper assembly for duct you are going to install in and yes, there are rectangular or square dampers available.
To replace an entire assembly, you first must remove any insulation around the area of the damper assembly. This is best done with a box cutter. Using the new assembly as a guide, cut the insulation out around the old damper assembly and then 2 inches or more on either side. Once you have the old damper completely exposed, you will find that it is attached to the duct using sheet metal screws. Maybe 3 on each end of the damper.
Remove these screws, all screws.
Now, the old damper will be wedged into the duct and if a flex duct on either end, no real problem as you simply pull it off the ends of the old damper.
If the old damper is installed in a sheet metal duct, you going to have to be able to pull one end of the duct away from the old damper to remove it. This can be easy or hard depending on your duct work.
One one of my replacements, I had to loosen the strapping that was supporting a long duct run and then push one end duct away from the old damper.
How you accomplish this is "how ever you can" and will depend on your installation.
Removed old damper assembly.
If you have not already prepared new damper by setting the motor on the damper plate shaft and ensured it is fully closing and opening as it should, do so now.
With confirmation the new damper assembly is properly set up, place into duct work and get both ends of duct work, fully onto the ends of the new damper assembly. Rotate the new damper as desired or required for damper 24VAC connections and perhaps for visual confirmation of correct damper operation in use.
Once all looks good, use sheet metal screws to attach new damper assembly to existing duct work. I use "self tapping" sheet metal screws but find if one screw will not begin to tap into the metal, try another screw. Once you have at least 3 sheet metal screws at each end of the new assembly, take foil tape and wrap the ends splices completely to seal the duct.
Now use the existing insulation you removed or procure some new insulation and install. Again foil tape wrap the insulation fully around the new damper assembly but ensuring the damper plate rod on the back side of the damper is not covered. Once insulation is installed, there are cable straps available of various lengths for duct work and you can use to ensure both ends of the new damper assembly are tight.
Again, do not replace a whole assembly if simply a motor problem and do not let some HVAC tech talk you into completely new damper assemblies as soon as he sees your system. This is a common trick and expensive and not needed in most cases.
More Topics on Zone Forced Air HVAC