Shared Knowledge
"HP DV1000 - How to Replace the Power Jack"
16 February 2011
Summary: motherboard must be completely removed from DV1000. Getting old power jack out is not easy. Must have decent soldering skills. To have this professionally done costs from $200 - $300 dollars as very labor intensive.
Background:
On a laptop, the 2 most fragile components are the LCD screen and the power jack.
Laptop power jacks become damaged from careless power adapter plug insertion or removal or if cable from the power adapter to the laptop is tripped over or yanked.
Once a laptop power jack is damaged, the laptop will no longer get power from the adapter or the adapter plug can even get so hot as to fuse into the laptop power jack.
Replacement of a laptop power jack is not an easy task and in most cases, the owner simply has to buy another laptop as professional repair costs are too high to warrant repairs.
But if you have decent soldering skills and are not afraid to take apart your laptop, you can do-it-yourself (DIY). In the worst case, the laptop will not work after you try to repair it and it was not working before hand, so nothing lost.
Power jack replacement overview:
Nasty job. Took me about as much time to get old jack out and new jack installed as it did to completely disassemble and reassemble the DV1000! The problem is that the power jack is soldered to the motherboard in 7 different places and the solder used on the board resists the use of a solder sucker.
Warning: on the soldered side of the motherboard, there is a flat pack resistor installed very close to the last 2 power jack lead solder pads. In removing the old power jack and installing a new jack, you do not want to damage this resistor or solder connect it to the power jack in any way.
Tools and Supplies:
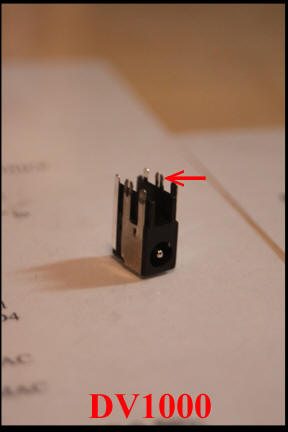
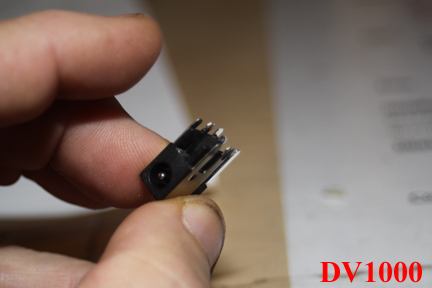
New power jack. Most be for DV1000. Available on eBay and other Internet sources. $2 each + shipping. Because so cheap, buy 2 so if you accidentally damage one installing onto the motherboard, you will have another immediately to use.
Phillips screwdriver with sharp points.
30 watt soldering iron.
Thin, rosin-core solder.
Magnifying glass. Really need this to check for pad shorts after new jack installed.
Exacto knife.
Wire cutters.
Needle nose pliers.
Solder sucker. Available at Radio Shack and from various sources on Internet.
Removing the motherboard:
Shut down Windows.
Unplug power adapter from laptop.
Remove battery.
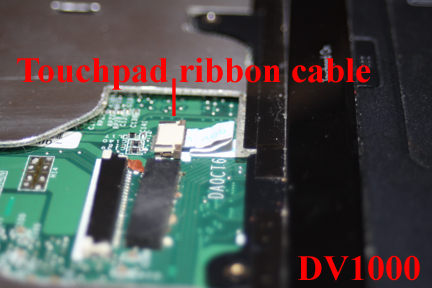
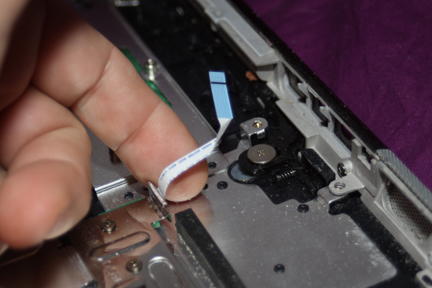
With laptop resting on its bottom, carefully remove the ribbon cable that connects the touch pad to the motherboard.
Use your fingers right at the female connector on the motherboard.
Never use pliers or any tool on a ribbon cable.
The ribbon cable pulls straight out of the female connector.
Note. When you install the motherboard into the laptop you must make sure this cable is exposed to the female connector on the top.
Flip laptop over so it is resting on its top.
Remove the black speaker module. Unhook the cable from the module and then pull module back and up and out of the laptop.
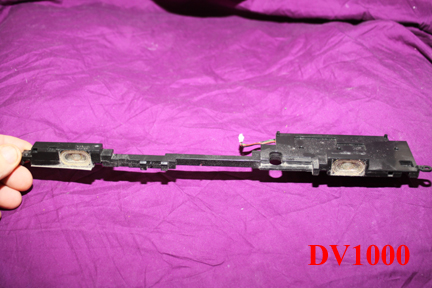
With speaker module removed, you will see the ribbon cable that connects front headphones and microphone jacks to the motherboard.
At the connector on the motherboard, grasp the cable and pull it straight out of the female connector.
Never use pliers or any tool on a flat ribbon cable.
Note how this cable comes up from underneath the motherboard. When you reinstall the motherboard, must make sure this cable is exposed to the component side of the motherboard.
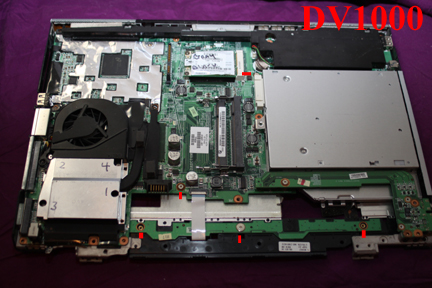
If you have not done so, remove the CD-DVD drive. It pulls out the side
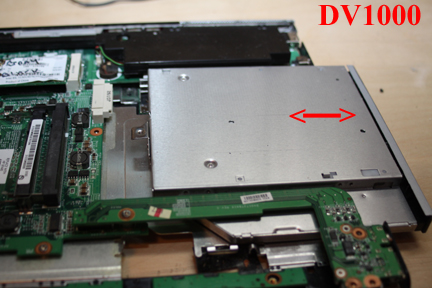
Now looking at motherboard, find and remove all screws. These screws hold the motherboard to the top of the laptop.
With screws removed, begin to lift the motherboard up at the display end. Now note that the motherboard has connectors on the sides that fit into holes in the sides of the top case and you will need to gently pull the plastic sides of the case off the motherboard connectors to get the motherboard to lift up out of the laptop top. Also note that the front of the motherboard has tabs on it that fit into slots in the laptop top case. So lift motherboard, and then pull towards display end to remove tabs from slots.
If the motherboard seems stuck, check that all screws have been removed. Easy to overlook one.
Note: there is a switch on the motherboard that when depressed, signals if the display is closed. This switch is depressed when the display pushes down on a rubber tipped lever that is attached to the laptop top case. When moving the laptop top case do not move this lever or you will not have display close when you reassemble.
When motherboard comes out, the switch board will come with it. Leave the switch board attached, via its ribbon cable to the motherboard.

To to remove the old power jack:
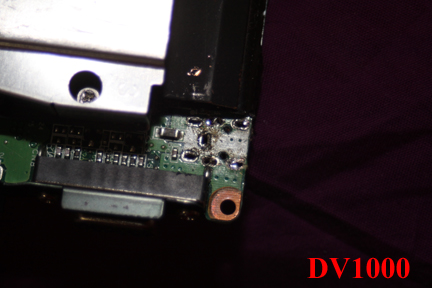
Because the defective power jack is attached to the motherboard via 7 solder pads and the solder used on the board resisted my use of a solder sucker to completely clean a solder pad, I found it impossible to get the old jack out with out carefully breaking it apart and then removing one metal lead at a time.
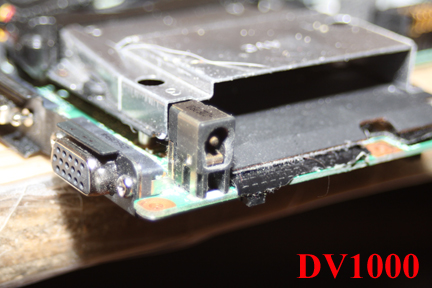
Using wire cutters or other, carefully cut the plastic of the old power jack and remove all pieces, leaving only 7 metal leads sticking up into the soldered side of the motherboard. Leave enough metal lead to get needle nose pliers on.
Using needle nose pliers, grasp one lead at a time and pull down while applying a hot soldering iron to solder pad of the same lead. When solder melts, with luck the lead will pull out.
Remove all metal leads.
Now using a solder sucker, apply a hot soldering iron to each lead pad and remove as much solder as possible. I found the solder cooled very rapidly once the soldering iron was removed and thus it took a while to remove even a very small amount of solder.
Using an Exacto knife, heat each pad and work the Exacto knife down to clear the hole where the new jack leads must go.
Remove all solder from the component side of the board that got pushed down by the Exacto knife.
Use the solder sucker on all pads to clean as much solder off as possible.
Make sure no two jack solder pads are surface solder connected.
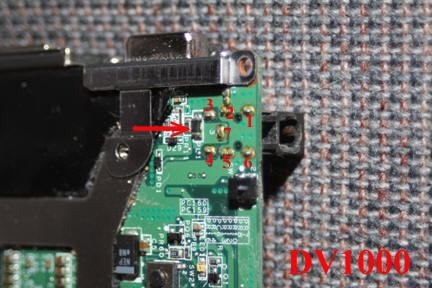
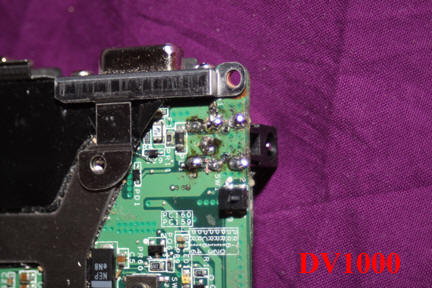
The motherboard must look very much like below to get the new jack to install.
When motherboard is ready for the new power jack, place power jack leads over holes on motherboard (do this on correct side of motherboard!!) and apply gentle pressure to see if jack will push down into holes.
If the power jack seems like it is going into motherboard holes, apply steady downward pressure.
If power jack does not want to go down into holes in motherboard, try to determine which hole or holes is stopping the jack from being inserted.
Note that the power jack fits very tightly into motherboard holes even when the holes are perfectly clear of solder, so expect some resistance in pushing jack leads into motherboard holes.
Once new jack is pushed down into the motherboard as far as it will go, take soldering iron and thin, rosin-core solder and heat each lead and get solder to flow around lead and associated solder pad. BE CAREFUL. You do not want so much solder that it bleeds, runs and attaches to any other jack lead or solder pad.
Once all new jack leads have been soldered to solder pad, use magnifying glass to confirm that no 2 leads, solder pads are connected to each other and that flat pack resister at rear of jack pads is not connected to any jack pads.
If required, use Exacto knife to clean around each solder pad.
Although not as "pretty" as old jack solder job, below shows my new jack solder install.
Again, check solder job over very carefully. Nothing shorted to nothing.
Now, with luck, you have a new power jack installed on the motherboard.
Go slow on assemble. Remember ribbon cables and screws.
I think those that destroy a power jack ought to fix one sometime.