.jpg)
Shared Knowledge
"Cable TV (CATV) Home Wiring - How to Wire a Home"
17 November 2010
Summary: Home cable TV (CATV) wiring is not complex but the wiring in most homes was not done with proper care and thus results in a poor TV picture or one with interference. It does not take much to put cable TV wiring to right.
Background:
It is hard to believe now that once upon a time, most people got their television signals from an outside antenna. I remember reading some 40 years ago in the “Mechanics Illustrated” magazine (wonder if “Illustrated” is still published?) that one day, most people would receive various information to include their television shows over a cable, which was run into their house from the street. At the time, this concept, idea, future prediction, did not make any sense to me as why would someone would pay for a cable service when they could just continue to use an antenna and receive various broadcasts for free. Wrong, once again. Today, Community Antenna Television (CATV) is in over 69.8% of all American households having a television set.
How the CATV is actually configured or wired for a house varies from home to home, depending on whether or not the house was built before or after the neighborhood was wired for CATV. Although CATV has actually been around for a long time, only in the last 15 years or so has it become widely available and thus for most homes, CATV is an add-on and exists of a cable coming to the home from the street where it probably is connected to a “splitter” from which one or more cables are then run along the outside of the house, to where the homeowner defined he or she wanted access (known as a “drop”) to the cable. At this point or points, the cable is routed through the house wall and finally terminated in a wall fixture CATV wall plate. I would be willing to bet that most older homes only have 2 CATV drops although with more and more households moving to cable Internet, 3 drops may become more the norm.
CATV Wiring:
If you live in a house with 1, 2 or 3 drops, there is not much you really need to know about CATV wiring except the following:
- Unlike electrical wiring, you cannot simply route a CATV cable to one drop and then continue the same cable to another drop. You must use what is known as a splitter.
- Always use the best quality splitters you can find. I recommend the ones sold for use in a dish-based system, which handles frequencies up to 1000MHZ. Yes, high quality splitters cost more but helps improved all over quality of signal presented to TV or cable Internet modem.

- If the cable from the street is tied into a splitter or "terminal block" outside your home, make sure that there is a wire from the case of the splitter to earth ground. This will give you some level of protection if the CATV system is hit by lightening. Also, any splitter outside the house should actually be mounted to the house with screws or brick nails. Finally, if possible, make a loop of the cable coming from the street before it connects to the first splitter as this will serve as a rainwater drip path and keep water out of the splitter.
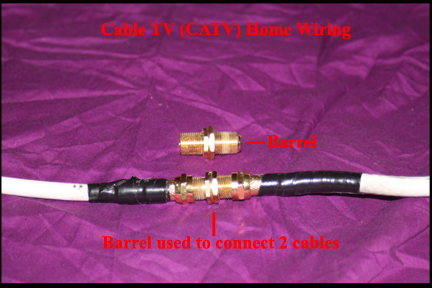
- Always keep the number of cable splices (connectors or barrel pass-through) or splitters to a minimum. Every splice or splitter drops the cable signal strength. For example, it is better to run 3 separate cables from a single splitter than run a single cable and then insert a splitter and on the cable coming off the splitter, still another splitter. If you must use a barrel to connect 2 shorter cables to make a longer cable or make a non-splitter connection, make sure the connectors are absolutely tight on the barrel and then wrap the entire junction, to include barrel and connectors with electrical tape and then cable strap the ends of the tape so they can not loosen over time.
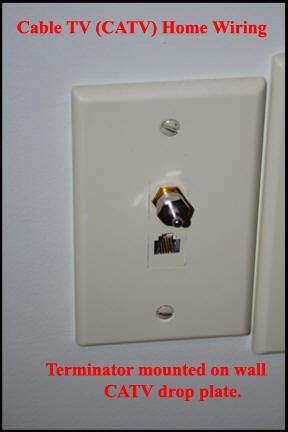
- If you have several drops but are not using them all, you should buy what is known as cable terminators and install a terminator on all unused cable drops. An open, meaning not terminated to a TV or cable modem CATV drop, allows the CATV signal to bounce up and down the cable and inducing interference in the entire cable system. Installing a cable terminator ends signal bounce.
.jpg)
.jpg)
- If a splitter has unused ports, you should install a terminator on them, like any unused cable drop.
- If you have to add a drop, I suggest you use screw on cable connectors or buy a cable already set up with a connector at either end. There are other types of connectors on the market to include crimp on but I have never had much luck with getting them tight on the end of the cable. Getting the screw on type connector just right on the end of the cable, can take a time or 2 as determining how much insulation to cut back and how long to leave the center wire can be tricky at first.

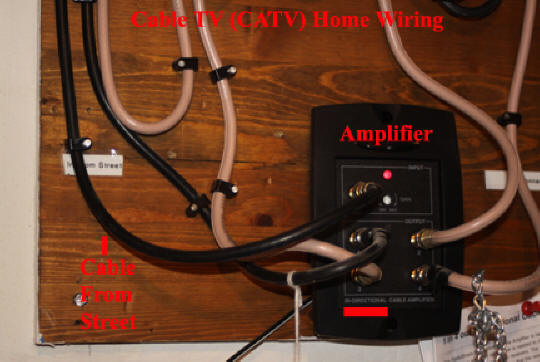
- If you want to add a signal booster to your CATV system, add it as close to the street side of the CATV as possible and if you are using the cable as your Internet connection or plan to in the future, make sure you buy a bi-directional cable amplifier.
- If you have to add a cable drop, you can buy plastic electrical outlet boxes at your local hardware store, which easily install into drywall because they have these plastic wings on them that screw down into place and tighten against the backside of the drywall. These plastic boxes come either in full depth or shallow wall varieties. So, you route the cable along the outside of your house to where you need a drop, attach the cable to the house with cable nails or other suitable, drill through the wall of the house and route the cable into the hole. You then caulk to seal around where the cable penetrated the house wall. Finally, you determine where you want your drop, using the plastic outlet box, mark an outline on the wall, and then cut out a rectangular hole using a box cutter or other tool. With the outlet hole in place, you route the cable through the plastic box and then insert the box into the hole and take a screwdriver to the 2 screws provided on either side of the plastic box which bring plastic wings down into place and are gradually tighten on the backside of the drywall. You then install a connector on the CATV cable, connect it to the CATV wall plate, and screw your CATV wall plate into position.
.jpg)
- Never run a CATV cable parallel to an electrical cable. This is often done by electricians when they wire a house cause it is easy to route various cables together but although the CATV cable is shielded, if run parallel to a 120 volt AC cable for a long enough distance, interference will be induced into the CATV cable and show up on your TV screeen.
- Never bury a splice in the ground. For example, you have place a connector on one end of a cable and a connector on the other end and by use of a barrel, connect the 2 cables together and then bury the "splice" underground. This will work for a time but eventually water will get into the junction and you will loose cable signal. Always run a single, un-spliced cable from a splitter to a drop location.
- For all cable runs outside, use cable made for exterior applications. Not all CATV cable is a like so use the right type cable.
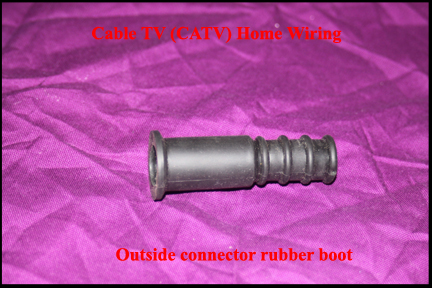
- Any cable with a connector on it used outside should have a rubber boot around the connector to keep the weather out of it. It is amazing how quickly electrical connections can corrode when left to the elements.
If you live in a newer home, it is possible that many drops were installed in the house, with all CATV internal cables routed to where the CATV comes into the house. All CATV drop cables may or may not be tied to the street CATV through splitters and in my case, they were not. To correct this problem, I constructed a CATV distribution panel. If you are interested in constructing such a panel, Cable TV (CATV) Home Wiring - How to Make a Distribution Panel.