Shared Knowledge
"BMW X5 - How to Replace the Upper Radiator Hose"
18 April 2011
Summary: draining coolant system not necessary. A bit messy but easily done and certainly a do-it-yourself (DIY).
Background:
BMW X5: model year 2000, 4.4i, 167,000 miles.
End of 1200 mile trip, "Check coolant level" display.
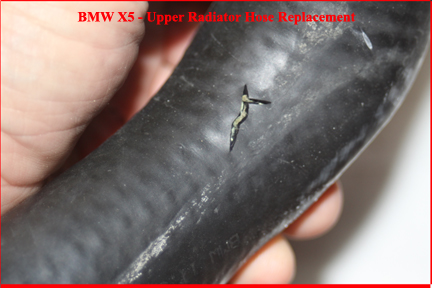
Difficult to spot at first but small pinhole in upper radiator hose on the underside of the hose where it bends down towards water pump.
Make sure the upper radiator hose is the cause of your coolant leak before replacing it.
Tools required:
9mm Allen wrench.
Small flat blade screwdriver or knife blade.
Latex gloves. Do not get coolant on your hands or arms.
How to replace the top radiator hose:
It is not necessary to drain the coolant system to replace the upper radiator hose.
There will be some coolant spell, so park the night before you do the replacement on an area that can withstand some coolant.
Do the replacement with a completely cold engine.
Once upon a time, a radiator hose was just that, a hose held on by removable clamps but to speed assembly, the upper radiator hose on a BMW X5 is actually an assembly where hoses are permanently attached to plastic connectors.
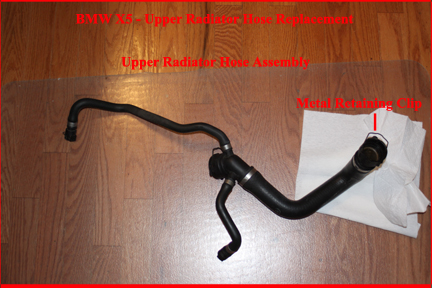
As can be seen above, the upper radiator hose assembly has 4 connectors with each one having a wire retaining clip that is loosened, pulled out, by using a small flat blade screwdriver or knife blade
To make it easy to get to the water pump end of the hose, I removed the plastic shroud on top of the engine.
To remove the engine shroud use a 9 millimeter (mm) Allen wrench.
There are 4 Allen head bolts holding the plastic shroud to brackets on top of the engine. These bolts are fixed to the shroud such that you simply loosen them all and lift off the shroud.
The small long hose of the upper radiator hose assembly goes on a fitting on the lower radiator hose.
To get to this fitting, I had to remove the mass air flow sensor (MAF) that sits between the air filter box and the intake manifold.
The MAF is held on by metal clicks and is easily removed and laid aside out of the way.
Note that the MAF can not take rough handling and is a very expensive component to replace so treat it gently.
Now, using a small flat blade, pull the metal retaining click out of the hose connector on the top of the upper radiator hose that connects the radiator to the reservoir tank.
With the metal click pulled out of the reservoir tank hose connector, lift the connector off the upper radiator hose.
Be very careful when you play, lift, move, the expansion tank hose as this is hard plastic and can snap or break.
Now pull out the clip out of the upper radiator hose connector that is actually connected to the radiator.
With the clip pulled out, pull the hose off the radiator fitting.
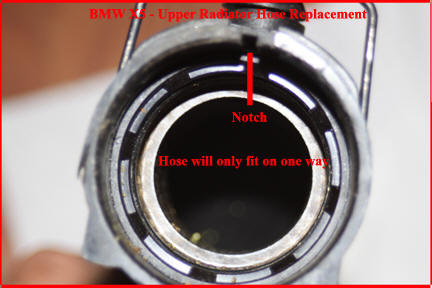
Note that all upper radiator hose connectors have tabs in them such that you can not rotate the connector off and the connector will only fit on one way.
My hose connector would not pull off and I had to use my small flat blade between the upper hose connector and the radiator hose connection to split the 2. I was very careful in doing this as not to damage the radiator hose connector flange.
When I pulled the upper radiator hose off the radiator connector, I did have some coolant leakage but not a lot.
Now locate and pull out the metal click holding the hose connector in place on the small hose directly under the coolant pump.
This hose should pull off easily.
Now place your new upper radiator coolant hose sort of in place just above your old hose assembly.
Now find and pull the metal click on the upper radiator hose connector of the connector that attaches to the coolant pump.
With the metal clip pulled out, this hose should pull off easily.
Now attach your new upper radiator hose to the the radiator and push in the metal clip. As noted above, all upper radiator hose connectors have a tab in them such that the connector will only go on one way so slowly rotate each connector until it pushes on easily.
Attach the small coolant hose that is directly under the coolant pump and push in the retaining clip.
Now attach the upper radiator hose to the coolant pump and push in the retaining clip.
Now route the long small upper radiator hose along the front of the engine.
Find where the small hose is held in place by a clip on the front of the engine and pull the hose out of the clip.
Now reach down in the spot created by removal of the MAF and pull the retaining clip out of the connector holding the small hose in place.
The long small upper radiator hose should pull off easily.
Now attach your new upper radiator small hose to where you just removed the old hose and once in place, push in the retaining clip.
Find where the small hose goes along the front of the engine and push the hose into the retaining clip to hold it off the coolant fan.
With all hose connections made, tug on each connector to make sure it is firmly in place and can not be pulled off. I do not mean you pull with all your might here but enough to ensure yourself, all hoses of the upper radiator hose assembly are attached correctly and their metal retaining clips in place.
Now open the expansion/reservoir tank and pour in new antifreeze.
Place the reservoir cap in a safe place and not on top of the engine.
Insert the MAF in the air stream between the air filter and the engine. Make sure you snap the clips.
Now look around under the hood. Any tools? Any paper towels? Anything out of place???
Place the plastic shroud back on top of the engine. Align the 4 Allen bolts and then tighten the shroud in place.
With the top off the reservoir tank, start the X5.
Do not use the accelerator.
Set cabin temperature to as high as it will go and make sure cabin temperature control is turned on. This will open the heater core to coolant.
Let the X5 warm up for a few minutes.
Shut off engine and check coolant level in reservoir tank. Add coolant if needed.
Again start engine and let it run for several minutes.
Watch the temperature gauge in the cabin to ensure the engine is not overheating. If the temperature gauge begins to climb too quickly or go above what is normal for a hot engine, shut down the X5 immediately.
If all seems well, let the engine come to operating temperature and then shut it off.
Now allow the engine to cool completely.
As coolant is toxic to animals and will drink it if it is laying about, make sure you water hose the area under the X5 well after hose replacement.
After the engine is completely cool, check the level in the reservoir tank again and add coolant if required.
Place cap back on reservoir tank and start engine.
Now take a short drive allowing the engine to come up to normal operating temperature. If the temperature gauge rises too rapidly or begins to go above what is normal for your X5, shut down the engine immediately.
If all seems fine, drive normally for a day or 2 and then check coolant level in reservoir tank and add if needed.