![]()
![]()
![]()
![]()
![]()
![]()
Ron Stultz
![]()
![]()
Summary: do-it-yourself (DIY)??? Easy enough except for getting ball joint assembly out of steering knuckle. Risks of DIY: ruining stuck ball joint assembly and unable to get it to break free of steering knuckle (tow to a repair shop); ruining half-shaft rubber boot and ruining steering knuckle.
Background:
BMW X5: model year 2000, 4.4i, 148,000 miles.
Time to replace lower and upper control arms, upper ball joint and sway bar link.
Tools Needed:
Torque wrench that will do 120 foot pounds (ft-lbs).
E12, 10millmeter (mm), external Torx bit socket.
22mm shallow socket for torque wrench.
22mm open end wrench.
Hammer. Regular nailing hammer might work but 3 or 5 pound hammer better.
Chisels.
Anti-seize compound.
May need, although did not seem to help me: penetrating oil and\or 3-in-1-Oil and a propane torch
Good work light. Any car work requires you be able to see properly.
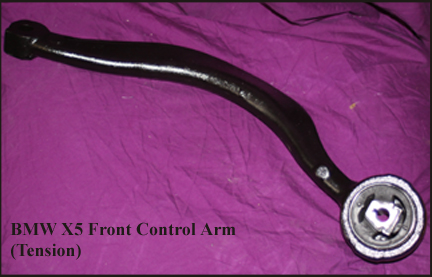
How to replace the front upper (tension) control arm:
Easy enough as long as the control arm is not "frozen" to the ball joint.
1. Set park brake.
2. Turn steering wheel such that wheel on the side to be worked on is pointed outward, giving you as much room as possible to work.
3. Jack up side of car. Place supports under car.
4. Remove wheel (19mm lug nuts).
5. Use 22mm socket to remove nut that keeps arm on ball joint.
6. Use torque wrench with 22mm shallow socket and 22 mm wrench to loosen bolt going through upper control arm. Very limited room for torque wrench and socket but shallow socket will fit on bolt head.
7. Bolt that goes through upper control arm can be removed without removing any fender molding but tight.
8. Remove control arm from ball joint. A tap or 2 with hammer might be required. I have no experience in how much hammering control arm will take before ball joint is damaged and must be replaced. 3-in-1-Oil or Penetrating Oil may help here. Also there might be a tool you can rent, borrow or buy, which helps get a stuck arm off the ball joint.
9. Place new arm up on frame and reinsert bolt. Use a new nut. Do not tighten.
10. Start car and turn front wheel until it is aligned as it would be for straight ahead driving.
11. Place control arm over ball joint. Alignment here can take some patience but if aligned properly, new control arm will slide up far enough on joint for new new to be installed. Do not hammer on control arm. Ball joint may be stiff to move but can be moved.
12. Tighten 22mm nut holding control arm to ball joint. Tighten to 40 ft-lbs.
13. Check everything over.
14. Place wheel back on car.
15. Slowly lower car off jack
16. Using torque wrench and 22mm socket and open ended 22mm wrench tight the bolt through the upper control arm to 120 ft-lbs. 120 ft-lbs is a lot when you have limited room for torque wrench but it can be done.
How to replace the control arm ball joint assembly:
1. Remove the 2 bolts holding the ball assembly to steering knuckle. These bolts require the E12, 10mm exterior torx bit socket.
2. The bolt next to the brake is at a slight angle and you will have to be careful and make sure your socket is placed correctly over the bolt and kept over the bolt while removing.
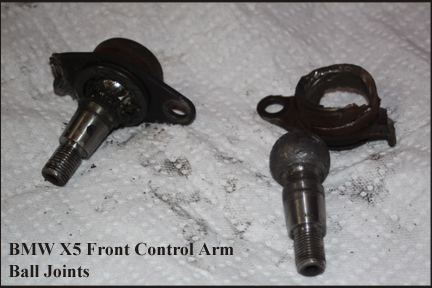
3. With bolts removed, if you are lucky, ball joint assembly will come right out of the steering knuckle BUT mine did not. The cup of the ball joint over time becomes rusted. seized, to the steering knuckle and because it sits right under the half shaft, it is hard to get a good downward angle on a hammer blow.
4. Wish I had some straight forward process to provide you to get the ball joint assembly out of the steering knuckle. One one side, penetrating oil allowed to set overnight and hammering with a chisel down on the top of the assembly finally broke it loose but on the other side I tried: penetrating oil; hammering for hours and a propane torch, all with out making the assembly move at all. Finally I used a Dremel tool with metal cutoff wheels to first cut the ball out of the assembly (ball must be removed from below as not enough room under half shaft to remove from above) and then cut the cup from the inside. Once the assembly cup was cut, it pounded out quickly.
Below shows what the old ball joint assemblies looked like after I finally got them out of the steering knuckle.
Perhaps you have some sort of tool to use.
Perhaps your ball joint assemblies will not be "welded", seized, in like mine were but I am warning you, removal can be a long nightmare.
5. Ok, once you have the old ball joint assembly out of the steering knuckle, clean up the hole in the steering knuckle by removing any rust.
6. Place new ball joint assembly up into steering knuckle. It should fit right up into the hole and be flush at the bottom. You should not have to do anything special to get it to fit properly.
7. Probably just me but remove assembly and coat cup where it mates to steering knuckle with anti-seize compound. I will probably never replace ball joint again, but someone might and if anti-seize reduces the time required to remove the assembly, then it worth it now.
8. Place assembly back up into steering knuckle and align one of the holes in the assembly with a hole in the steering knuckle and insert a new E-12, Torx bolt. Hand insert and tighten.
9. Insert the other Torx bolt and hand tighten.
10. Using E-12 Torx bit socket and torque wrench, tight to 49 ft-lbs.