![]()
![]()
![]()
![]()
![]()
![]()
RonStultz
![]()
![]()
BMW X5 - "How to Replace Rear Brake Pads"
Summary: easy enough do-it-yourself (DIY) job but I find taking the carrier off the hub and cleaning it helps with pad squeal.
Background:
BMW X5, 4.4i, model year 2000, 151,000 miles.
Rear pads almost gone.
Intent was to replace rotor, caliper and pads.
This deals only with pads.
Bought pads via Internet and not from BMW dealer.
Note: for fronts, bought expensive "racing" pads but pad squeak would never stop and replaced with softer. Can't go wrong with BMW pads.
Tools Needed:
Lug nut wrench or 19 millimeter (mm) deep socket.
Ratchet.
2 cans of brake cleaner.
Wire brush.
Long flat blade screw driver.
17mm socket to remove carrier.
7mm Allen wrench.
Paper towels.
Pieces of cardboard or other to keep floor from getting filthy from brake dust and brake cleaner.
Perhaps fresh bottle of Dot 3/4 brake fluid.
Needle nose pliers.
GoJo or similar hand cleaner.
BMW brake grease. You can use any sort of anti-squeak compound but I like the BMW grease.
Safety first:
Park on a level, hard surface like concrete.
Pull the parking brake.
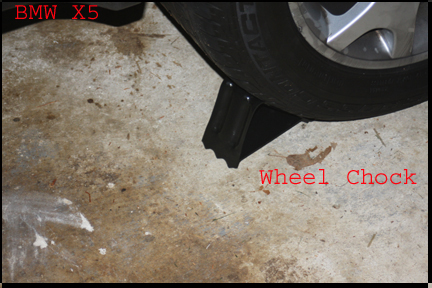
Anytime you jack up the rear of an X5 and remove a tire, take extra measures to ensure the car does not move. There is enough slop in the universal joints between the transfer case and the rear end for the car to move forward enough to twist a jack.
There are 2 wheel chocks in the rear under the removable floor on the right side. Use them.
Using a rear jack point, use the X5 jack to jack up the car.
Remove the wheel.

On one side or the other, there is a brake wear sensor you are going to have to unhook. In the image above, the wire leading to the sensor is the inner of the 2 wire-like cables going across the face of the shock.
The wear sensor is pressed into a slot in the inner pad and you will need needle nose pliers to remove it. Do not simply pull on the wire but rather get you pliers on the plastic end of the wire and pull outward.
Note that there is a thin strip of cooper fitted over the end of sensor plastic. In my case, the thin strip kept falling out of the plastic and I had to bend the strip to make it latch properly in the plastic end of the sensor. Just remember the thin cooper strip is there and do not loose it on the floor.
Once the wear sensor is loose from the inner brake pad, pull it up out of the way and perhaps poke it behind the shock absorber.
If you are changing pads because you got a brake alert, the sensor will have to be replaced. Brake wear sensors on the X5 are 1-shot sensors meaning that when that cooper strip is chewed up by the rotor, an open circuit results in the warning light. The brake sensor plugs into the wiring harness at a junction box on the wheelwell.
On the inner side of the caliper is a piston. This piston is what the brake pedal moves when you brake, pushing the pads against the rotor. As you are replacing pads, in all likelihood the piston is so far out that you will not be able to lift the caliper off the rotor once you have removed the (2) bolts holding the caliper to the hub.
The image below shows the caliper piston fully retracted back into the caliper. It also shows one of the 2 caliper bolts sticking out of its rubber boot.
So, what you need to do is to use a long flat blade screwdriver and insert it between the outer pad and the caliper and prize hard. This will force the piston back into the caliper.
In the image below, I show the piston being moved but because I was replacing the rotor at the same time, I used the rotor as part of my piston wedge. DO NOT USE THE ROTOR AS A WEDGE IF YOU ARE NOT REPLACING THE ROTOR.
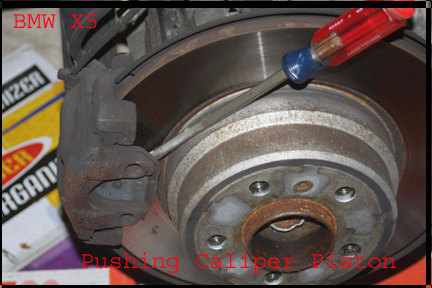
It is doubtful that you will be able to move the piston completely back into the caliper but by prying on the outer pad, you will move the piston enough to be able to remove the caliper.
With the caliper piston moved, use the flat blade screw driver to pop off the anti-squeal clip fitted on the caliper. This clip is simply wedged on and you should be able to get it off without breaking it.
The caliper is held on to the rear hub by (2) 7mm headed bolts that are in rubber boots behind the caliper.
The rubber boots have plastic caps on them or should.
Reach behind the caliper and find the lower rubber boot and plastic cap and pry cap off with your fingers.
I would have like to have used a 7mm Allen socket and ratchet but just could not find way to make socket and ratchet work.
Using 7mm Allen wrench, if you are working on the driver's side, you push down on the Allen wrench to loosen a caliper bolt. If you are working the passenger side, you pull up on the Allen wrench to loosen a caliper bolt. (United States).
On my X5, I found the caliper bolts on both sides to be easy to remove with an Allen wrench. Does take some time to unscrew as can only get partial turn at a time.
Once the head of a caliper bolts begins to appear at the end of the rubber boot, you want to continue to turn but also to try to exert an upward pressure to and pull outward to help pull the bolt out of the boot.
You do not have to completely remove the caliper bolt from the boot and I recommend you do not.
Once you have both caliper bolts removed, you should be able to lift the caliper off the carrier and thus rotor.
Remove the outer pad however you can.
The inner pad has prongs on the back of it that fit inside the caliper piston so you will have to pull the inner pad outward to get it to release from the caliper piston.
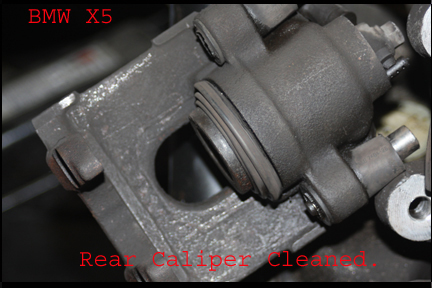
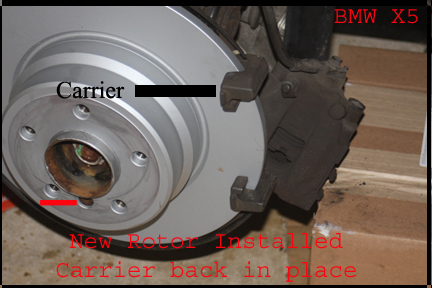
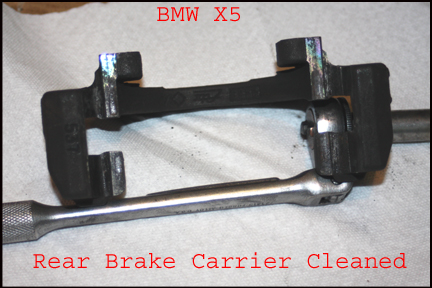
With both of the old pads removed, I recommend you remove the carrier and clean it thoroughly. The carrier is the metal track caliper pads move along as you brake. Cleaning the carrier and then applying BMW brake grease helps reduce the chance you get pad squeal after the job is all done.
In the image below, the "carrier" is identified.
Of course you can try to clean the carrier mounted to the hub with brake cleaner but at least use a small flat blade screw driver to make sure all carrier edges are free of debris.
If you want to remove the carrier and clean it, the carrier is held on the rear hub by (2) 17mm bolts.
On my X5, I found both bolts on both sides easy enough to remove with a socket and ratchet.
With the carrier free of the hub, I use a wire brush to clean all the brake dust, dirt off of it and especially any groove where a caliper pad slides along. After the wire brush, a good cleaning with brake cleaner.
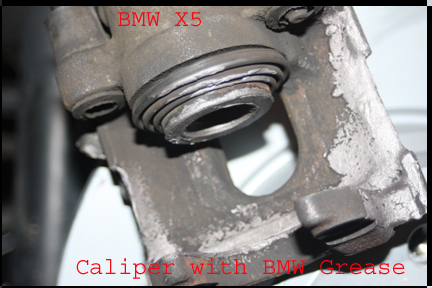
Now inspect caliper. It is probably fine but if rubber boot on piston is torn or piston is leaking brake fluid you have to replace it. See "BMW X5 - How to Replace Rear Calipers"
Now clean caliper. Here you can use wire brush again to clean off surface brake dust. Clean all grooves well. Use brake cleaner on whole assembly.
Clean your hands.
Taking your new brake pads, apply a liberal amount of BMW brake grease to the metal back of each pad. Also apply grease to pad metal "ears" that ride on carrier.

Now apply BMW brake grease to caliper. You want to coat the inside of the piston, the piston metal face and all edges of the caliper where the brake pads fit and move along.
Place inner pad in caliper and with prongs on back aligned with hole in piston, push pad into place.
Mount outer pad into caliper.
Take caliper and see if it will slip down over rotor.
If caliper will fit down over rotor with new pads in place, align holes in caliper with holes in hub and start 2 caliper bolts using 7 mm Allen wrench. Might have some alignment problems so go slow.
If the caliper will not fit down over the rotor with new pads installed, at this point, going to have to open the caliper bleed screw and let some brake fluid out while pushing the caliper piston back into the caliper.
The bleed screw on my rear calipers took a 7mm wrench. On my calipers there was a rubber cap over the bleed screw I had to remove before getting the wrench to fit. The bleed screw was tight.
Make sure you have cardboard or something under the wheel when you open the bleed screw.
Before opening the bleed screw, check the brake fluid level in the fluid reservoir. This is located on the driver's side up near the windshield wipers.
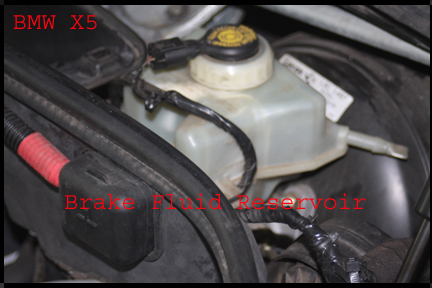
If the level in the reservoir is less than half full, add a little Dot 3/4 to bring it up to half or a little more than half.
Crack open the screw and push the inner pad against the piston until you can not push anymore.
Close bleed screw and tighten. Leave rubber cap off.
Now try the caliper and pads over the rotor. It should fit. Tighten 2 caliper bolts.
As I could not get a 7mm Allen socket over the caliper bolts, no way to torque to a specified but I found both bolts tightened down hard easily enough with Allen wrench.
With caliper and bolts back in place, spray with brake cleaner to remove anything that might have come in contact with pad surfaces.
If you had to crack open the caliper brake fluid bleed screw, you are going to have to bleed the brakes. To do this, you need somene to sit in the car and push down hard on the brake pedal while you quickly open and close the caliper bleed screw. Do not have the "driver" pump the pedal or let up on the pedal while you open the bleed screw. What you want to do is open the bleed screw quickly, get a nice pulse of fluid to shoot out and then tighten the screw back down. One bleed, if done correctly, should be all you need.
Replace rubber cap on bleed screw.
Clean any fluid that might have dribbled out the bleed screw off the caliper and for good measure, shoot the whole assembly with brake cleaner one more time.
Now refit the anti-squeak clip over the end of the caliper. Sometimes you wish you had 2 hands and this is one of them but you can get the clip to home in the holes in the caliper and also the clip end of the clip over the edge of the carrier. If you wish, you can buy new clips from the dealer or most parts stores for next to nothing.
Finally, if the side you have been working on has a brake wear sensor, you need to reinstall it. Again, make sure the sensor has a thin strip of cooper on the end of it. Using needle nose pliers, looking into the caliper, push the sensor into the channel in the center of the inner pad. The channel will appear to be made for the sensor and it is.
Check everything over. All bolts tight? Caps back on caliper rubber boots? Rubber cap back on bleed screw? Wear sensor pushed all the way into the rear brake pad? Rotor face clean of grease?
Image below shows driver's side ready for tire install. This image shows a new rotor installed but other than that, yours should look similar.
43

If all correct, remount wheel. 100+ pounds of torque on lug nuts.
Slowly lower SAV off jack.
Now check the brake fluid level again. It at half or slightly above? If not add Dot 3/4.
Test drive. When you are done both sides, you are going to want to test drive your new rear pads. With your pads probably came instructions about how to break-in the pads. Follow those instructions. For a while, the rear pads may bind or be tight and the rear rotors get hot to the touch but it will not take long for the pads to get adjusted.