![]()
![]()
![]()
![]()
![]()
![]()
Ron Stultz
![]()
![]()
BMW X5 - "How to Replace the Final Stage Resistor"
Summary: Very easy install. Certainly do-it-yourself (DIY).
Background
BMW X5, 4.4L, model year 2000, 114,000 miles.
Over past year have found battery dead in the morning several times. When battery put on charger, charges right up and dead does not happen again for weeks or even months. Never an apparent cause.
Recently, air fan would not come on either in automatic or manual adjust modes.
Recently, after shutting down engine and removing the ignition key from the steering column, I could hear an air blower running, cycling from slow to a faster speed and then back to slow again. (Occurred to me that if blower cycling on and off all night, could easily drain down battery.)
Internet search says, problems described above probably caused by bad "final stage resistor" and relatively easy to replace, so dealer parts visit and for $100, had a new resistor and headed home.
To replace final stage resistor:
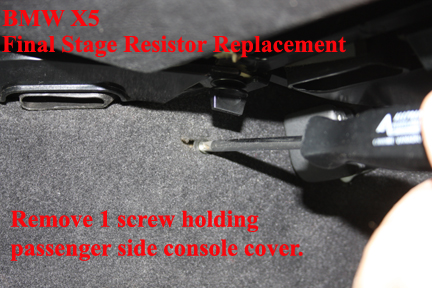
You are going to need a Phillips screwdriver, a flat blade screwdriver and a good bright light (suggest not a flashlight).
1. Remove passenger side console cover. To do this you remove the one Phillips screw up near the firewall.
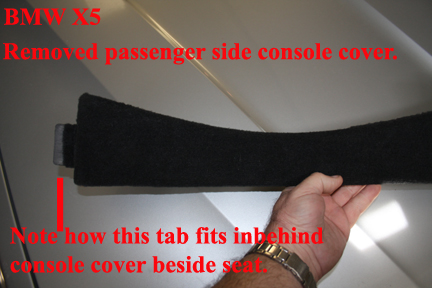

2. With the console side cover screw removed, insert a flat blade screwdriver at the bottom of the console cover up near the firewall and lift upwards toward you. When side cover is up enough to insert one of your fingers, do so and then slide it towards the rear of the car, again lifting towards you. Go slow. From above you can see that there are several plastic inserts used to hold the console cover in place and you do not want to break any of these (if you do, easily replaced).
3. As console side cover comes up from floor, lift and when it completely loose, pull it forward towards firewall. The console cover is "tabbed" into another section of console cover beside the seat. With console cover completely loose from console, flip it over and unhook the connector on the accessories power port built into the console cover. Now set console cover aside.
.jpg)
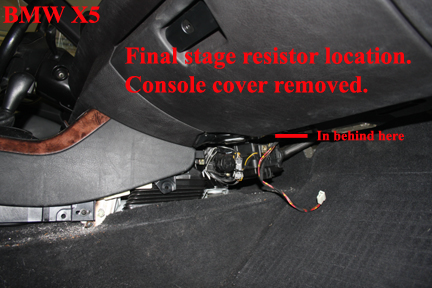
4. The final stage resistor is located up behind the large plastic box, hidden from view other than its connector. If you look in location shown above, you will see a connector, which you remove by pressing on the sides of the connector and pulling it towards you. The wire on this connector is not very long. Move it out the way as best you can and place your hand in behind and at the bottom of the final stage resistor is a plastic tab you need to push down to get the final stage resistor loose. You might have to use a flat blade screwdriver to push down on the plastic tab while pulling the connector on the final stage resistor towards you. Once the final stage resistor is past the plastic stage, you can go back to one hand.
5. Now to get the final stage resistor completely out, I had to pull and at the same time angle the end towards the firewall. A pain because final stage resistor connector cable is in the way but if you push it up out of the way, you can work resistor out. Go slow and if need be, get up and walk away for a while. At this point it is simply a topology problem and is doable. Have seen suggestions that removing the glove box helps removal but I honestly do not see how. Up to you. Oh, interesting that final stage resistor does have 2 points where a bolt could have been used to mount the resistor but not bolts used as these resistor mounting holes simply fit over tabs.
.jpg)
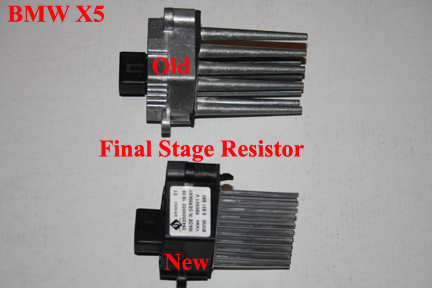
6. As you can see above, the new final stage resistor has had a redesign from the unit initially installed in car. As this unit is termed a "resistor" I assume that all those metal studs sticking out of the base are heating elements and the new design has significantly more than original but shorter. With new final stage resistor in hand, mounting it is easier than removal because the studs are shorter and thus less of an angle to insert and move into place. Again, those 2 holes in the base have to fit over the tabs. Once you have in place, you will have to push the final stage resistor in and at the same time try to get the plastic tab at the bottom to snap over the lip of the final stage resistor base. Did not want to but had to use flat blade to push base of final stage resistor in enough for plastic tab to snap over edge of resistor. Although electrically simple, start up car and check air to be sure final stage resistor is working properly. If your air fan does not come on, either the wiring harness is not connected to the final stage resistor correctly or not tight enough or the new final stage resistor is defective.
7. Once new final stage resistor in place and you have checked it operation, take console cover and reconnect accessories power port cable to console cover power port and angle cover tab back under console cover beside seat. With console cover tab in place, swing console cover towards console and with top aligned correctly begin to push cover in place. Go slow. If you meet a lot of resistance, plastic tabs as apart of console cover are not aligned with holes in console and you need to check plastic tabs.
With console cover back in place, all done.
Actually, one of the easiest replacement/repairs I have done on the X5.